
Frequently Asked Questions
Get your questions answered with our top FAQs.
Most Common Questions
The KORONA Support team will always follow up via e-mail once your import is finished. Imports can take anywhere from 24-48 hours during the business week. We will respond to your original e-mail that you sent over with your CSV/Excel product document.
Your bank will send you a notice about the chargeback. These typically include a rough time frame of the transaction, the last 4 of the card used, whether it was credit or debit, and the total amount of the transaction.
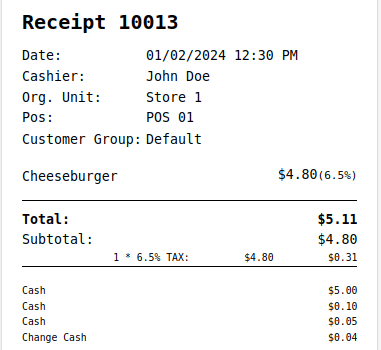
To answer the dispute, you will typically need the Transaction Token and a copy of the Receipt. This can be found in KORONA Studio (Cloud Backend) under the Evaluations tab.
Look for a report called Payment Transactions.
Filter for the date and Payment Method (Debit or Credit) and find the transaction total from the report.
See more here.
The specifications for the image are:
- Image size/resolution
- 100x100px – minimum size
- 300x300px – optimal size
- 1000x1000px – maximum size
- Aspect ratio
- 1:1 (square) works best, but others are supported.
- File Format
- .png (.jpg may work but not recommended)
- Max file size
- 1mb
- Background Color
- White background, black and white color
See more about how to change your receipt logo and troubleshoot if your logo is not showing here.
Here is our most common payment processor contact information.
Please check the following if a printer is not printing.
- If this is a new printer setup on Windows, ensure it was set correctly
- Check the cabling
- Print out a test sheet
- Check Windows and KORONA POS settings
See more in-depth of how to troubleshoot your printer here.
You can add a logo or change what is viewed on the receipt by going to Settings > Receipt Layouts. Here, you can add a logo to the top or bottom of the receipt.
You can also select which information is shown on the receipt. To add text to the top or bottom of the receipt, navigate to Sales > Points of Sale, then click into a point of sale. On the right hand side under Receipt there are two fields that allow you to input text into the receipt
See more about receipt layouts here.
All of your subscription and payment information can be found in the “My KORONA.studio Packages” section. This can be found under the section on the sidebar showing your name.
The “Change Credit Card” button can be used to change your payment information. If your billing address is changing, please update that in the section called “My Company Data” also in the sidebar. The “Expand” button is used to change your packages, including adding or removing points of sale. Please contact our support team if you plan on reducing the number of points of sale you have.
The final section has buttons for “Cancel” and “Edit.” Cancel will cancel your current subscription, and you will continue to be active until you reach the date you paid for. The Edit button can be used to switch between monthly or yearly, or to switch automatic renewal on or off.
*Note* Currently, automatic renewal does not work with PayPal.
We have semi-integrations with PAX, Dejavoo, and Blockchyp credit terminals which allows us to work with most processors. If you don’t see your desired processor on this page, please reach out to your KORONA POS sales rep to see if we are compatible.
The main processors we work with:
- TSYS
- First Data
- Priority/Bold
- Cayan Genius
- Clearant
- Elavon
- Evo Merchant Services
The most common discrepancy reported has to do with Profit Margin/Costs. You may need to correct past cost/purchase price if products were sold before that information was added. You can see how to fix costs here.
Another thing you might run into is revenue reports on KORONA not matching payments/batches from your processor/bank. This is typically because KORONA ends the day and reports the revenue for the day of, but your batches won’t happen until after that and you won’t see the money deposited until at least the next day. If you run into this issue, try adjusting which dates you are looking at and see if it matches after that.
If neither of the above resolve your issue, email our support team at support@koronapos.com with the report you are using and which numbers you are seeing a discrepancy with.
Accounts & Security
Resetting your password and changing your email in KORONA POS is simple.
If you forgot your password or need to reset it, go the KORONA Studio login screen and click the “Forgot Password?” link.
To change your email, log into KORONA Studio and navigate to My User Account in the menu, then click Request Email Change and fill out the form.
Sales data for active accounts is stored for 10 years.
Inactive accounts can be accessed for up to 12 months after the account has expired.
As you may have noticed, a small green icon next to the keyboard icon sometimes appears on the upper right margin, followed by a yellow round icon.
Both symbols display the update process of the KORONA POS software.
When you see the first green icon with the loading arrow, the POS has downloaded the latest version from the cloud.
To perform the update, press the yellow icon. The POS then reboots and executes the update.
See Images
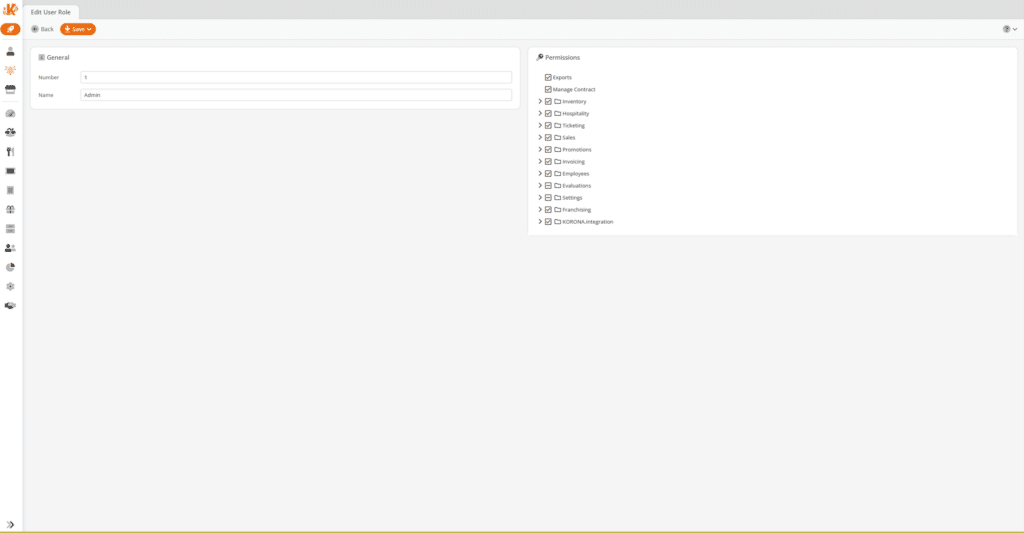
If you don’t see the widgets on the front page of the cloud, the permissions are missing, and you do not have the right to display organizational units.
If you are allowed to change user roles, you can set the right permissions under:
Employees > User Roles > Edit Roles > Settings > Organizational Units > List Organizational Units.
If you cannot edit user roles, don’t hesitate to contact your manager or supervisor, who can edit the role for you or permit you to do so yourself.
Navigate to Settings > Data Exchange.
At the top of the page in the blank field, type in QuickBooks, then press Add. This will pull up the QuickBooks integration. Select Quickbooks Online, click Add a New Connection, and click Connect to Quickbooks, which will allow you to log in to Quickbooks.
KORONA POS and QuickBooks are now integrated. The next step is to add organizational units into that connection and select a start date for syncing the end of day statements. View more information on the integration here.
Discounts and Promotions
Price rules and promotions do not have an option to exclude certain products.
However, you do have the following options to exclude certain items:
- Disable the product setting Is Discountable. Please be aware that this option will not allow the item to be discounted at all and will exclude the item from all price rules.
- Set up a promotion tag that includes all items you would like to discount except the ones you would like to exclude.
The deviation, which is usually no more than one to four cents, is that the discount on the individual items must be divided evenly.
Here is a small example:
You have three items on the receipt and give a receipt discount of $1, In this case, you can not split one dollar on 3 items: $1 / 3 = 0.333333…
This means that the cash, in this case, must be round, which results in only a 0.99 discount instead of a dollar.
Check to see if the product is eligible and review your promotion to ensure you have set up the correct tag, date, and customer group. See here for more information.
To start bonus points:
Create a new promotion in Promotions > Couponing Promotions with the type set to Bonus Points for Customer, then set the dollar value that each bonus point is worth and how many points are needed to redeem a product or monetary/percent value.
To set up loyalty cards:
First, create a button with the function Set Loyalty Card, which applies loyalty cards to the receipt. You can use this button to assign existing cards and assign new cards. Once this button is set up, you would enter the desired number for the card on the POS keypad (phone numbers are a popular option), then press the Set Loyalty Card button and this number will be applied to the receipt as its loyalty card.
Once you total out and close the receipt, that number will accumulate points and be synced to the backend. If you assign a customer to that receipt and apply a number, the customer will then be tied to that loyalty card. Going forward, you would enter their number, press the Set Loyalty Card button, and it will automatically put that customer on the receipt as well. The tied customer and accumulated points can be adjusted in the backend in Promotions > Loyalty Cards.
Learn more about creating loyalty cards and points here.
KORONA POS offers various methods to do Surcharging / Cash Discounting. Depending on what compliance you need with your payment processor, we can display (or not display) the surcharge or cash discount differently. You can contact our support team at support@koronapos.com to see which method works best for you or to get help setting it up.
Below are the different options available.
- Surcharge / Non-Cash Adjustment through Card Terminal: The various credit card terminals we work with offer their own method for a surcharge/non-cash adjustment.
- KORONA Adds the Surcharge: We can set up your transactions paid with credit to automatically add a percentage charge to the total. This will show up on the receipt and can show up under whichever name you need depending on compliance (e.g. Surcharge, Credit Fee, etc).
- Dual Pricing: If you don’t want any charge to show up on the receipt, this would be the option for you. This is best done during your initial product import before going live.
- Change base prices to credit pricing and do a cash discount
The easiest way would be to create a discount button with one of the following functions in your Button Configuration. The cashier would then be able to manually trigger this discount as needed.
*Please note, all products must have Is Discountable enabled in order for discounts to apply correctly.
- Receipt Discount Absolute: Discounts the entire receipt by a set $ amount.
- Receipt Discount Percent: Discounts the entire receipt by a set percentage.
- Sale Item Discount Absolute: Discounts an entered number of dollars from the selected item on the receipt.
Upon adding the desired button functionality on the POS, you can type in the desired discount amount onto the receipt keypad and then select the discount button. This will apply to the receipt and it will show on the receipt how much the discount total was.
Visit the following pages for further information on:
- Price Changeable and Discountable settings
- Creating promotions
- Button configurations
- All POS functions
Alternatively, you can create a promotion with specific triggers to fire off automatically on a receipt.
Hardware
The printer icon is gray, so printing is turned off, but some receipts still print:
Deactivating the printer from the POS is only for normal transactions. Reprints and voided transactions will print no matter what. When the receipt printing is disabled, automatic receipt printing will also occur in the following cases:
- Balance
- Reports
- End of day
- Cancelled receipts
- Returns
- If a promotion triggers a coupon (this can also happen even if the promotion is set for immediate discount in case the trigger applies but the discount can’t be applied)
- Gift card transactions (only the balance remaining receipt for the gift card will be printed)
- When the payment method forces printing (credit cards, gift cards)
- If a production type is set up (kitchen, ticket or gift cards)
- Clock in and Clock out slips from Time Tracking Entries
A PAX Communication Error occurs when the terminal cannot send payment data to the PAX Device for processing. One of the main reasons for this error is that the PAX IP Address has not been set in the POS Profile Page.
See how to fix it here.
See how to manually batch your PAX S300, Android PAX devices (A60, A80, A920) or Dejavoo credit devices (Z11, Z8, Z-series) here.
Test your PAX S300,Genius Payment Terminal, Pax A35, Dejavoo DJV Z11, or Blockchyp devices here.
On the Pax Credit Terminal, you will want to confirm the current IP address showing on the pax terminal. How to check depends on your model.
See how for models PAX s300 and PAX A Series here.
The cash drawer and the receipt printer work in tandem. If one isn’t working, typically the other won’t work either.
Check and make sure the cash drawer is plugged into the receipt printer and the receipt printer is connected to the POS. Verify your device setup under Settings > POS Profiles.
Learn more about the Open Cash Drawer POS function and troubleshooting here.
Inventory Management
No, internal orders do not affect the current and the last purchase price since these two values would be distorted by internal goods movements.
There could be several reasons the inventory count is wrong, such as inventory tracking, sales not syncing, or wrong warehouse assignments. Troubleshoot here.
To set all inventory counts to zero create an annual inventory count by navigating to Inventory > Inventories. To learn more about creating inventory, please refer to our Inventory manual page.
Once your inventory is created, select the Organizational Units you wish to set Zero Counts for and click on the Edit Inventory Count List. On the following page, click Book.
A ‘Validate Inventory Count‘ page should launch. Locate the Actions for Missing Entries drop-down menu and choose ‘Set Zero for Actual Goods.’ Once done, click Book. This should amend all products within this Warehouse/Organizational Unit to a Zero Count.

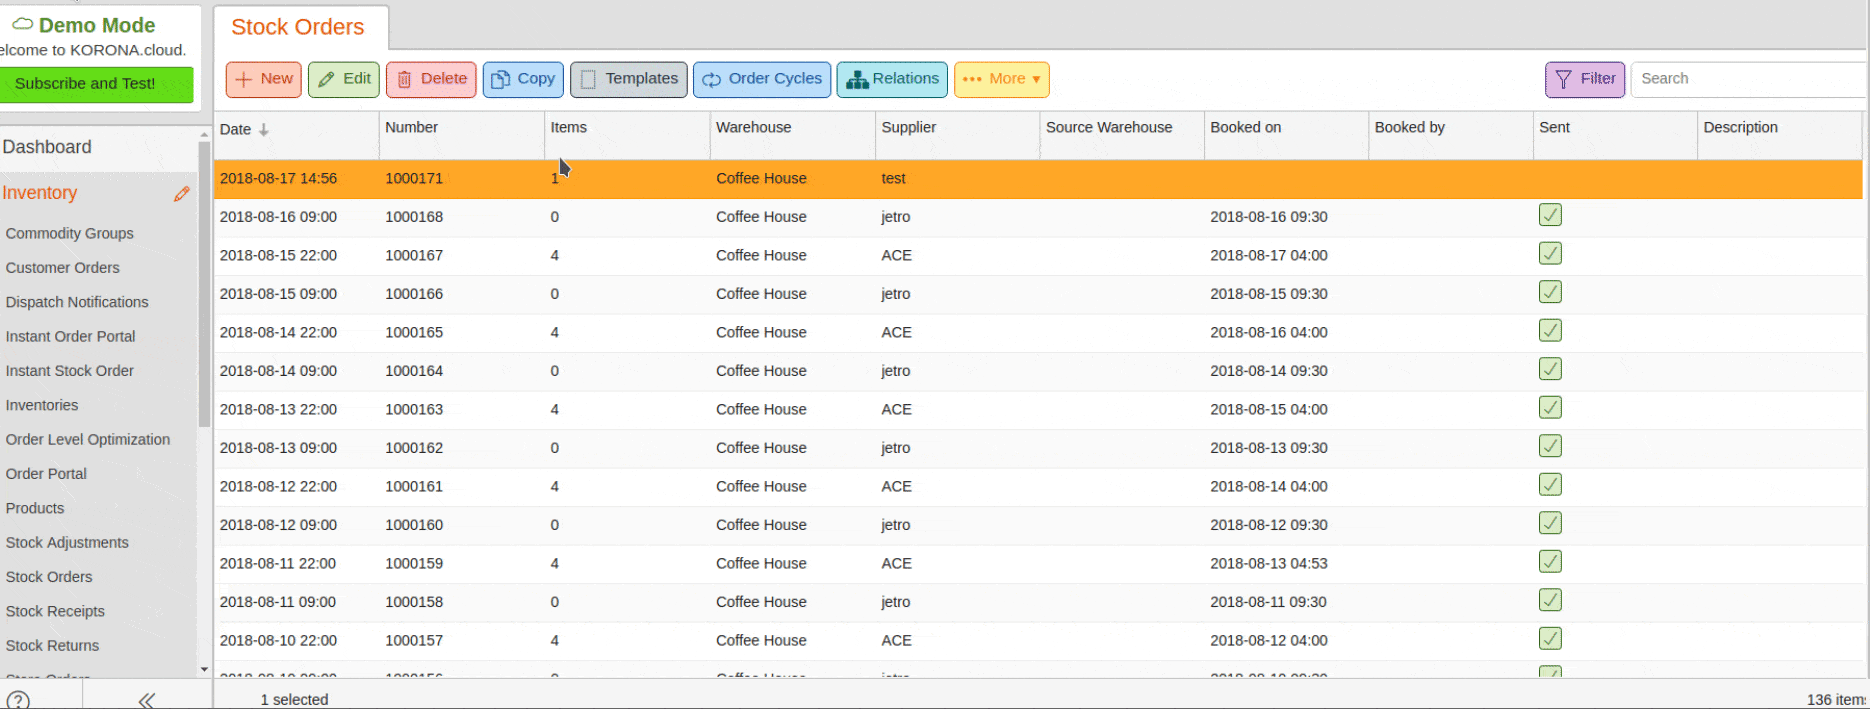
If you are using the order portal to create new stock orders and you do not see your newly created stock order on the list, this is due to an already open stock order for that same supplier.
If there is an existing unbooked stock order, the system will update the open order rather than create a new one. All open stock orders must be finalized and/or deleted for a new stock order to show on the list.
For example, below there is an open order for the supplier Test. We ordered the item 0.2Pack using the order portal. Notice how the quantity on the existing order for the supplier Test changes from 1 to 2.
Firefox has an issue that causes reduced resolution for PDF labels. A setting within Firefox can resolve this issue. Navigate to the print settings in Firefox, go to Image Quality and change it from 600dpi to HQ1200dpi.
This will update the resolution and quality of your PDF label.
To start an inventory, go to Inventory on the side bar and then Inventories. Now, press “New” at the top. Make sure to give it a description and move the correct organizational unit over to the “Selected” side.
For your first inventory, you can do Annual Inventory or Inventory Sampling for the Inventory Count Procedure. Annual Inventory will load all of your products, and you can flip through each page to put in the quantity. Inventory Sampling will give you a blank list you can add or scan products into and add the quantity as you go.
Press “Save” at any time to save your progress and come back later. Press “Book” when you are finished and want to finalize the quantities. If we imported your inventory for you, it should show up already and will just need to be booked.
For more information on inventories see this page. If you purchased a handheld scanner from us, see this page.
The reason you can’t change inventory (aka stock levels) on the product page, is because KORONA keeps track of stock level changes for historical purposes.
The stock level needs to be changed through an inventory or stock receipt so that the quantity of the product can be tracked at all times. If the stock level was just a field on the product page, it would make it harder to track the change.
Both inventories and stock receipts need to be booked so that the exact time the quantity was updated is logged. This would not be feasible on the product page.
To create a stock receipt in the backend, navigate to Inventory > Stock Receipts and press +New.
You can create a stock receipt from a stock order, where you can add and edit the number of received goods and prices from that order, then book.
A stock order does not affect inventory until you book a stock receipt for it. The most frequently used stock receipt type is an empty stock receipt. This is the best option for inputting received goods that weren’t created as a stock order. You must select a target warehouse and supplier, then it will give you the ability to add any product from that supplier into the receipt and key in the purchase price and the number of received goods- then book.
Stock receipts can be saved to edit later, as none of the changes made will apply until you book that receipt.
For more in-depth information view our Stock Orders & Stock Receipts page.
POS Functions
Point of sale buttons can be created a couple of different ways in KORONA Studio or at the POS. See this guide here on how to do so.
Yes, you can temporarily use the POS Terminal without connecting to the cloud. Please note, however, that certain functions only work with an active connection to the cloud.
These features include (depending on the packages on the account):
- Retrieving Master Data.
- Transferring sales data to the cloud.
- Creation, balance checking, and payments made with prepaid/gift cards.
- Inventory receipts, such as inventory counts, stock receipts, and order requests.
- Create, edit and search for customer orders, offers, rentals, and delivery notes.
- Creating and picking up customer orders.
- The creation of, searching or retrieving of customer data.
- External system calls / API.
- Event ticket sales.
POS functions are preset point of sale functions such as product search, change quantity, customer lookup, and more. View this guide providing an overview of available POS button functions.
Any changes that you make in the KORONA Studio Cloud Backend will require you to Retrieve Master Data (Update POS) in order to sync the Point of Sale with the Cloud.
Ex: If you create a new product and save it in the backend, you won’t be able to search that new product on the Point of Sale until Retrieve Master Data has been triggered and the POS is updated.
See here for more information.
Products can only be created in the backend to avoid accidental or unsupervised product creation on the POS.
Setting up your taxes has 3 components, all of which can be found under the Settings section on KORONA Studio.
The first is the tax rate itself, found in the Taxes section. You can have multiple taxes show up on the POS, either displaying each individually or together as the total of those tax rates. This gives you the reporting flexibility if your legislation requires that your business’s taxes show up separately.
The second component is the Sector. You can think of the Sector as buckets that the taxes go in before being applied to your products. A Sector can have multiple taxes in it. You can switch between sectors at the POS so that you can sell a product with its standard tax or tax-free.
The third component is the Economic Zone. These apply to your Organizational Units and Customers, so you can think of them as different locations with different tax rates. Each Sector can have different tax rates for each Economic Zone. Changing the taxes that apply to each Economic Zone is done through the Sector.
See here for more information on how to set up your taxes.
Products
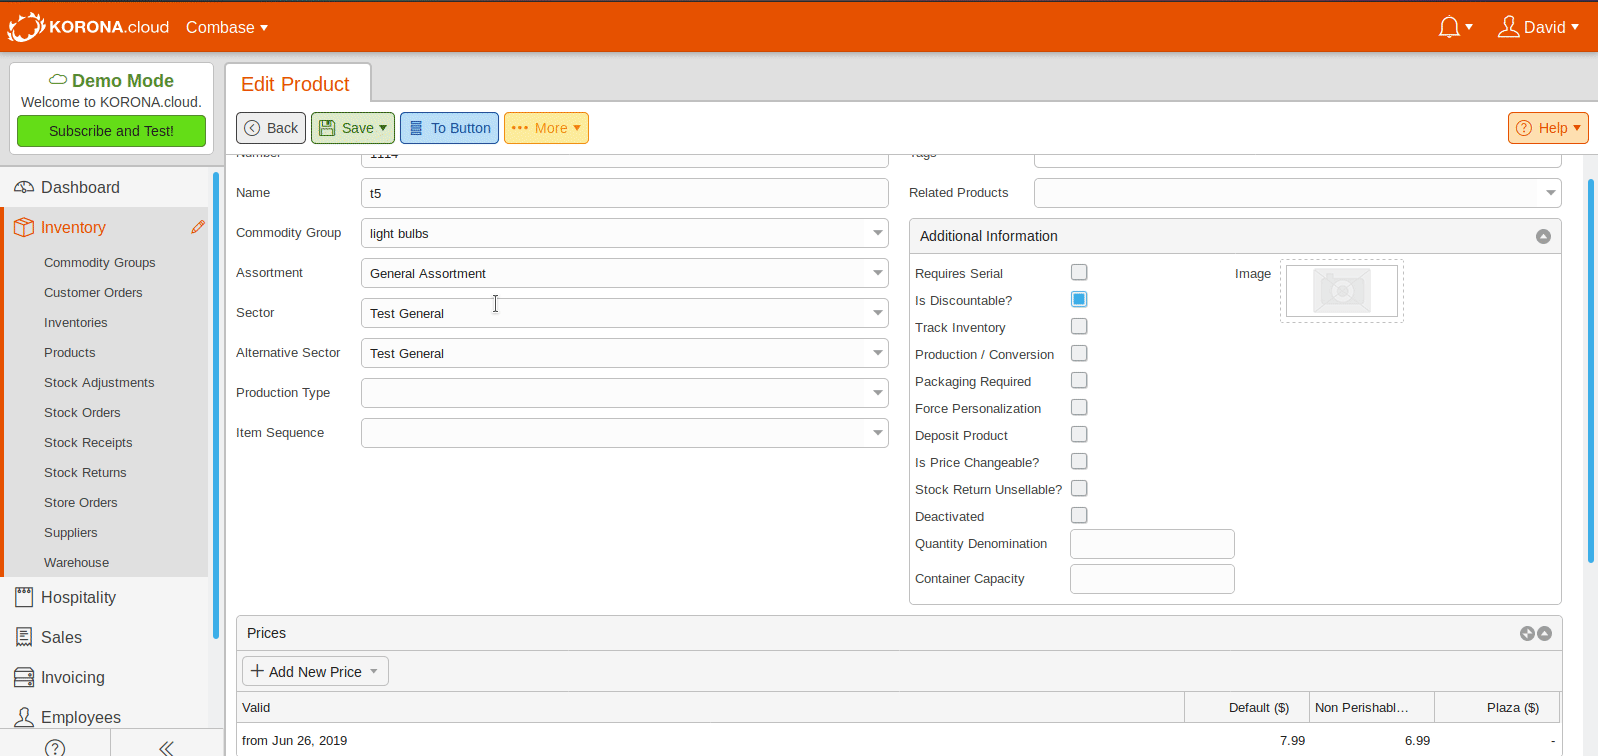
The current profit margin for product prices is determined by the difference between the retail price and the last purchase price.
The last purchase price can be found in the Edit Product screen. It is automatically updated if you book a Stock Order or Stock Receipt.
Profit margins are calculated using the actual sales price, which includes item discounts and the average purchase price at the time of sale for the warehouse from which the item was sold. If, at the time of sale, you also have an additional cost set up in the product settings, this cost will be added to the purchase price.
You can review the average purchase price under Inventory > Warehouses.
If you need to correct the average purchase price, you can do that by performing an inventory count under Inventory > Inventories.
To find products without suppliers you can create a store order under Inventory > Store Orders and click +New. Then change the source from Product to Assortment, and from there you can select general assortment, which will add all the products to your store order. After you have clicked Save, then export to Excel, the store order sorts products by supplier, so you are able to find out what product does not have a supplier in the Excel document. This automatically filters products without suppliers to the top of the list. See more here.
A Deactivated product removes it from being sold. A Delisted product can still be sold but will not be recommended for reorder. See how to deactivate or delist a product here.
There are different ways to set prices for products in KORONA POS. If your product isn’t showing up at the price you expect it to, check the product’s page itself or the Store Pricing menu.
See how to check both settings here.
If you want to sell products by weight, put in the per unit (lb, oz, etc) price for the price of the product. If you sell beef for $1.70/lb, for example, then put the price on the product as $1.70. Then at the POS, use the Change Quantity button to input the weight. For example to sell 5lbs: scan the item, press 5 and then Change Quantity, and the item will come up as the correct price 5*1.70 = $8.50.
We suggest putting “per lb” or “per oz” in the product name to make it more clear to your customers.
If you have barcodes with embedded prices, read here for more information.
Transactions
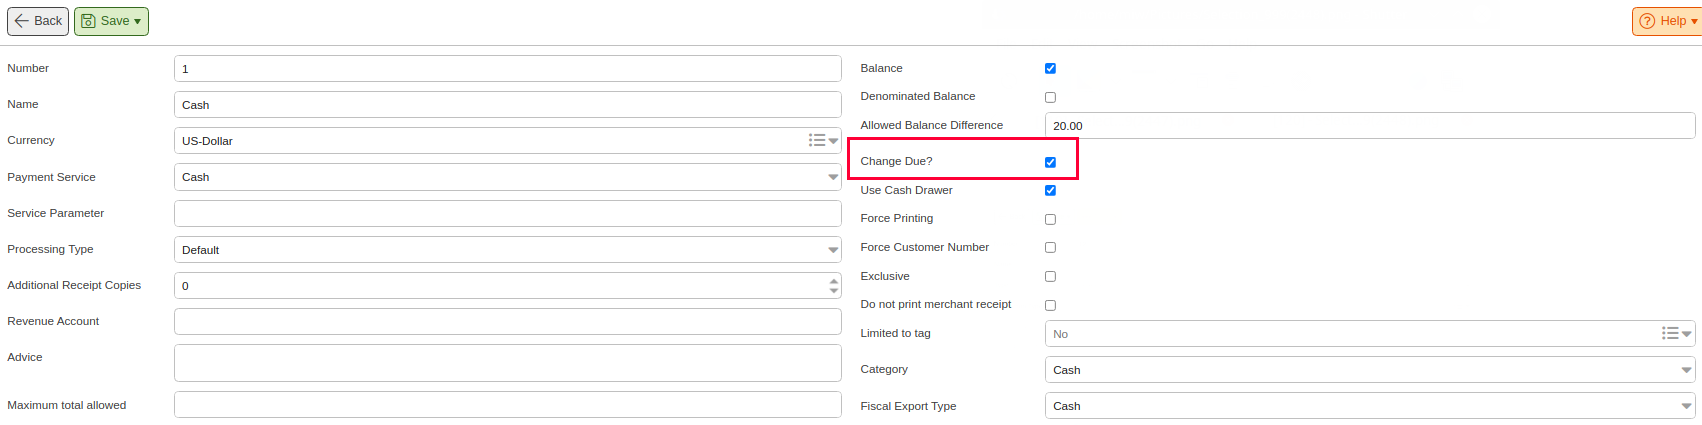
This message displays when the cashier is trying to process a transaction using more than the total amount displayed on the point of sale terminal using the selected payment method. To stop this popup, you must allow that payment method to process more than the total. Go to the payment methods screen by navigating to Settings > Payment Methods.
Select the payment method you need to change and click on the edit button. Once inside the payment method edit screen, tick the “change due” checkbox and click save. Make sure you retrieve master data on all points of sale terminals that are using that payment method. You will now be able to process amounts greater than the total receipt for that payment method.
If you load KORONA POS on a tablet, the receipts prices may be cut off from the preview. This is because the display size of the fonts is set too high.
To fix this, you will need to access your font size settings and decrease the size of your fonts. Follow this guide to reduce the font size.
Settings
To clarify how taxes are calculated on your receipts, let us look at an example:
Initial situation: You have 5 items. Each of these items has a net price of $0.99 and is taxed at a rate of 19%, each of which corresponds to a gross amount of $1.18 ($0.99 * 1.19 = $1.1781 rounded to $1.18). There are two legally accepted procedures to calculate the value-added tax:
- The net amounts are added together on the receipt, and the tax is then applied to the sum: ($0.99 * 5) * 1.19 = $5.8905 rounded to $5.89.
- The tax is calculated based on the posting method, rounded, and then added together: ($0.99 * 0.19) * 5 = $5.90
The checkout uses the first method, which typically makes things easier for taxes and accounting. Most tax collection agencies will take a gross total and multiply that by the tax rate. Using the first method will typically match up with what the reporting agency expects. When you have items with multiple tax rates, the items are grouped together, and that amount is rounded per tax rate.
To get full directions on how to set up your taxes, please refer to our Tax Set Up Page.
User roles are a way to manage and control permission for any KORONA Studio user. Here, you can block certain users from viewing and editing sensitive functions and reports. This page will list all known available user roles.
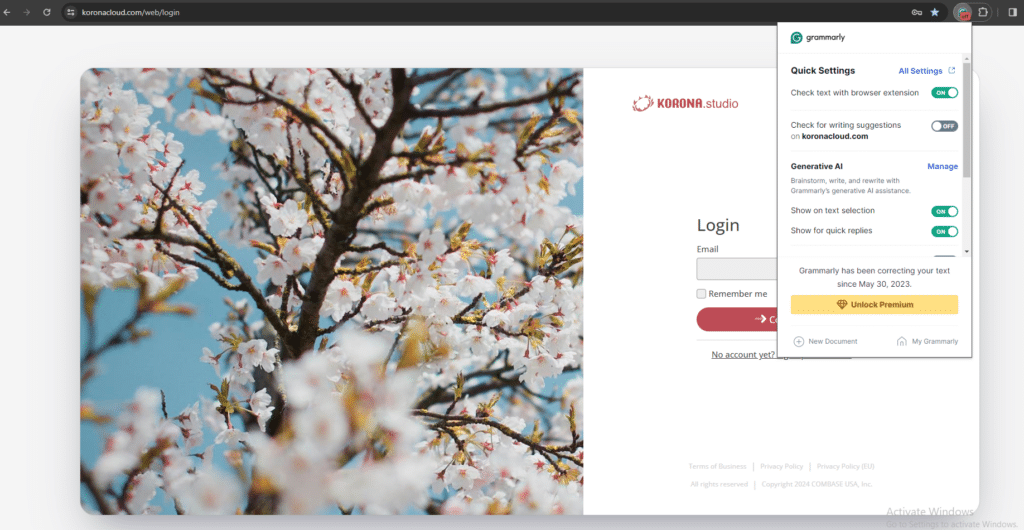
If you attempt to save information within a text field (coupon text, receipt header, receipt footer, etc.) and it disappears afterward, please check your browser extensions.
There is a known issue with the popular extension Grammarly. Please disable it for koronacloud.com.
If you want to pull information from the Cloud API, first go to Settings and then Data Exchange. Then in the search bar at the top, put in “api” and press “Add”. Now, in the APIv3 section, you can find your Account-ID needed for API calls, the link to our documentation for the API, and the Endpoint. You can add credentials to the list at the bottom of the APIv3 section or double-click existing ones to get their login/password and edit their permissions.
If you want to use the Client API to extend POS functionality, go to Settings and then External System Calls. Here, you can add your own POST or GET HTTP requests that the POS can utilize. After setting up the External System Call, you will add a button that activates it. For more information, see this page.
Didn’t find what you need help with?
Search more articles below or contact support.