
Stock Orders
Stock Orders differ from Store Orders as they are specific to a Supplier. A Stock Order will correspond with one Supplier, whereas Store Orders would be an aggregate of all items required regardless of Supplier.
Note this will only show the non-booked orders any booked orders will not be listed here. To locate the booked orders please refer to the “Finding Booked Stock Orders and Receipts” section of this page.
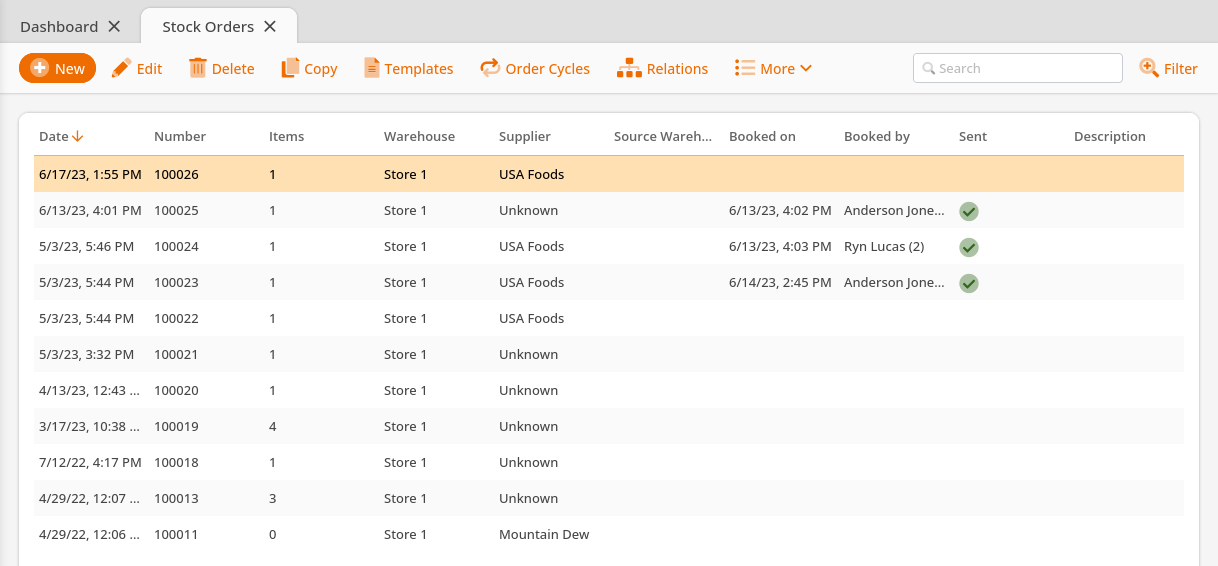
To create a new stock order, first navigate to Inventory > Stock Orders. Click +New, and you will be given the options below:
Stock Order from Template
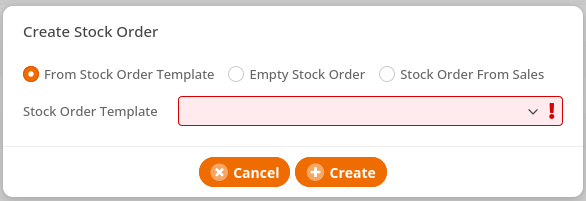
To use this option, you must have a template already pre-set. If you do not have one already created, navigate to Inventory > Stock Orders click on Templates and click +New on the following page.
On the Create Stock Order template page, type in a Name for your template and choose a Target Warehouse and Supplier. You may also choose to Add all short products simply by selecting the corresponding check-box. Click Save. This will allow you to +Add Products. You may scan or manually enter items. Once you have made the desired selections click Save and Back.
Now from the Stock Order page, click +New and choose From Stock Order Template. Select the template you created and click Create. Now you have the ability to add products. You may manually add each product or scan them using a barcode scanner.
Once you are satisfied with the selections, click Book at the top of the screen.
Important Note
Stock Order Templates are different than Store Order Templates as they are specific to a Supplier. For more information on Store Order Templates, please refer to our manual page on them.
Stock Order From Sales
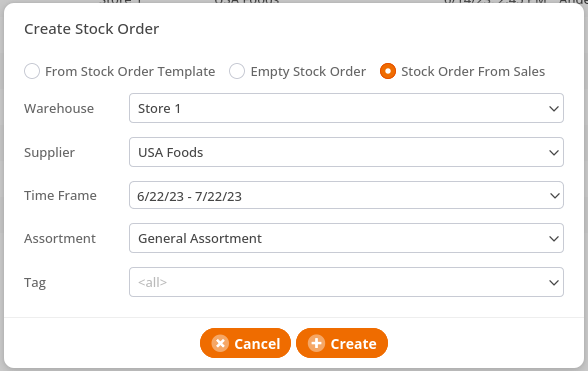
This will help order product quantity based on sales made for that product in a selected timeframe.
Navigate to Inventory > Stock Order. Click +New, Click on Stock Order From Sales, Choose a Warehouse, Supplier, Time Frame, Assortment, and Tag.
Once you have made all of the desired selections, click Create.
Once the Edit Stock Order page launches, products will automatically list based on their sales. You may delete or add products as you wish.
This option is similar to our Short Stocks. To learn more please visit our Reorder Level/ Order Recommendations manual page.
Empty Stock Order
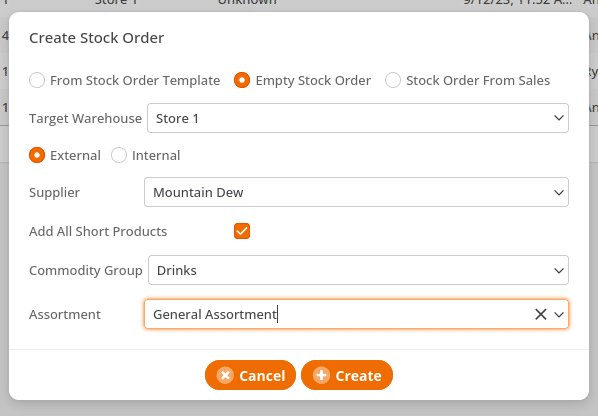
Navigate to Inventory > Stock Orders. Click +New. Select From Empty Stock Order. Select a Target warehouse and Supplier.
Using this option you will need to identify if this order will be an Internal transfer (from Source warehouse to target warehouse) or External (supplier to target warehouse). You also have the option to include all short products simply by checking the Add All Short Products check-box. If this option is selected, additional drop-down menus will appear, Choose the Commodity group and Assortment you would like the “short products” to load for and click Create.
When you are ready to book your order simply click on Book. Once the order is booked, you have the ability to email this directly to the supplier if the supplier’s information has been entered under Inventory > Suppliers. You may also download it as a PDF or Excel spreadsheet.
Important Note
Once the stock order is booked, the products cannot be added, removed, or adjusted.
How to Make a Reorder Report
Stock Receipts
Once a stock order is booked, you can create a new stock receipt based on that order. You can do this by navigating to Inventory > Stock Receipts. Click +New.
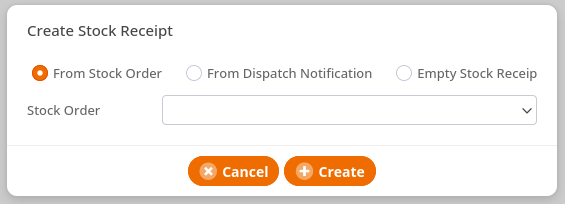
Stock Receipt From Stock Order
To use this option the stock orders must be booked prior. To learn more, please refer to the stock order section of this page. Select a stock order and click Create. If a stock receipt has been previously booked for the selected order, a confirmation text box should appear “There already is a booked stock receipt for this order. Create another one?” your options are Yes (creates new stock receipt), Only use missing items (disregards all items previously accounted for), Show (launches existing stock receipt).
Once the Edit Stock Receipt page launches, you may add in products using the +Add Products or Scan Products options. You may also edit or delete already existing items. You may add an order Code/PLU/GTIN for each product. You may also, edit the number of Received Goods and the Purchase Price (if different than expected). When finished, click Save and Book. Your items will be added to your inventory and the average purchase price or RRP will be adjusted if necessary. This may take a few moments after booking depending on the number of items being received.
Omit Fully Received Products
Previously, when a stock receipt was created from an order, all items were copied, regardless of whether they had already been recorded with another goods receipt. These positions were then only inserted with the quantity 0.
Now the items of the order, which have already been completely recorded as delivered by other goods receipts, are no longer transferred to the new goods receipt if the checkmark for Only add missing items is set.
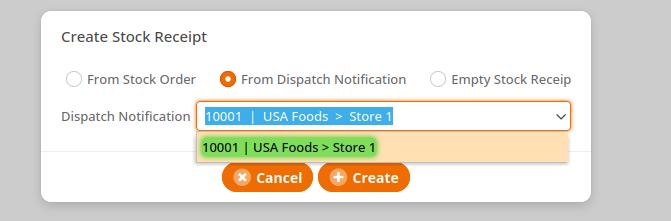
Stock Receipt From Dispatch Notification
To use this option the dispatch notification must be set up in the system prior to. To learn more please refer to our Dispatch Notification manual page.
If a stock receipt had been created from dispatch prior to, a confirmation text box should appear with the following message “There already is a stock receipt for this dispatch notification. Create another one?” You may select Yes or No.
Once the Edit Stock Receipt page launches. On this page, you may add products by using the +Add Products or Scan Products. You may also edit or delete already existing items. You may add an order Code/PLU/GTIN for each product. You may also, edit the number of Received Goods and the Purchase Price (if different than expected). When finished, click Save and Book and your items will be added to your inventory and the average purchase price will be adjusted if necessary.
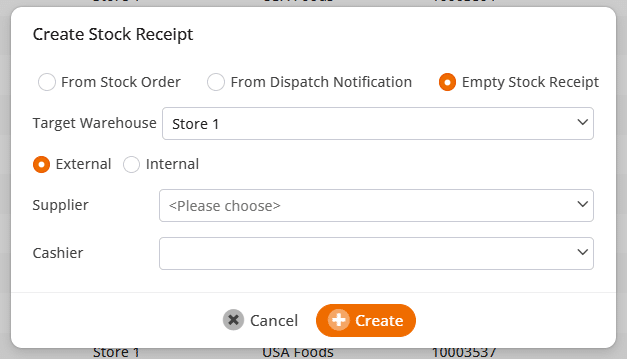
Empty Stock Receipt
Once this option is selected, you must also choose a Target Warehouse (where the goods will be received). Next, specify if the receipt is External (supplier to target warehouse) or Internal (Source warehouse to target warehouse). Finally, choose the Supplier/Source Warehouse and Cashier and click Create.
Once the Edit Stock Receipt page launches, you may add products by using the +Add Products or Scan Products options. You may also edit or delete already existing items. You may add an order Code/PLU/GTIN for each product. You may also, edit the number of Received Goods and the Purchase Price (if different than expected). When finished, click Save and Book and your items will be added to your inventory and the average purchase price will be adjusted if necessary.
Important Note
The Supplier item number on this page is the “ORDER CODE” on the edit product page.
Stock Receipts at the POS
Use the POS function “Stock Receipt”.
Create a button with the POS function “Stock Receipt“. You can find a guide for creating buttons here: Create POS Buttons / Button Configuration
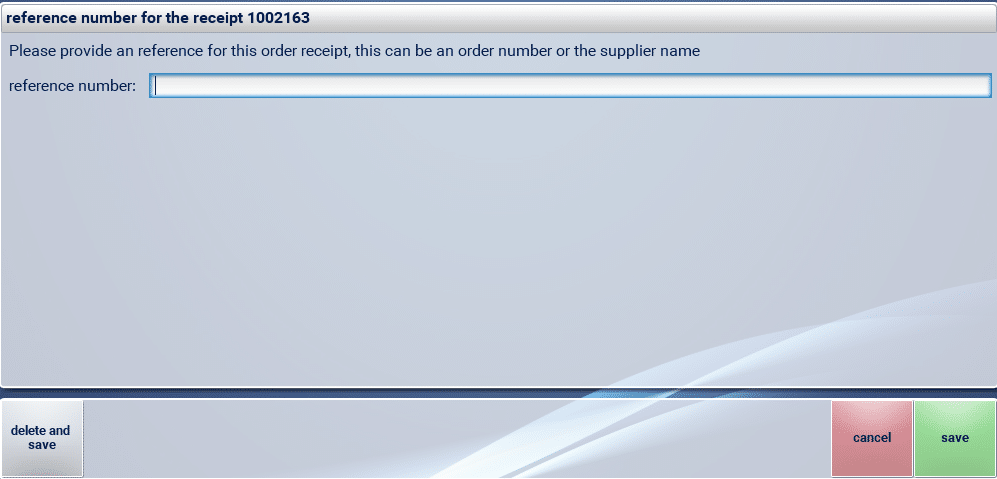
At the point of sale, you simply add items to the transaction as you would when selling the items. After you have added all desired items to the receipt, press the Stock Receipt button, which will open a new screen which allows you to enter some reference information that can later be used to match the stock receipt to an order or supplier.
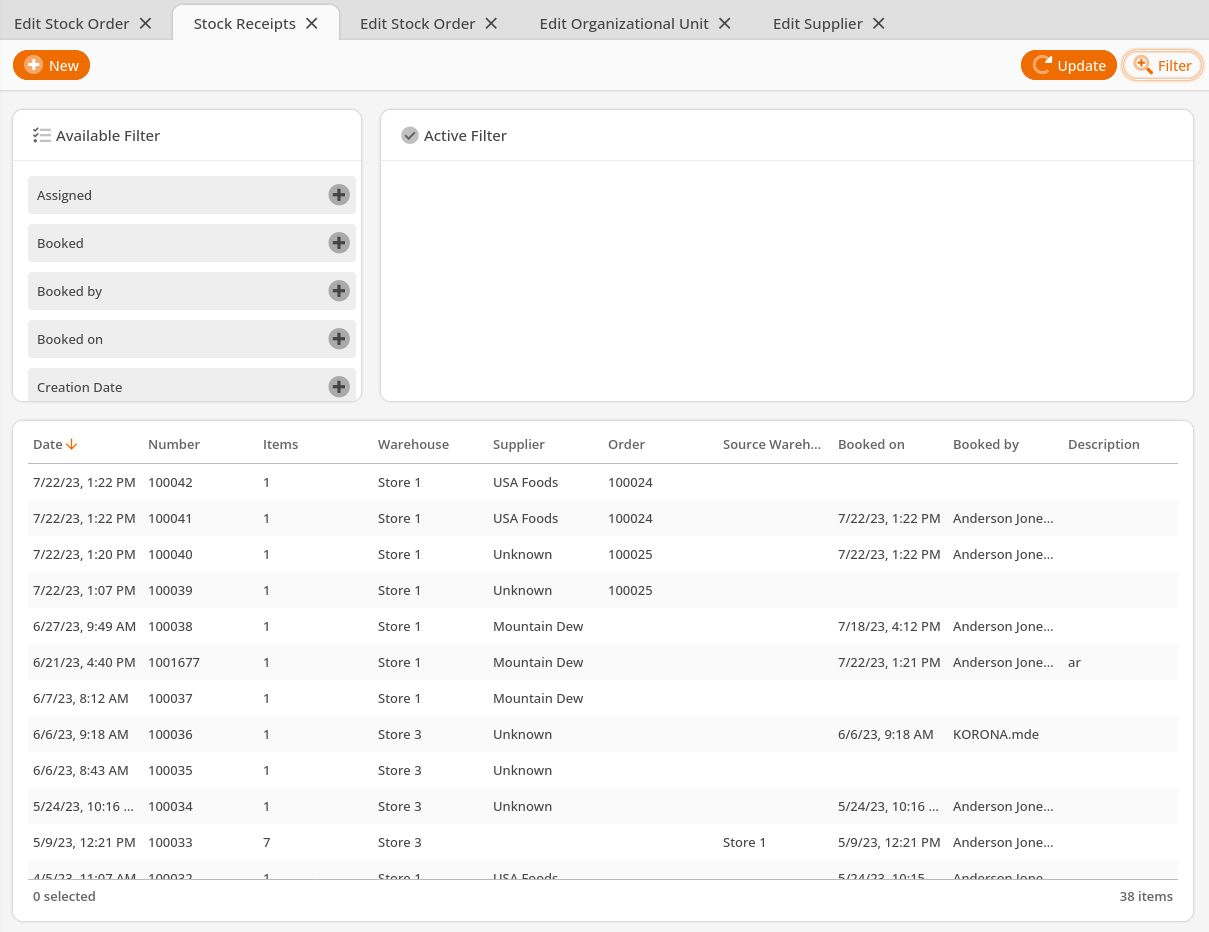
Finding Booked Stock Orders and Receipts (Back Office)
Once stock orders and stock receipts have been booked, they may seem to disappear from the cloud. All you have to do to see these previously booked items is hit the Filter button on the top right of the screen. This will show you all of your orders and receipts and will allow you to filter them as you wish (by supplier, date, warehouse, etc.)
Short Stock Widget
There are 4 available widgets that allow for an order placement right from the dashboard. These widgets are Short Stock, New Products, Promotions Products, and discontinued Products.
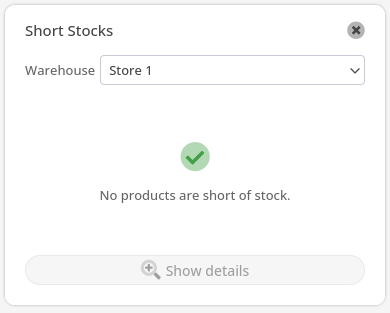
If you would like to create orders based on your re-order levels right from the dashboard you can use the Short Stocks Widget. To learn more please navigate to our Reorder Levels/Order Recommendations manual page.
Important Note
In order for short stocks to work the Assortment must be assigned to the Org Unit.
Also, the short stock widget works with the Order Level Optimizer. This feature is only available on the KORONA Plus Package, To learn more please visit our Order Level Optimization manual page.