
Point of sale buttons can be created and modified in KORONA Studio.
To change the layout of your point of sale:
- Log into your KORONA Studio Cloud back office.
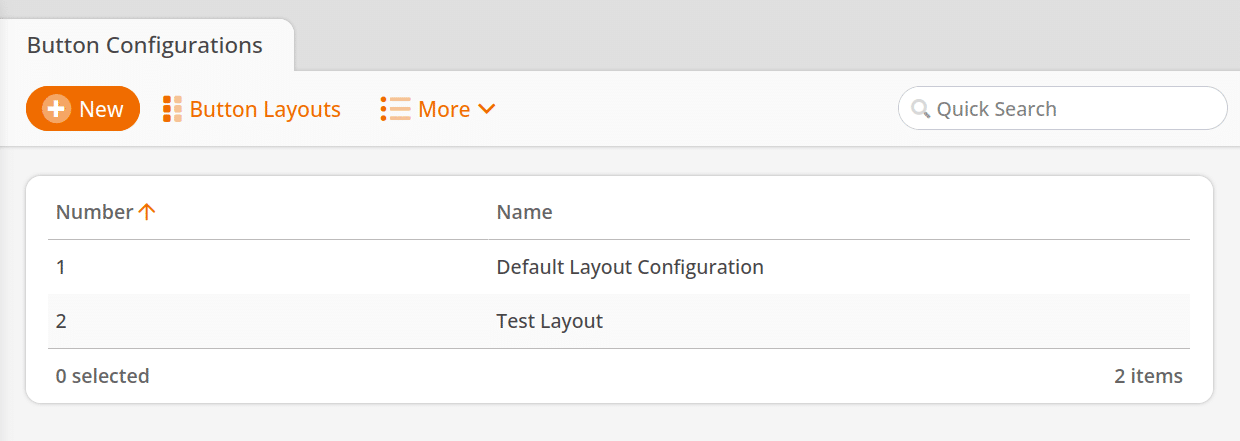
- Navigate to Settings > Button Configurations.
Here, you can manage multiple profiles for different POS stations.
You have the option to create a whole new configuration by using the +New button or to edit an existing configuration by double-clicking a listed entry.
*Note: You can use the same Button Configuration for multiple Points of Sale or make them individually.
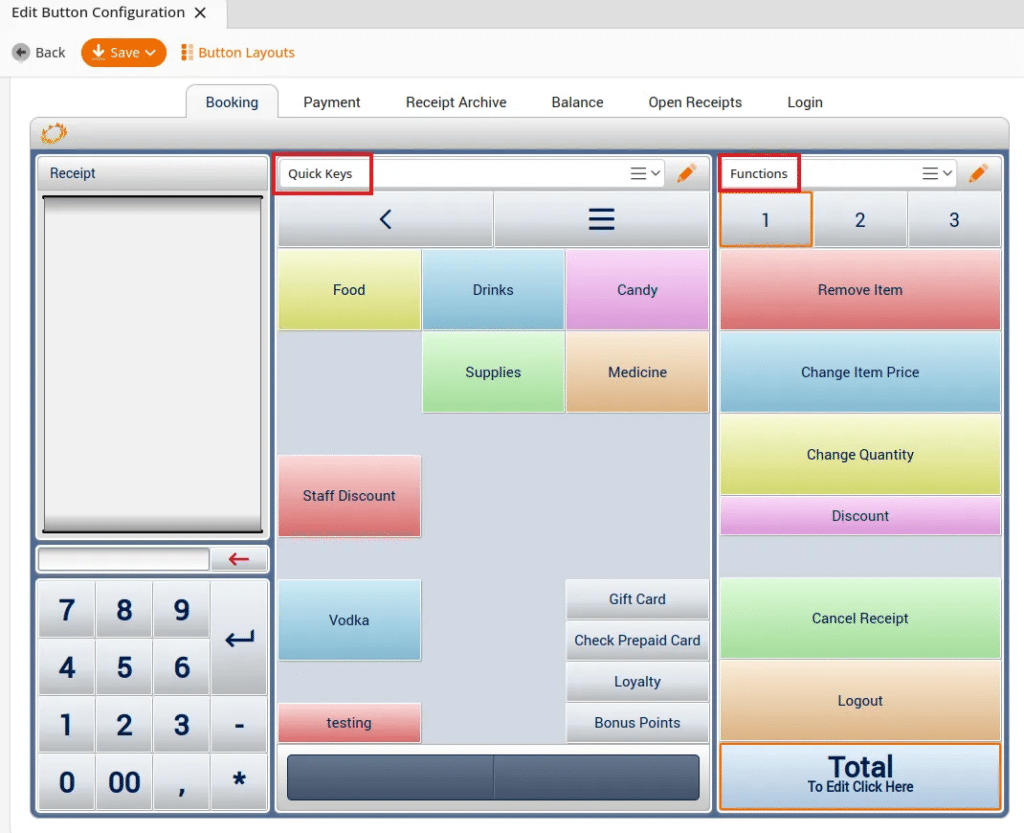
Key Layouts
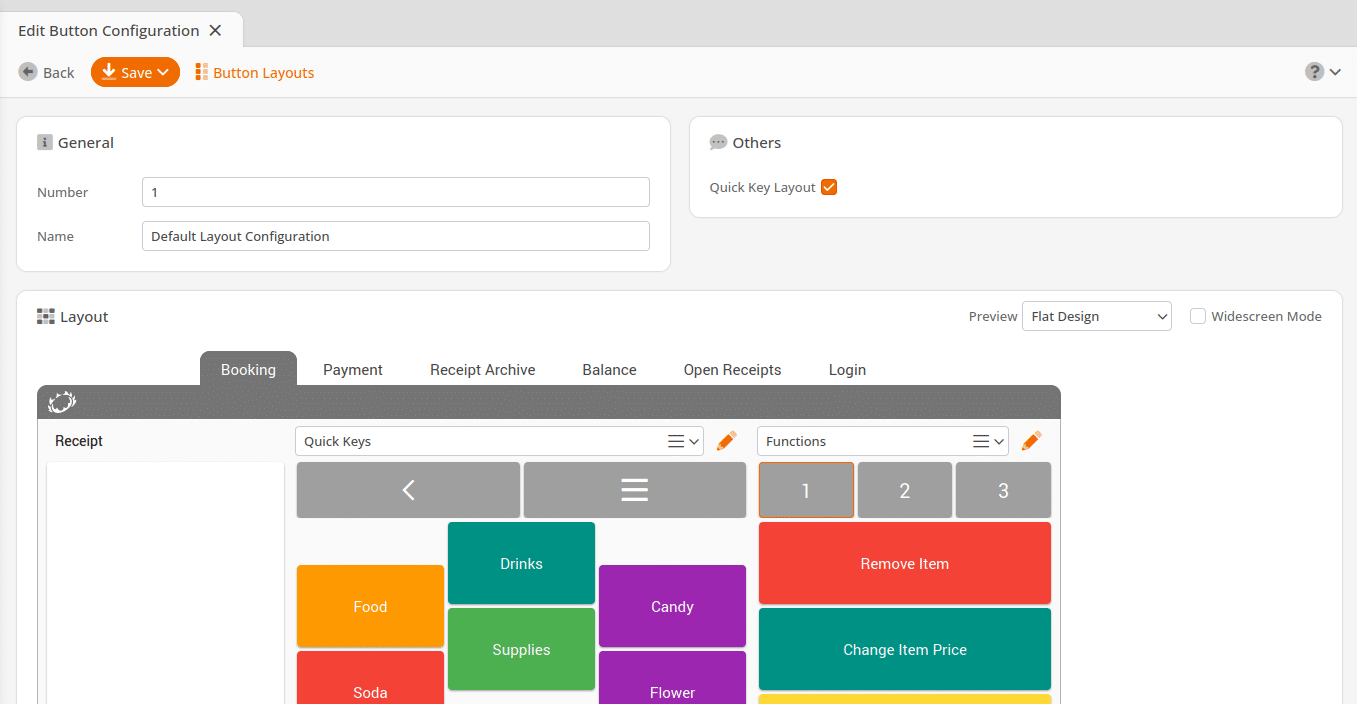
- Give the button configuration a name and decide whether or not the layout configuration will use Quick Key Layout.
- The default layout configuration will be set up with quick keys.
- If all of your products are scanned at the POS, you may want to disable quick keys to simplify the layout for your cashiers. Doing so will preview the scanning mode screen.
- You may also navigate to desired button layouts by clicking on the buttons just like you would at the POS.
- The right section has three tabs that contain a button layout of 1×12 buttons.
- Above each section, you will find a drop-down menu that allows you to assign a different button layout for the section below and an orange Edit button, which allows you to edit the displayed button layout quickly.
Creating Button Layouts
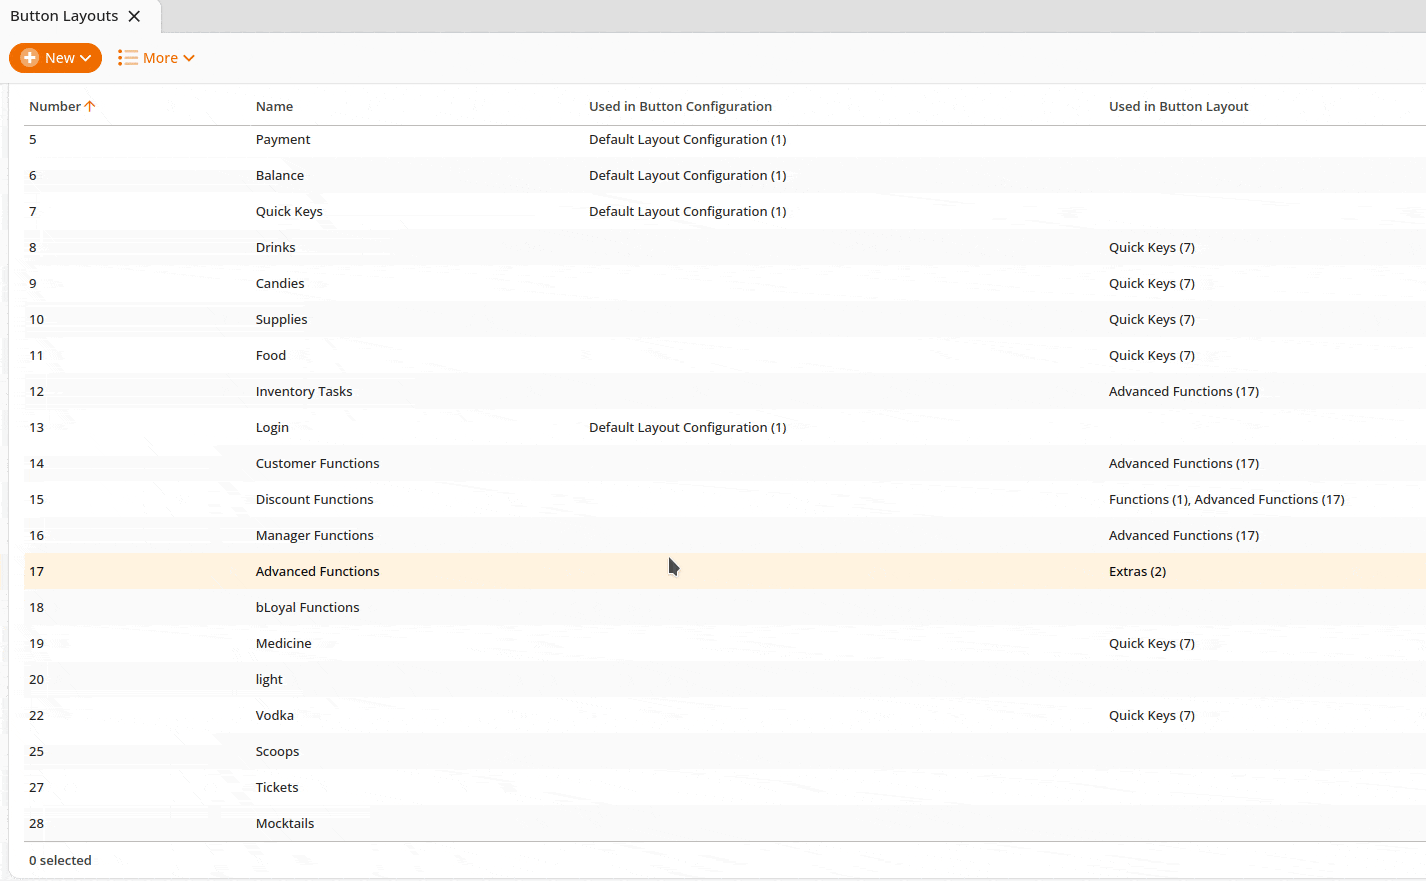
- To create a new button layout, click Button Layouts, which will take you to the list of button layouts.
- +New will allow you to create a new button layout.
*Note: All of your Button Layouts will be available for all of your Button Configurations.
A change made to a button layout will affect all Button Configurations that use that Button Layout.

– Empty Button Layout
- Starting from scratch, you can manually add every product and function to this button layout.
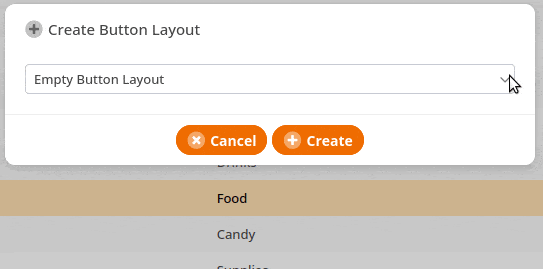
– From Single Commodity Group
- Select a Commodity Group. The assistant will create a button layout that includes one button for each product within that commodity group.
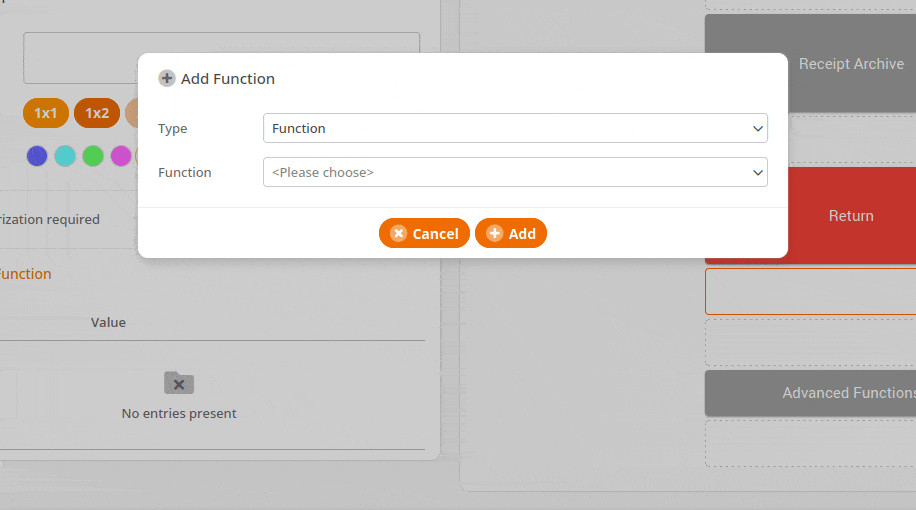
- To access this layout from the POS, go to the Button Configuration that you want to edit, press the Edit button, click on a blank space, name your button, and then press +Add Function.
- Select Button Layout, and then choose the layout you would like to add.
*Note: Only the first 15 button layouts will be displayed, but you can type on the button layout line to search.
– From Commodity Group Hierarchy
If your commodity groups are nested (Example: Alcohol > Wine > Red Wine > Malbec), then you can create the necessary buttons to show that all at once.
- Simply check the commodity groups that you will use and create the layout. This will create layouts that show all of your alcohol commodity groups, all of your wine commodity groups, etc., and link all the layouts together so that you can easily click through them at the POS.
– From Tag
- First, tag all the products you want to put in this layout.
- Select the appropriate tag and then create the layout. This will work just like the Single Commodity Group creator, except you can tag products across all your commodity groups if necessary.
Add Button Layout with To Button Feature
The To Button feature allows for a more straightforward way of adding a button layout to your button configuration.
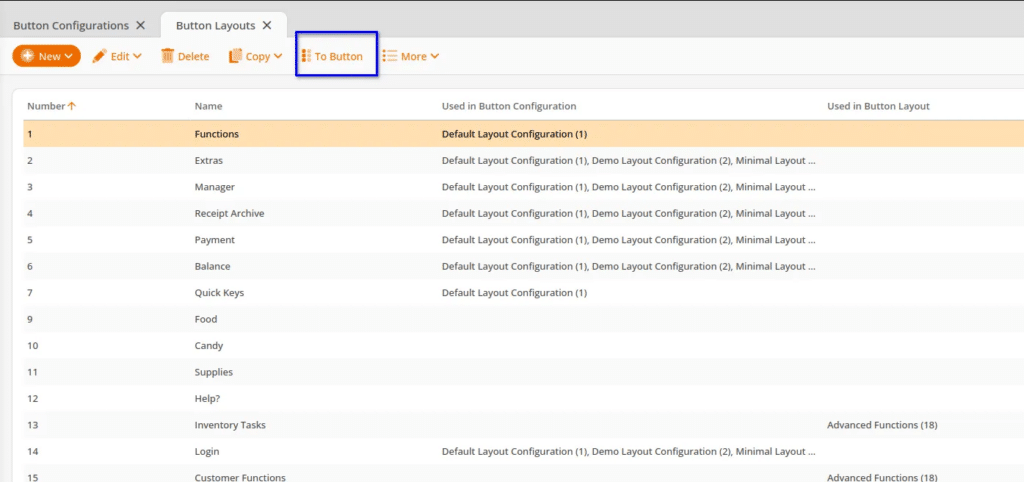
Navigate to Settings > Button Configurations, then click Button Layouts at the top. This will take you to all of your existing button layouts. To add a layout to your button configuration, select a layout and hit the To Button at the top. This will launch a mini window called Assign Button Layout.
Step 1 will ask you to choose where to assign this button. You can choose from the layouts in your button configuration. You can see your current layouts if you go to Settings > Button Configurations and go into the configuration you are using.
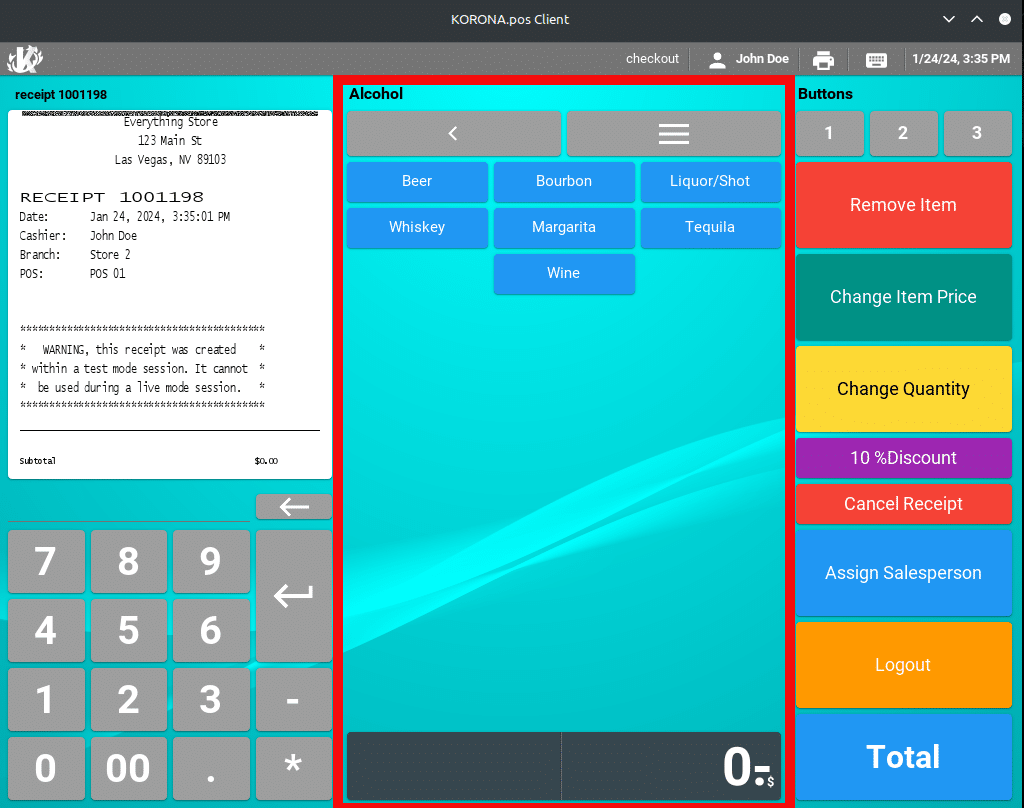
*For example, see the following screenshot.

If you would like to add the button to an area, you will find the name of that layout. So, if you wanted to put the button in that middle section, we can see that the name of that area is "Quick Keys." From the drop-down menu in Step 1, you would choose Quick Keys. If you wanted to put the button layout in the right sidebar, you would select Functions from the drop-down menu.
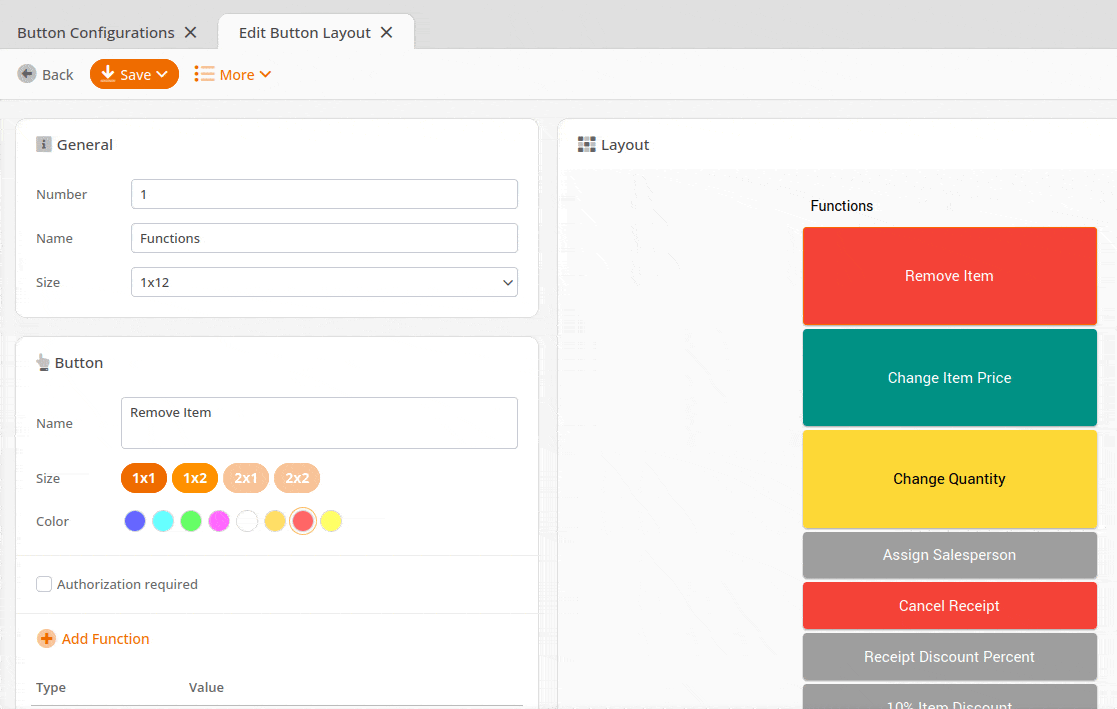
Step 2 is to customize the button’s appearance. Here, you can name it and select the desired size and color.
For Step 3, you will click and drag that button to the right-hand side where the layout is displayed, in whichever cell you’d like it on. Once it’s in place, press Save at the bottom. This will then save that button to your configuration.
POS Layout
Button layouts can now be switched between 3×12, 4×9, and 1×12. If a button cannot fit on the new layout size, a warning will show to inform you, allowing you to move it.
- 3×12 is generally recommended for quick key layouts, which appear in the center of the screen.
- 1×12 should be used for function layouts on the right side of the POS screen.
- 4×9 is a special size option which is also for the center screen. It has one difference in that it is used for wide-screen POS terminals. If you use wide-screen button layouts, please also make sure that you have wide-screen mode enabled in your POS profile (Settings > POS Profiles > Wide Screen Mode).
Creating a New Button on the POS
- Select the place for your new button by clicking on one of the empty button positions.
- Then, you can select the button size and color on the left.
- The next step is to add a button by clicking Add Function. This will open a dialog that allows you to select a specific function type. To continue our example setup, select the function type Button Layout. This will give you another drop-down for selecting the specific button layout.
Buttons and Cashier Roles
You can also set your button to be available only for specific Cashier Roles. This is most commonly used if you want to restrict an entire button layout from view, unless a manager approves.
- You can do this by activating the Authorization Required for this button and selecting which Cashier Role is required to perform the stored function.
If a cashier with a different role presses the button, the login screen will open, and a cashier with the specified Cashier Role can enter their cashier code. After their cashier code is used the restricted page can be viewed by the current cashier.
*Note: You cannot restrict a function button for a function linked to a cashier permission (such as voids, cancel receipts, returns) behind this authorization function and have a manager approve this single use action. This can only be used for non permission based functions such as Manual Discounts, External System Calls, Assigning Customer Groups etc. In other words this will not work to offer a one time access to a prohibited cashier permission, for granting temporary permissions please review ‘Revisions‘.
If manager sharing is enabled, two-cashier verification can also be activated. This means that a second cashier login is always required when the button is pressed, even if the logged-in cashier has the defined role.
*Note: If your desired button layout does not appear in the options listed, try typing the name. The result list will refresh automatically once you type at least three characters.
Function Types
- Account
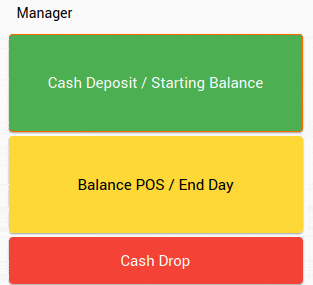
Account transactions are very similar to product sales, with the exception that they do not have a quantity and do not affect revenue. They can be used to track money movements like opening cash, cash drops, gift card sales, or expenses.
- Button Layout
Used to open another button layout by pressing the button at the point of sale.
- Button Status
Highlights product buttons based on a selected tag. The product status function type will allow you to select a specific tag and a color. Common scenarios are “highlight gluten-free products” or “highlight dairy products.”
- Character / Character String
Used to make a button add certain characters to the POS input line. This is commonly used for buttons containing multiple functions.
- Customer Group
Changes the customer group on a receipt. This can be used to track revenue based on customer groups or to trigger promotions and price groups that have been set up for a specific customer group.
- External System Call
External System Calls can display web pages that can interact with the POS using the KORONA POS Client API. This can be used to access your web-based scheduling system, web email client, or API application. You can set up external system calls under Settings > External System Calls.
- Function
POS functions are preset points of sale functions such as product search, change quantity, or customer lookup. When creating a new button with a function on it, you can now type in all or part of the name of the function to filter the list, allowing you to access the desired function faster.
- Info Text
Info Text can be added to a line item to provide additional information. This can be used to accommodate additional customer requests or track product details on the receipt.
- Item Sequence
An Item Sequence button can be used to group items on the receipt. Common scenarios are courses in restaurant environments or work orders in service environments.
- Online Function
The KORONA POS Online Functions help pull in specific data at the POS, such as customer information with last purchases, employee workday ratings, cashier information, messaging between individuals within the organizational unit, and looking up Stocks for products.
- Payment Method
The Payment Method button function collects payments for a receipt. This button function type is usually used for the payments button layout. Payment methods can be set up and adjusted under Settings > Payment Methods.
- Product
The Product function will allow the cashier to add a product to the receipt.
- Show Products with Tag
A Tag Button will allow the cashier to select a product from a list of products with the specified tag.
Tips for Manipulating Buttons
Here are some of the main options for customizing buttons to optimize your workflow:
- Moving Buttons
Buttons can be moved via drag and drop. You can only move buttons to free button slots.
- Deleting Buttons
Right-click on the desired button and select Delete.
- Editing Buttons
Left-click on the button you wish to edit. Once the button is highlighted, you can edit its display name, size, color, and functions on the left side.
- Applying Changes at the POS
After saving your changes in the back office, Retrieve Master Data at the POS for the changes to take effect. In the default configuration, a button for this is under the third function tab. If you do not have a button for retrieving master data, restart the POS twice.
You may also view any layout at any time simply by adding the button function “Show Button Layout.” Once the appropriate number is entered, this will launch any button layout you wish.
*Note: If the changed button layout is being displayed while retrieving master data, you will need to refresh the screen to show the changes. The easiest way to do that is by closing the current transaction using the total function.