
Please note that if you have a new account and haven’t setup a Credit Terminal to your POS Profile yet please follow this link: https://manual.koronapos.com/adding-a-pax-device-to-a-new-account/
On the PAX Credit Terminal, you will want to confirm the current IP address showing on the PAX terminal.
How to check the IP address depends on your model:
- Press the Menu option on the PAX unit’s screen (if this fails, hold the blue “FUNC” button and press the 1 key).
*Note: The Default Password is today’s date in MMDDYYYY format. If this is not the correct password, ask your provider.
- Press the on-screen Down Arrow from the main menu to view the second page of options and select the Communication option
- Press the Down Arrow from the Communication Options to view the second page of options and select the Lan Parameters option.
- Press the Down Arrow from the Lan Parameters Options to view the second page and select IP Address.
- Click on the Settings gear from the home screen of the PAX device, it will prompt you for a password.
By default, all PAX passwords are either “9876” or “pax9876@@”.
*Note: If this is not the correct password, you can try using Today’s Date in MMDDYYYY format. If this also does not work, ask your provider as they may have changed it.
- From there, navigate to Network & Internet and then tap on Ethernet or Wifi, depending on which connection type you are planning to use.
For Wifi, select Advanced.
For Ethernet, select Ethernet.
There should be an option for IP address. You will want to copy this IP down.
*Note: If the IP address says 0.0.0.0, your PAX is not connected to the internet and you will need check
your network connection.
- With that IP address in hand, navigate to the KORONA Studio Cloud Backend and go to the Sales tab.
- Go into Points of Sale. Find the POS that this terminal belongs to.
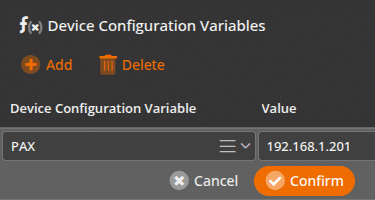
- We are looking for Device Configuration Variable.
If this has previously been set up, the variable should say “PAX” and there should be a Value with an old IP address. You will want to edit the Value and replace the old IP address with the new one.

- Confirm under Device Configuration Variables.
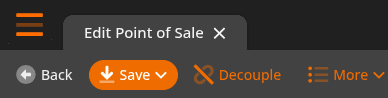
- Save under Edit Point of Sale.
- On the Point of Sale, make sure you Retrieve Master Data (Update POS) to reflect the change from the Cloud to the POS.
- Attempt a new test transaction and this should now work correctly.
If not, contact support for further assistance.