You may want to manually batch your credit terminal for various reasons. Typically, the devices are set to batch automatically at a certain time. These procedures can help you if you need to perform one outside of those normal circumstances.
Manually Batching
- Access your PAX Device’s administration menu by pressing Func + 1 together.
- When prompted, enter the password provided to you.
- Tap the button labeled Host Settings. You will be prompted for the password a second time.
- Scroll down and tap Batch Close.
- The S300 will process the batch. When finished will display a message stating “Batch Closed.”
- You will need to tap the 4 corners of the screen starting in the top left and move clockwise from there. In order: top left, top right, bottom right, bottom left.
- Then it will prompt you for a password. Enter the one provided.
- Go to Host Settings
- Press Batch Close
Note: If your device is not automatically batching frequently, go to the Pax home screen > Settings > Security and set the scheduled reboot time to after your typical batch time (3AM or 4AM for example).
- Press the 3 lines icon on the bottom left of the screen. You will be prompted to enter a password. Enter the password provided to you here. (Default 1234)
- From there, navigate to Settlement and select the option Settle Daily Batch
For some Z-Series models, you can press the gold star icon at the bottom, enter the default 1234 password, and then select Settle Daily Batch.
Sometimes you will need to switch your credit terminal to standalone mode. This makes it so that you can manually type in a total on the credit terminal without the POS being involved. You may need to do this when your Internet goes out or for testing during initial setup.
Standalone / Non-Integrated Mode
Inside the payment app (this could be TSYS Sierra, Rapid Connect, Elavon, etc), you need to open the settings menu. Tap the 4 corners of the screen, starting in the top left, and move clockwise from there. In order, it would be top left, top right, bottom right, and bottom left. See the above batching section for Android PAX devices for a video example.
From there, you’ll be prompted for a password. Enter the password you’ve been provided. (Typically, your street address or the current date, e.g., 05082026).
- Navigate to System Settings and scroll to the bottom of this page.
- The third option from the bottom, ECR-Terminal Integration Mode, needs to be set to Internal POS/Standalone. Once that is set, you can exit this menu and return to the main payment screen.
- When done using Standalone mode, go back into that menu and change the ECR-Terminal Integration Mode back to External POS.
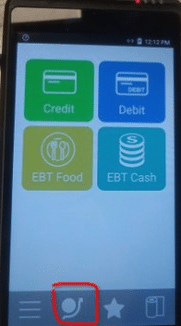
Inside the payment app, there is an icon with a circle and a bent line around it (second from the left).
Press this button to enter or exit standalone mode.
- Press the gold star icon at the bottom.
- Enter manager password (the default is 1234). Then press the green button for enter.
- Find the option for Turn SPIN Bypass On and select it.
This will allow you to do a standalone transaction once, and then it will default back to SPIN bypass to off. If you need to permanently turn on SPIN bypass, contact whoever programmed your device (typically who you bought it from).