Note*: Loyalty points are calculated based on the Full Retail Price of products, not on discounted or sale prices.
Creating Loyalty Cards
The Loyalty Cards menu may be found under the Promotions > Loyalty Cards tab. If you can not locate it there, you will need to Edit Menu Entries. On the Loyalty Cards page, click New. On the Create Loyalty Card page, fill out the Number and select a Customer from the drop-down menu.
You are also able to create the Loyalty Card/Number at the POS by inputting a number not currently in your database and then selecting Set Loyalty Card.
Note
We recommend setting a number that is easy for the customer to remember, like their phone number.
Next, you may enter an amount for Stamps and/or Bonus Points. You may also choose to leave this field blank. On the right-hand side, a timestamp of the Last Activity is listed. Once done, click Save.
Next, click Back to be taken back to the Loyalty Cards page, where you may view all created loyalty cards. Selecting one of the listed cards should give an option to Edit or Delete it. You may Filter this page by Card Number or Customer.
Setting Up Loyalty Point Promotions
After you have set up your card, you will have to set up a Promotion to coincide with the loyalty program. Navigate to Promotions > Couponing Promotions as shown on the side.
You must give the promotion a Name and select the type ‘Bonus Points for Customer.’
At the bottom right of the screen is how the points are redeemed. The first box controls the increment that the points will be applied and the second box determines how much they are worth.
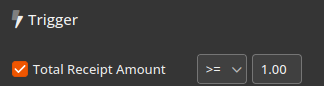
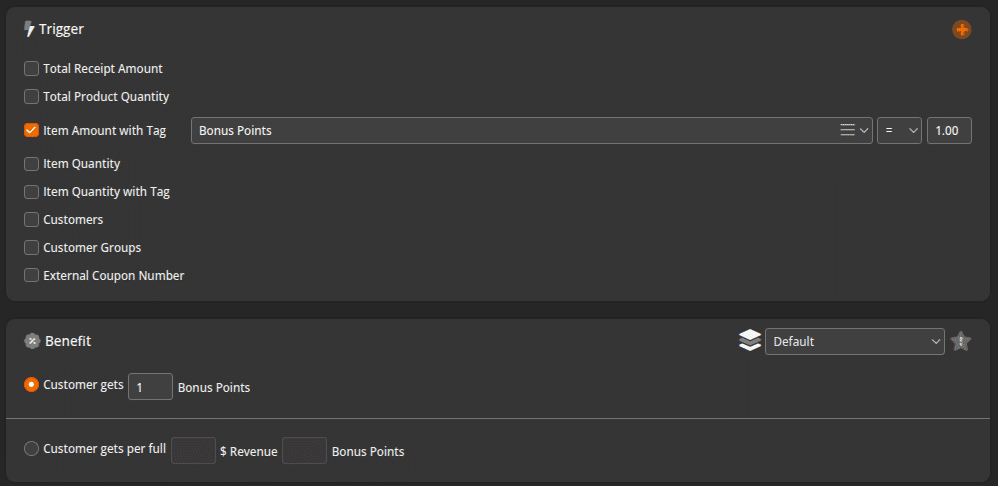
- On the right, setup the Trigger as Total Receipt Amount >= 1. This will activate the loyalty for anyone with a loyalty card. You can alternatively use Customer Group as the trigger to designate specific loyalty customers.

- Setup the Benefit. The first option, Customer gets __ Bonus Points, gives a set amount of points per transaction. The second option, Customer gets per full __ $ Revenue __ Bonus Points, is to set how many points they get per dollar spent. For example, Customer gets per full 1 $ Revenue 1 Bonus Points means they get 1 bonus point for every dollar they spend.
- Setup the Redemption of bonus points.
- The first option, Redemption (Monetary Value), means they get a dollar amount off for how many points they spend. For example, setting the first box to 100 and the second box to 10 means they spend 100 points for $10 off.
- The second option, Redemption (Percent Value), is similar to the above option but instead is a percentage off. For example, setting the first box to 100 and the second box to 25 means they spend 100 points for 25% off.
- The third option, Redemption (Product), means they get one free product (designated by a tag) for how many points they spend.
The above configuration is our most common configuration. Please note, loyalty points are calculated based on the full retail price of your products, not the discounted amount. If you would like to setup your Loyalty Program to ONLY accrue points on some items rather than all items you would need to add a tag to all of the items that you want to accrue points and adjust the trigger and benefit to match what is shown below:
Using a Loyalty Card at POS
Navigate to Settings > Button Configurations. Add a button on your screen of choice for function with the type being ‘Online Function’ with the value ‘Bonus Points’. Additionally, add another button with the type of ‘Function’ and the value of ‘Set Loyalty Card’.
When a customer has purchased a product that falls within your loyalty program, you may enter them into the program by typing out their number and hitting the button ‘Set Loyalty Card’ at checkout. Again, we recommend using something like their phone number so that it is easy for the customer to remember and keep the numbers unique in your database.
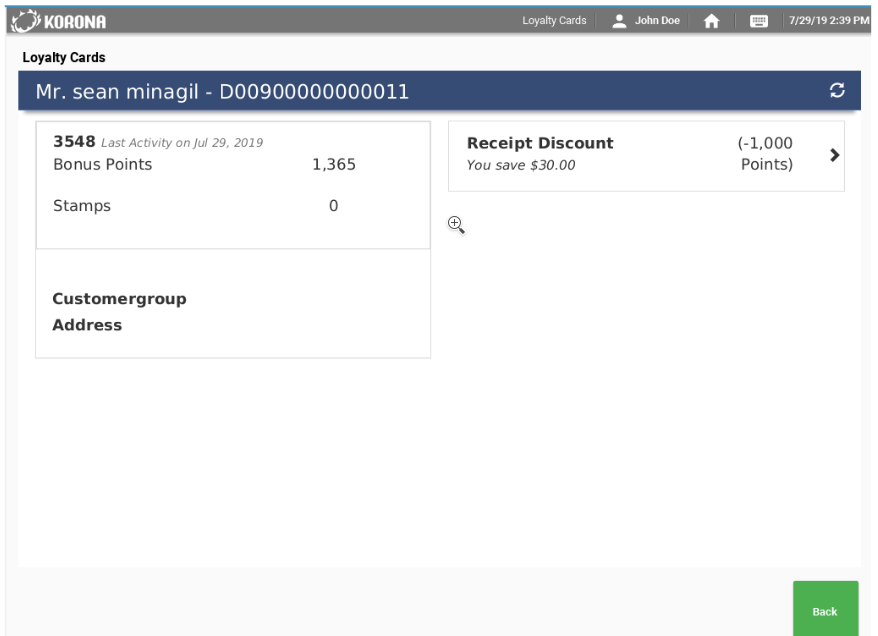
Once they have given you the number, enter it and click the button ‘Set Loyalty Card.’ (If the system doesn’t have that number on file it will create one) Then click the button ‘Bonus Points,’ and you will be prompted with this screen below.
Click ‘Receipt Discount’ to then apply the discount to the receipt. Remember that the item(s) you wish to discount must be set as “Discountable” under Sales > Products > Individual Product.
For a more in depth explanation of using the Loyalty Program at the POS please see this page:
https://manual.koronapos.com/how-to-setup-loyalty-program-on-pos/
Using a Stamp Card
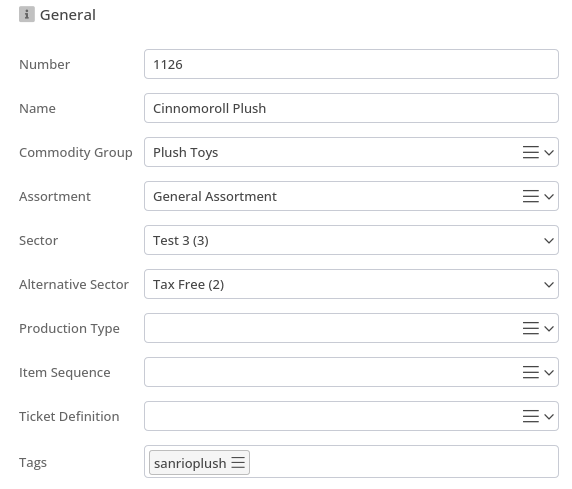
To use a stamp card, you will first need a product to correlate to your promotion and a tag placed on that product, as shown in the picture below.
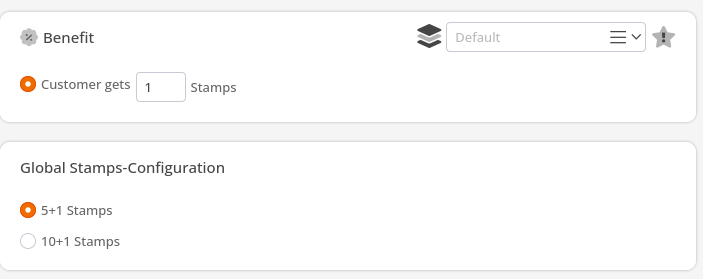
Second, you will need to set up a promotion of the type ‘Stamps for Customer’ with the benefit and configuration selected. In this example, we have the customer receiving one stamp for each singular purchase of an item, and five stamps will equal one item discount.
Below the initial selection, you may indicate when and where the promotion is active. Remember that you need to link the items included in the promotion by using the tag at the bottom of the page.

Items included in the promotion are, in turn, the items that stamps can be redeemed for. In the scenario we have presented, each sixth stamp will return one free item. To redeem a customer’s loyalty card item, simply assign the loyalty card at the time of checkout and total out the transaction. The item will then be deducted.
Also, make note that sales/purchases made prior to the loyalty card being assigned or the promotion being active will not be included in the customer’s account.
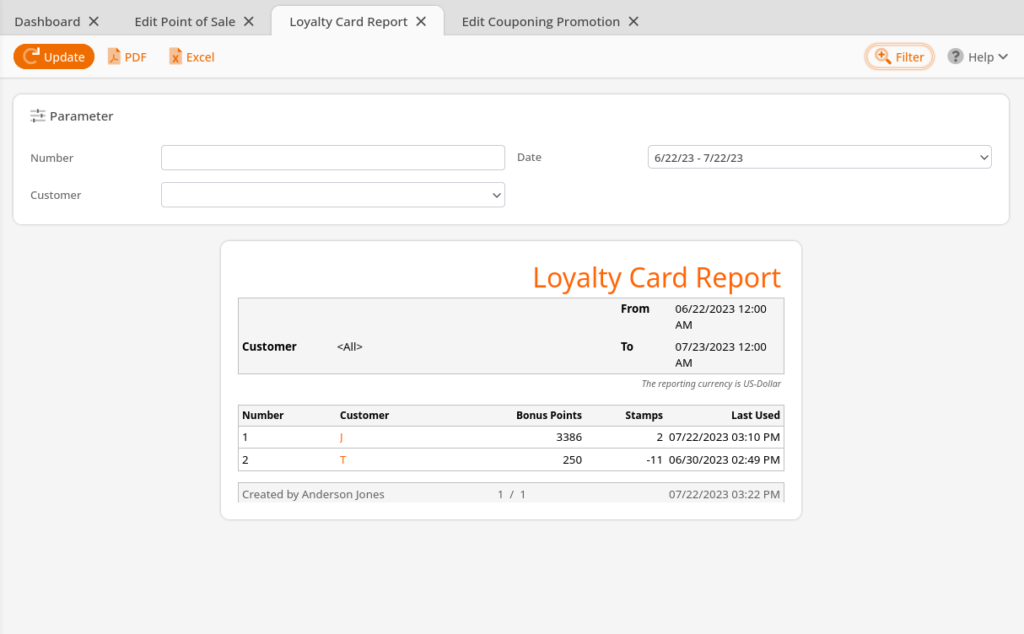
Loyalty Card Report
You may also access a Loyalty Card Report by using the More drop-down menu. This report can also be located under the Evaluations tab on your dashboard. If you are unable to locate it there, you may need to Edit Menu Entries.
This report may be filtered by Number, Customer, and a specific Date. Once the report loads, you will see the selected fields plus any Bonus Points and/or Stamps a customer might have. Additionally, you may click on the customer name for these additional menu options:
Finally, you may export this report into a PDF or Excel simply by selecting one from the top of the screen.