
Container Mode allows the POS to default to a product container instead of an individual product when selected.

This is a great feature for selling products that have the same bar code.
Container Setup
Below is an example of creating a container “product” that will be assigned to the product you wish to sell in that quantity under the container section. In this example, we create a 4-pack container product and then attach it to the Red Bull product so that if we use either the container conversion or the container mode icon, we can sell this at the price we assigned it at the 4-pack quantity.
Note
For more information on creating products, please refer to our Creating Products manual page.
Note
In order to track the inventory when selling your items in containers, you must fill out the Container Capacity field under the product as seen in the early part of the video above.
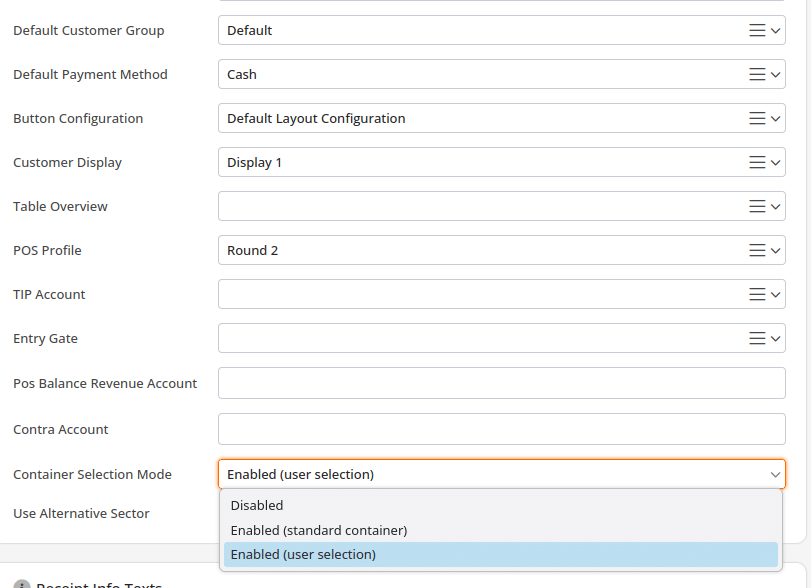
Container Selection Mode
There are three dropdowns for Container Selection Mode: Disabled, Enabled (Standard Container), and Enabled (User Selection). To activate Container Mode, you must choose Enabled.
Disabled
This is the default setting if you dont use containers or you can select to disable containers.
Enabled (Standard Container)
This is a foundation method, please see below or click here to learn more about this setting.
Enabled (User Selection)
The (User Selection) allows for a more streamlined process when using containers than (Standard Container). The setup for this is the same as the standard mode, however, it displays the data differently.
User Selection must be enabled in KORONA Studio from Sales>Points of Sale. Double click into the POS you want to activate this on and then go to Container Selection Mode.
When this mode is enabled, it changes how the containers are shown and selected on the POS.
You know you are in Container Mode when you see the box icon at the top right of the screen:
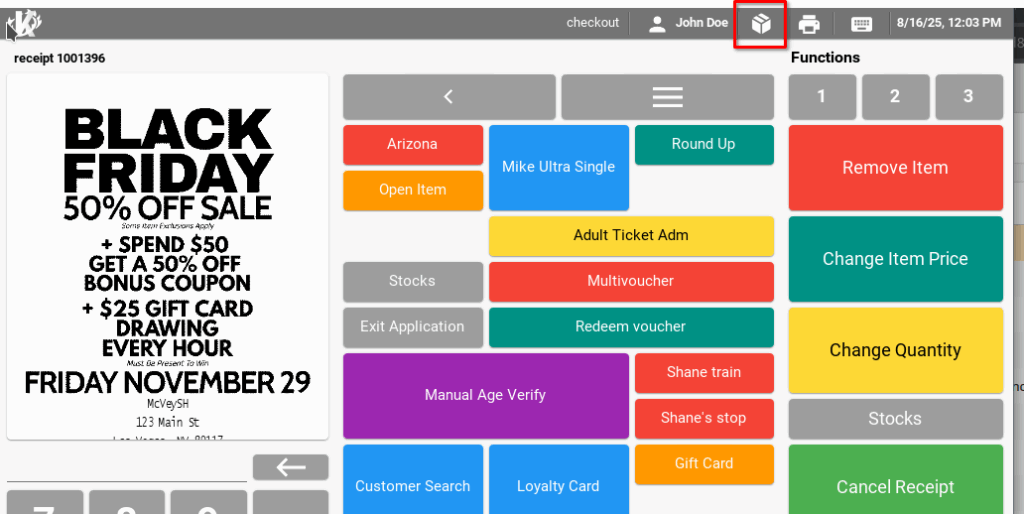
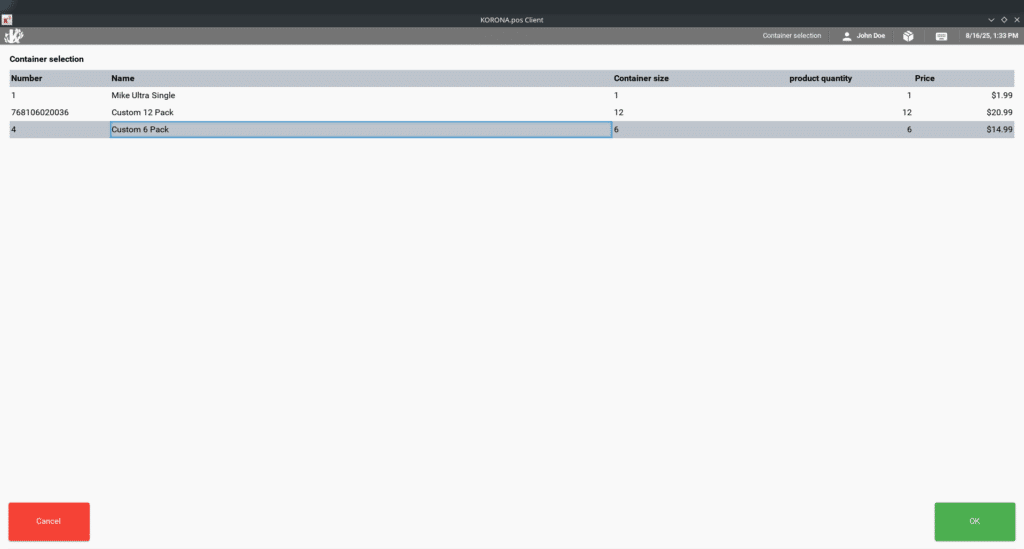
When you ring up a product that has container items attached to it, it will now display from a new screen where the cashier can select the different container options:
Legacy Container Selection Mode: Enabled (Standard Container)
Enabled (Standard Container)
Standard Container Mode in KORONA POS allows you to manage and sell products as containers, grouping multiple individual items into a single unit. This feature is particularly useful for businesses that sell multi-pack items or need to manage inventory by treating a group of products as one.
There are two ways to activate Container Mode in KORONA POS:
- Container Mode on POS
Activate Container Mode
This setting ensures that the POS defaults to treating products as containers rather than individual items. The Box Icon seen here below will be look like this when container mode has been activated. To activate this simply select the icon.

Note
Once activated, this setting applies to all transactions on that specific POS terminal until you change it back by selecting it again.
- Container Mode Button
Using the Button:
Pressing this button on the POS will toggle Container Mode on and off. When Container Mode is on, all products will default to their container configurations. Press the button again to switch back to individual product mode.
*Note: This method provides flexibility, allowing staff to switch between container and individual product modes during transactions.
Access Button Configuration:
Go to Settings > Button Configurations.
Select the button layout you want to edit.
Create Container Mode Button:
Click to add a new button.
In the function text field, type ‘container’.
Select ‘Switch POS Container Mode’ from the function list.
Click Save to create the button.
Convert Single Item to Container by Capacity
We recommend using the Convert Single Item to Container by Capacity function for businesses that frequently deal with products in multiple container sizes. This function allows you to quickly convert a single item into its container size based on capacity, making it ideal for managing inventory and sales efficiently.
How to Set Up and Use Convert Single Item to Container by Capacity
- Add the Function to a Button:
- In the Button Configurations section, add a new button.
- Type ‘container’ in the function text field.
- Select ‘Convert Single Item to Container by Capacity’ from the function list.
- Click Save to finalize the button.
- Using the Function:
- When you have a product that can be sold in different container sizes, simply enter the desired container capacity on the POS.
- Press the button to convert the product to match that container size.
- This function ensures that the correct quantity is applied, streamlining the process of selling multi-pack or bulk items.
Additional Container Mode Functions
In addition to our recommended function, KORONA POS offers several other useful container-related functions. These can be added as buttons for quick access: Click this button to select and remove specific sub-products from the container.
- Convert Container to a Single Item
This function breaks down a container back into its individual items.Useful for selling or returning items individually after they’ve been grouped. - Convert Single Item to Container by Product Number
Works similarly to the capacity function but uses the container’s product number.Enter the product number in the POS, then click this button to convert the item into the specified container. - Remove Sub-Products from Product Container
Ideal for containers that include promotional sub-products (e.g., buy one, get one at a discount)