Price rules are one way to apply price changes without using separate price groups or promotions. This is great if you want to offer your staff a discount on everything in the store. However, we recommend using our promotions feature to create and manage specials and discounts. For more information on promotions, please visit our Creating Promotions manual page.
Creating a Price Rule
Begin by going to the Price Rules screen and navigating to Promotions > Price Rules. Then, click on the +New button. In this screen, you will see various options for Conditions, Modifications, and Period of Validity.
Give your new price rule a Name, and assign it to an Assortment and Price Group. Make sure you also specify a minimum quantity. This determines how much of a certain product (determined in the conditions field) the person must purchase to trigger the price rule.

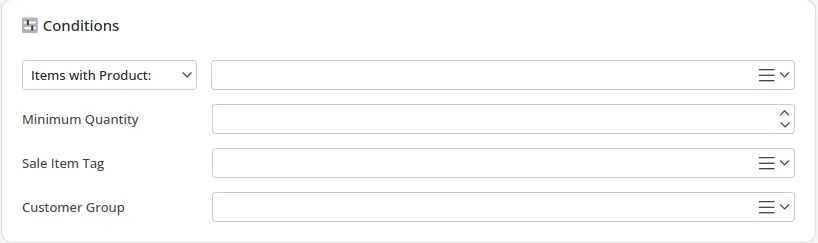
Conditions
Next, determine the conditions you wish to have for this rule to take effect. You can have it only apply to a certain Product, Products from a Tag, or a Commodity Group of products. If there is a minimum amount of items needed for this price rule, that can be specified under Minimum Quantity. If desired, you can apply this rule to a certain Customer Group as well.
For information on customer groups
Visit our Create Customer Group Manual Page. You may also need to add a button for that customer group to the terminal. Information on creating and adding buttons to terminals can be found on our Create POS Buttons / Button Configuration manual page.
Price Modifications
Within the Price Modification box, you have the ability to determine how you want the prices of the products to change.
The Operator is where you can choose to multiply, subtract, use a percentage, or even add to a price.
The Operand will be the factor or amount you wish to use.
For example, when taking 25% off the price of products, the operator is set to % and uses an operand of 75. The reason we have set this at 75 and not 25 is because KORONA POS will only be charging a percent of the price of a product. It will not remove a percent from that product. You can test the results of the operator and operand by using the Calculation Example field.

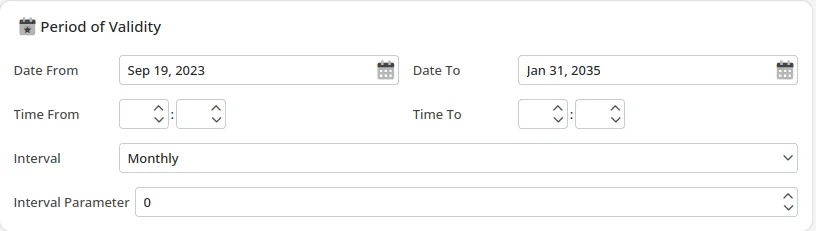
Period of Validity
In this section, you can determine the Dates and specify the Time at which this rule will take effect.
- Date: What month and day you would like this to take effect
- Time: What time of the day you would like this to occur on or between
- Interval: How long you would like this price rule to run for
- Ex: Singular(one time only), Daily, Weekly or Monthly
- Interval Parameter: This is specifying what day of the week or month you would like the price rule to be recurring on.
- Ex: The Monthly interval option gives you 1-31 choices. So if you chose number 15 it would be the 15th day of every month.
Example:
For the weekly interval, you can select a number between 0-6 and that defines what day of the week your price rule will run on.
- 0 = Sunday
- 1 = Monday
- 2 = Tuesday
- 3 = Wednesday
- 4 = Thursday
- 5 = Friday
- 6 = Saturday
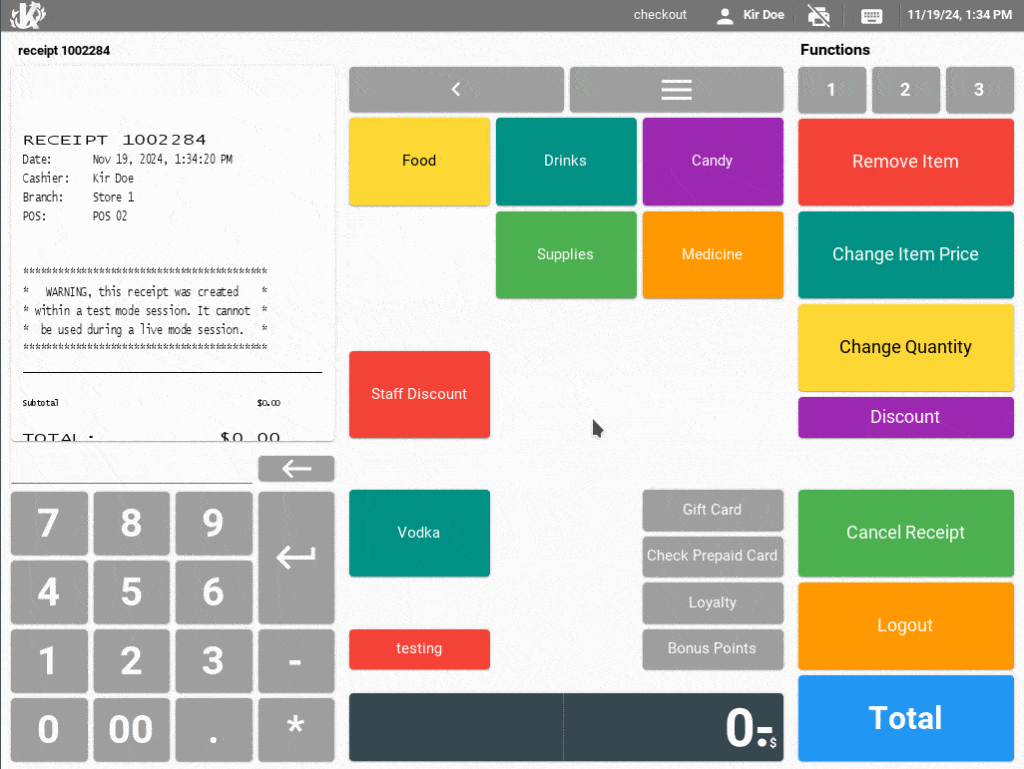
Use at the Terminal
Now that we’ve created our price rule. Let’s take a look at an example of how it would be used. This example assumes that the price group, customer group, and buttons have been created and assigned to the terminal.
The cashier begins by ringing up the order normally. They then assign the customer group “Staff” to the order by pressing the Staff Discount button. From there, they proceed to cash out the transaction.
Notice on the receipt how each item is now only being charged at 75% of its original price. This is because of the staff discount Price rule that was created earlier. The cashier proceeds to take payment and the transaction is finished normally.