
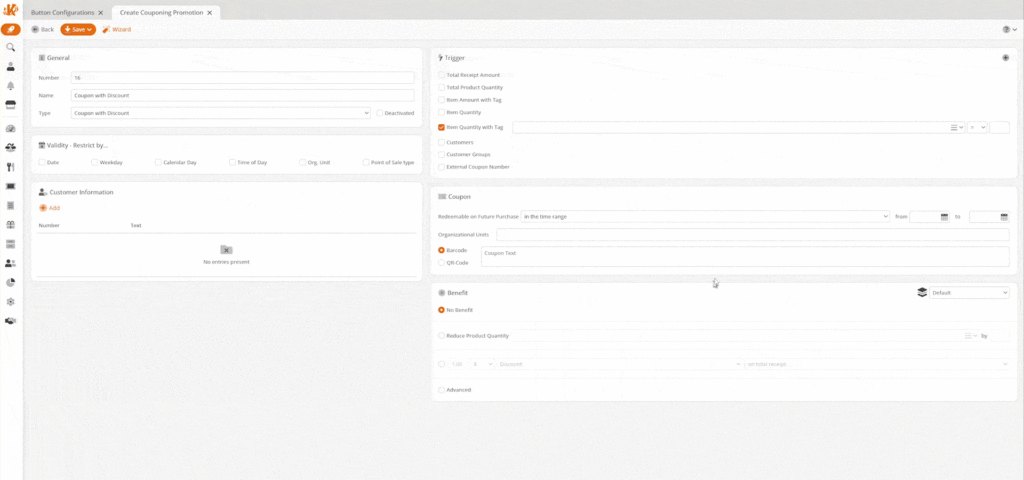
Go to the promotions page by navigating to the Promotions module on the left side, then select “Couponing Promotions.” Here, you can create new promotions or manage existing ones. To get started, click on +New.
Then select the type “Coupon with Discount.”
Trigger Box
The Trigger Box is where you will select what causes the customer to earn bonus points. This example uses products that are tagged ‘customercoupon.’

Coupon Box
In the first selection, you can select when the coupon starts being redeemable and for how long it stays valid. You do not have to fill anything out if you want it to function forever. You can also restrict which Organizational Units the coupon is valid for.
In the second box, you can select if the coupon that prints out has a barcode or a QR code. For a QR code to work, you must have a 2D scanner. You also have the option to insert text.
Additional Setup
You will also need to set up a production type and tie that production type to the printer on the POS profile and the products with the tag.
First, under Settings > Production Types, create a new Production Type with the trigger of “after payment” and the Production Method of “print voucher.” In this case, we have given it the name “coupon.“
Second, go to your POS Profile, find your Printer, and assign that production type by hitting +Add. Leave the “Print Template” and “Combined Print Template” blank.
Third, assign this production method to the product itself under “Production Type” on the left side.
Benefit Box
Here’s where you can select what benefits customers receive when they scan their coupon at the POS. In this example, we are saying they get a 10% discount on all the items on that receipt tagged ‘customercoupon.’
At the POS
When the customer triggers the promotion, their receipt will have an additional barcode at the bottom. This receipt is the coupon.
When they want to redeem the coupon, they present the receipt, and the cashier scans the barcode at the bottom (not the first barcode – that is the receipt number if you have “print receipt barcode” ticked on your receipt layout). On our example receipt, we have “here is your coupon” printed to indicate which barcode is the coupon.
Discount Management
It is also possible to select which promotion should apply first using Discount Management. You can define the different levels via Promotions > Discount Management. The different levels can then be set for each promotion under the Benefit area by selecting the drop-down arrow.
Additionally, there is a star with an exclamation point to declare that this discount is exclusive and no other discounts may work with it.
Finally, Discount Management levels can also be selected for Price Rules.