Various types of businesses might want to be able to run a credit card tab for customers as well as accept tips after the check has been closed. This is especially true if you are running a bar or a restaurant. If you want your customers to be able to apply tips using their cards after the initial authorization, you will need to configure post-authorization. If you want to allow your customers to open a tab on their credit card, pre-authorization will need to be set up. This page will guide you through configuring pre-auth and post-auth settings within KORONA POS.
For detailed information on creating payment methods, please visit our Payment Methods manual page.
Note* Not all processors and credit terminals support pre-auth and post-auth functions. The newer method is Tip Adjustment. If you have questions about Tip Adjustments please refer to our Tips/Tipping Guide manual page.
To see which type of authorization your processor would best support or recommend, reach out to them directly. Here is our Processor Contact page.
Setting up Credit Pre-Auth & Post-Auth
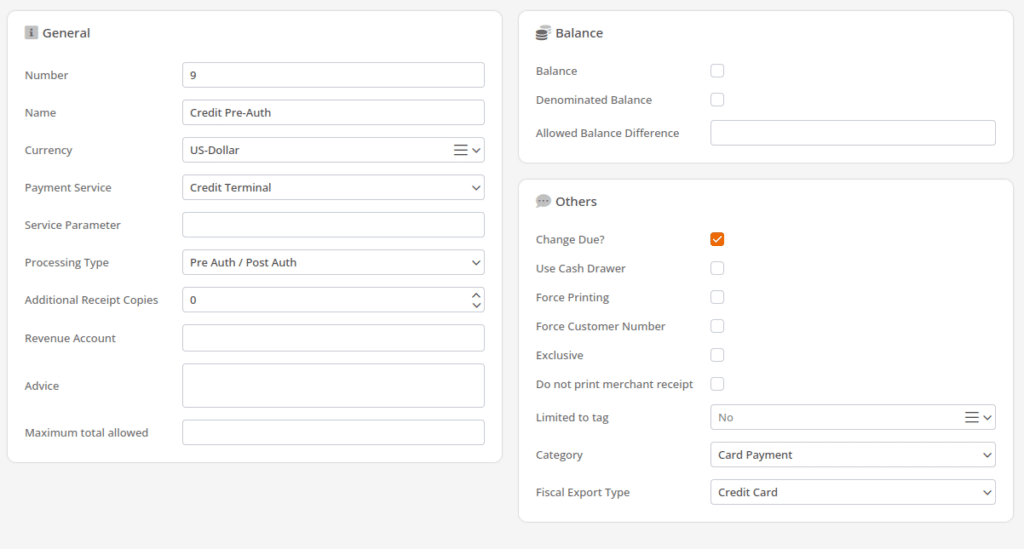
Begin by navigating to the Payment Methods screen and Settings > Payment Methods. Next, click the New button to open the payment method creation screen. Give your payment method a name. In this case, we are using the name “Credit Pre-Auth.” Select the payment service called “Credit Terminal.” For the processing type, you must choose “Pre Auth/Post Auth.” Set up your other options as desired. When finished, click Save at the top of the screen.
To use this payment method at the point of sale terminal, we will need to create a payment method button.
For detailed information on creating and assigning buttons to the point of sale, please visit our Create POS Buttons / Button Configuration manual page.
Creating the Pre-Auth/Post-Auth Button
Go to the Button Configurations screen by navigating to Settings > Button Configurations. Once at that screen, select the configuration that you wish to edit. Then, click Button Layouts to access the list of available button layouts.
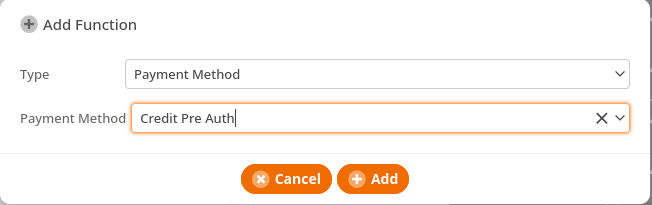
You need to find the payment layout since you are adding a payment method. Locate the layout “Payments” and select it to open the layout editing screen. Click a space and create your button. For this case, we are using the name “Credit Pre-Auth” and assigning it to the payment method that was already created. When you are done, save your button by clicking Save at the top of the screen.
Remember to Retrieve Master Data and restart the POS after adding your button. This will ensure that your new payment method has been added to the terminal.
Creating the Re-Open Receipt and Show Open Pre-Authorizations Buttons
Now that we have set up the ability to run pre-authorized transactions at the point of sale terminal, we will need to be able to reopen these receipts to apply additional charges or tips. This section will cover the setup of two buttons necessary to do this on the terminal.
Creating the Reopen Receipt Button
The Re-Open Receipt button allows us to re-open a receipt placed in the receipt archive. Using this button, we can re-open a receipt and add additional payments, change payment methods, or apply tips if desired.
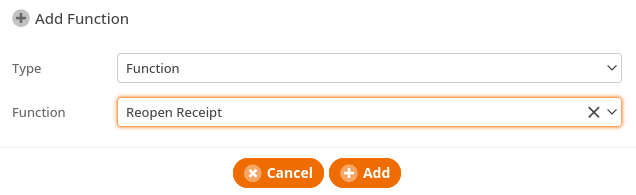
Begin by navigating to Settings > Button Configurations. Once there, select the Receipt Archive tab. Select a Layout from the drop-down menu and click on Edit. Select an empty space to create your new button. Click on Add Function. Set the Type to Function, and a new drop-down menu will appear. Select “Reopen Receipt.” Click on the Add button, and finally, click Save at the top of the screen.
Creating the Show Open-Preauthorizations Button
Now that we can re-open receipts, it is important that we also show open preauthorizations. This will greatly reduce the time it takes to search for open receipts.
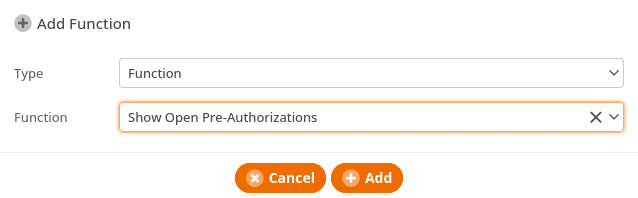
If you have not done so, go to your Receipt Archive button layout. Select a space and use the boxes on the left to create your new button. In the functions box, click Add Function. Set the type to function in the box that appears, and a new drop-down will appear. Set the function drop-down to “Show Open Pre-Authorizations.” Click on the add button and then click Save at the top of the screen.
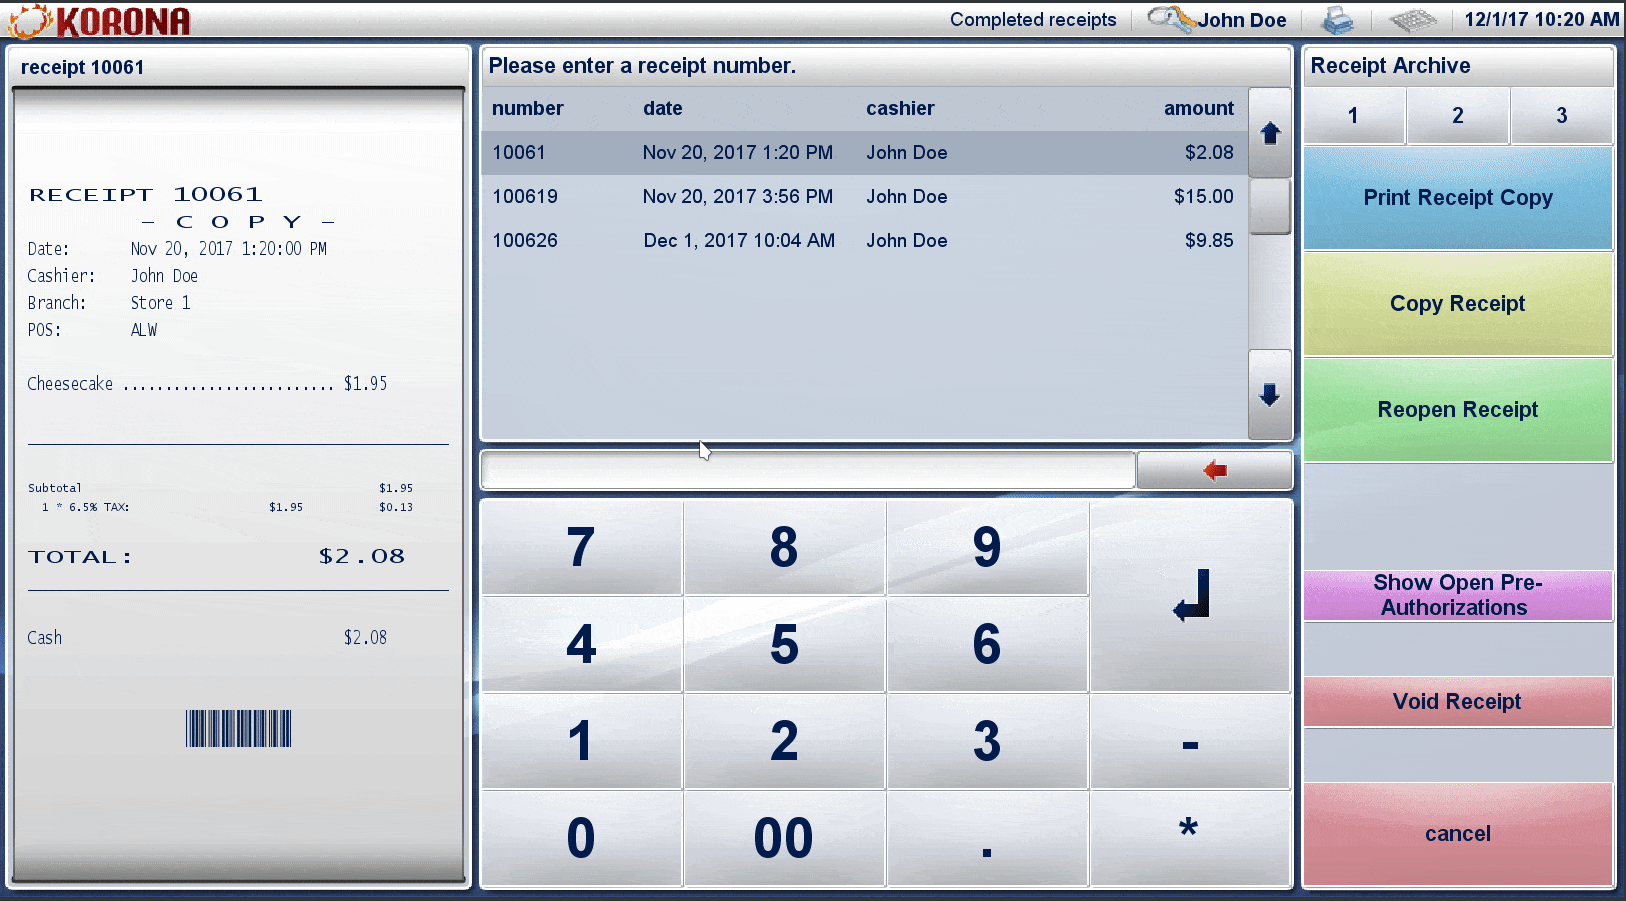
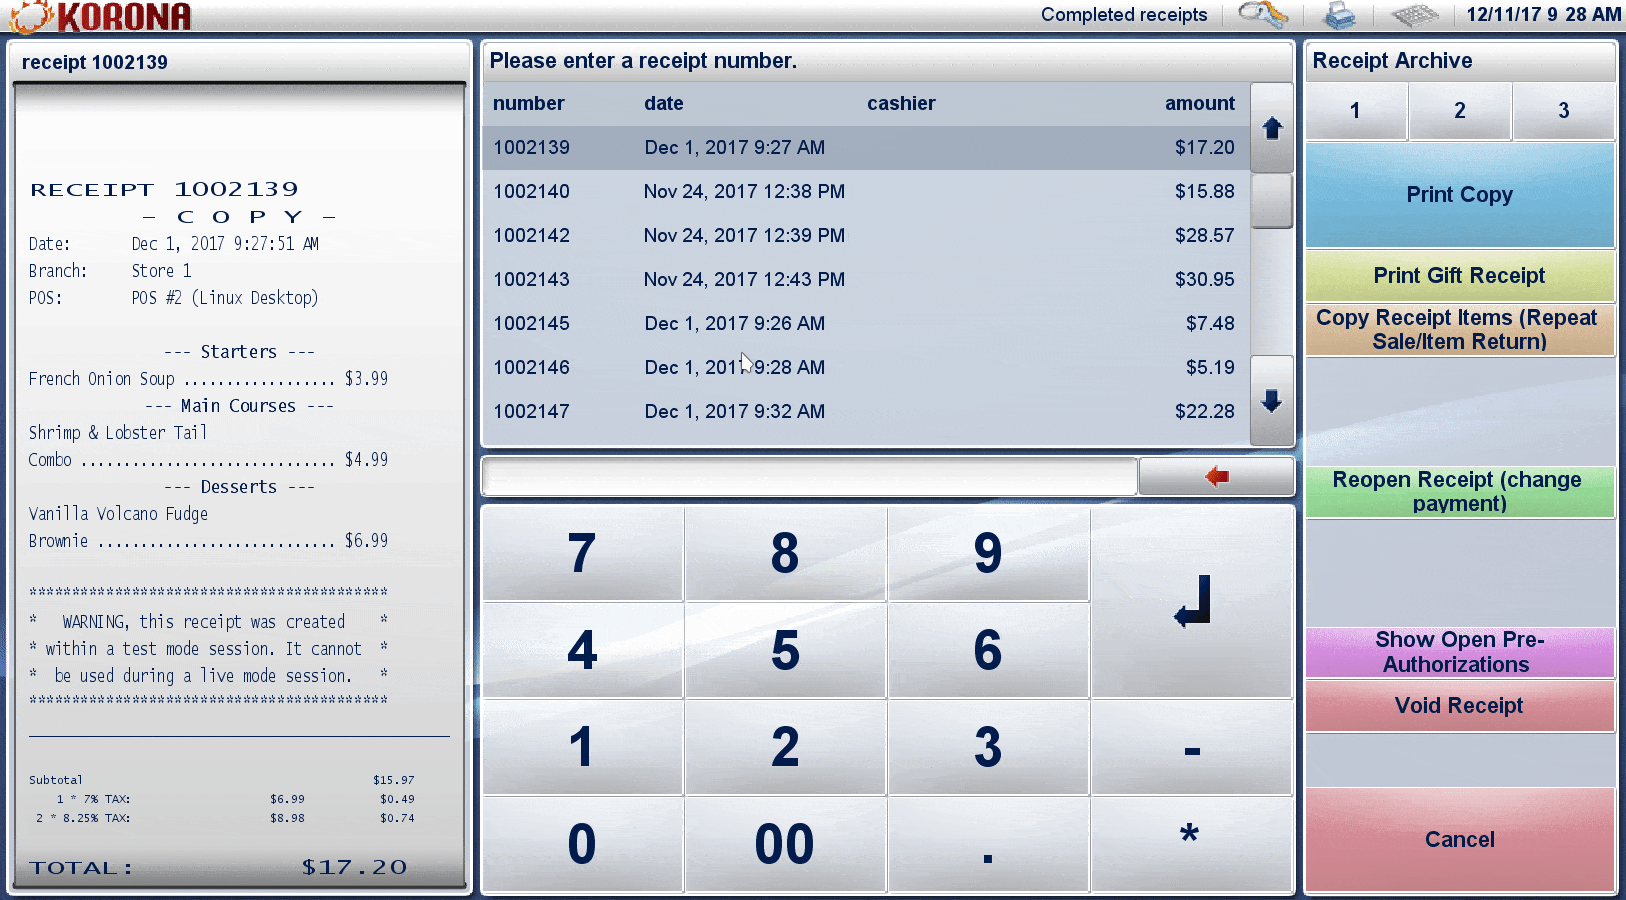
Showing Only Open Pre-auth Receipts at the Terminal
Here is an example of filtering out open pre-auth receipts at the terminal. You start with the receipt archive already open. A list of receipts is shown on the screen. You can either go through the list or use our newly created button to filter out the receipts we don’t need. You select the “Show Open Pre-Authorizations” button. Notice how the list changes to display receipts awaiting a post-auth transaction. We can select that receipt and close it out.
*Note: Make sure you Retrieve Master Data on any terminal these changes apply to. If necessary, you might need to restart the POS Software to download all of your changes.
Taking Pre-Auth at the Terminal
Now that you have created the Pre Auth/Post Auth payment method and added it to the terminal, you can use it to set up pre-charged transactions.
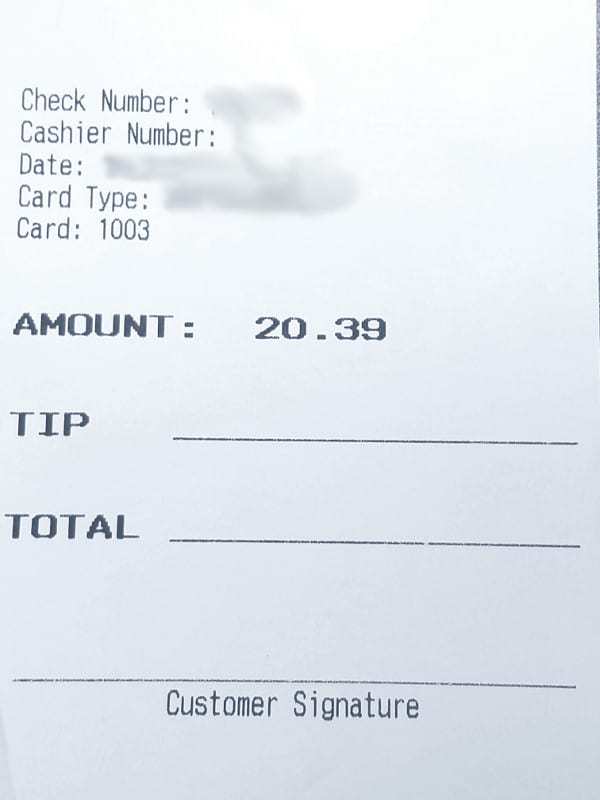
In this example, there is a new receipt with some items. Proceed to the payment screen and select the Credit Pre-Auth button that was created earlier. Add the amount you wish to charge and hit Enter. The card is run through the credit card terminal. When the receipt prints, you will notice that two receipts will print along with the itemized receipt. These tickets will allow the customer to provide a tip should they wish to do so.
Pre-Auth receipts will not be closed until they are finalized at the terminal, even if the customer has not left a tip or additional payment. To finalize the receipt, you need to go into the receipt archive, reopen the receipt, and add any additional payments. If the customer did not leave a tip, you must still enter “0” to close out the receipt. If an open receipt is not closed when the End of Day runs, it will not be approved, nor will the card be charged for any payment. Make sure you close out all receipts before running your end of day function.
For information on Tipping, please continue reading to the next section.

Setting up tipping in KORONA POS
If you are running a restaurant, bar, or any place that offers services, you will probably want to be able to take tips. KORONA POS allows you to take tips and keep track of them so that your employees receive the right amount on each paycheck.
The following section will review how to set up and configure tipping in KORONA POS.
Creating the Tipping Account
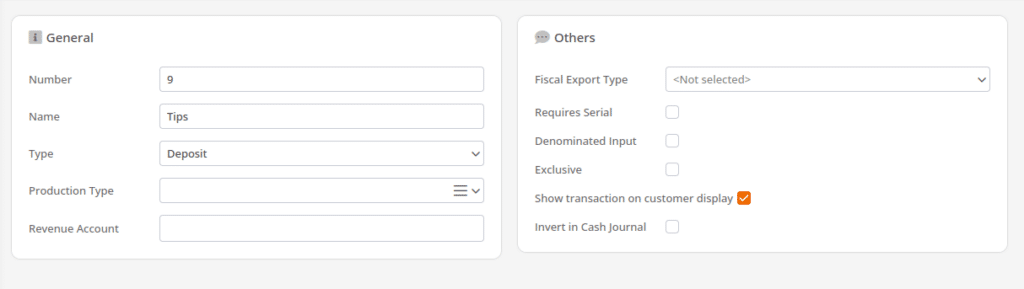
Begin by going to the accounts page and navigating to Settings > Accounts. Once you are there, click on the New button at the top of the screen. This will take you to the Create Account screen. Give the account a name. In this example, we are naming it “Tipping.”
Since we are taking in money for our servers/employees, set the account type to deposit. Set additional parameters as necessary. When done, click the Save button at the top of the screen.
For additional information on creating accounts in KORONA, please visit our Accounts manual page.
Assigning the account to the Point of Sale
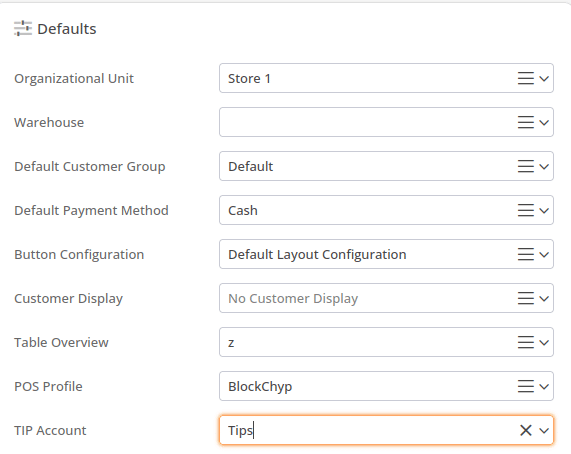
Now that you have created our tipping account, you must assign it to a point of sale terminal. Go to the Point of Sale screen by navigating Sales > Points of Sale. Then, select the point of sale to which you wish to assign the account. In the defaults box, locate the TIP Account drop-down and choose the account you wish to use to take tips with. In this case, we use our newly created “Tipping” account from above.
Once you are done, click the Save button at the top of the screen.
*Note: You must repeat this process for any terminal you wish to take tips on.
Creating the Apply Payment Tip Button
Now that the tipping account has been created and assigned to a terminal, you need to allow our cashiers to apply tips at the terminal. To do this, we must create a button for applying tips. Begin by going to the Button Configurations screen and navigating Settings > Button Configurations. Once there, select the configuration you wish to edit and click on button layouts at the top of the screen.
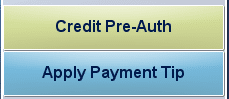
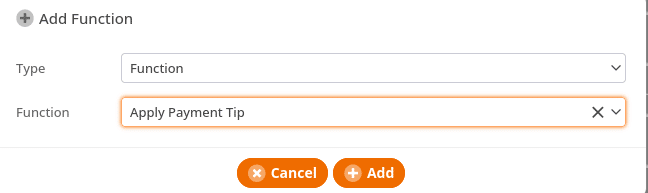
Locate and open the Payment Button layout. Select a space and create your button. For our example, we are naming it “Apply Payment Tip.” In the functions box, click on the Add Function. In the popup box that appears, select the type “Function” and set the function to “Apply Payment Tip.” Once done, click the Save button at the top of the screen.
Add the “Apply Payment Tip” button to the payment layout screen. This is the payment button layout that will open when you re-open the receipt to add your tip.
For detailed information on creating POS buttons and layouts, please visit our Create POS Buttons / Button Configuration manual page.
*Note: Make sure you Retrieve Master Data on any terminal this is applied to. If necessary, restart the software.
Use at the Terminal
Now you have created our tipping account, assigned it to a terminal, and given it a button. Let’s look at an example of how accepting tips works with KORONA POS.
Begin by adding items to the receipt. From there, hit the Total button to be taken to the payment screen. Notice that the Apply Payment Tip button is available. However, selecting that button now will create a pop-up asking for a payment method to be applied first.
We will need to run a credit pre-auth to take our tips. Select Credit Pre-Auth and run the transaction normally. The POS will have three receipts printed, one itemized receipt, and two receipts with lines asking for customer tips and the total amount to be charged.
In the example below, you will see the cashier re-opening an existing receipt using the functions from above. The cashier will apply a $2.50 tip to the receipt. The tip will be added to the receipt, and the total will now be adjusted. The card will be charged the final amount on the receipt, and the transaction will be closed.
Go to the receipt archive to view the receipt. If you are having trouble finding the receipt, you may filter receipts by using the “Show Open Pre-Authorizations” button.
*Note: This button must be added to the terminal for use. For detailed information on creating POS buttons and layouts, please visit our Create POS Buttons / Button Configuration manual page. The transaction will NOT be approved until a tip has been applied to the receipt. If no tip is provided, you must enter “0” when applying the tip.
Select the receipt and press “Re-Open Receipt.” If this button is not on the terminal, you must add it. You will be taken back to the payment screen with the receipt loaded on the left. Enter the desired amount and press “Apply Payment Tip.” A new item will appear at the top of the item list. This shows the name of the tipping account you created earlier and the amount to be applied. Pressing the enter button will finalize the transaction.