
The Print & Activate Ticket production type is ideal for when you are selling your tickets to your customers. They can be printed and activated from the point of sale terminal. Keep in mind this has nothing to do with kitchen tickets. For that, you should use the production type “print” without the ticket activation.
Creating and Applying “Production Types”
To go to the Production Type screen, begin by navigating to Settings > Production Types. Once you are on that screen, click the +New button.
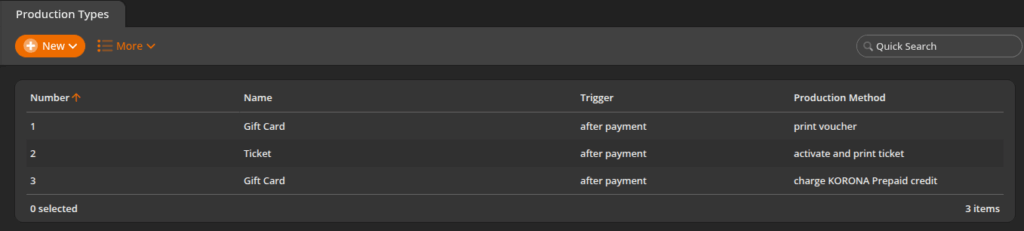
You will be taken to the Create New Production Type Screen. The Number field is already filled out. Give your new production type a Name, Trigger, and Production.
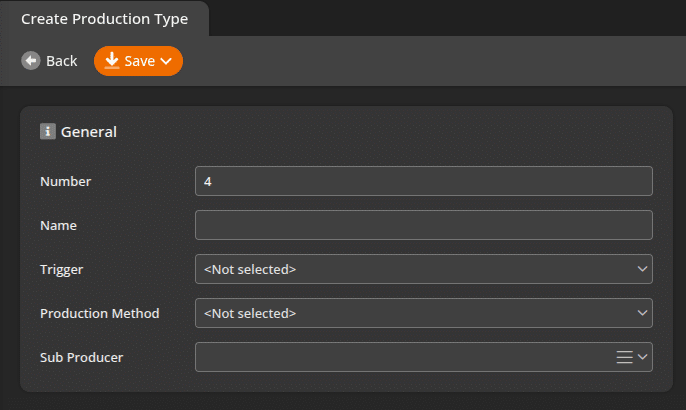
Triggers can be selected from the drop-down and can be set to: “after booking,” “after payment,” “after payment only,” “before payment,” “immediately,” or “manual only.”
*Note: For “manual” trigger type, you need to create a button with the type “function” and the function “trigger production.”
Once complete, you will need to choose the Production Method. You have the following options:
External System Call
External System Call Without Feedback
activate and print ticket
activate ticket
charge KORONA Prepaid credit
print binded
print ticket
print voucher
validate and print ticket
validate ticket
Select the “activate and print ticket“ option in the browser.
Finally, the sub-producer field assigns another production type that is already created to this production type. Once you have all your options set, click on the Save button.
Defining Production Types
Only Print: Will simply print the requested object and does not do any activation or validation if the object is a ticket.
Only Activate: Will allow for an activation of a linked ticket product but will not print a physical copy. This would be useful if you do not perform Ticket Validation at a physical location or if you are going to somehow redeem the ticket digitally without a physical counterpart.
Validate and Print: Will create a ticket that is Activated (allowed to enter), then Validate (auto enter the associated ticket), and then also print a copy. This would be useful when check-in occurs physically at the point of sale, and there is not a separate area where ticket redemption takes place.
*Note: Another usage with this is to attach this to a “dummy printer” in the POS profile. So that a ticket does not print, but you auto activate and redeem an admission any time a product with this production type is sold.
Print and Activate: This will create a ticket that is Activated (allowed to enter) and also print that physical ticket. This is most commonly used when the customer will need to present the ticket at the actual point of entry at which point the ticket will be Validated either with a POS, turnstile, or handheld entry scanner.
Assigning the Production Type to a Printer
Go to the POS Profile screen by navigating Settings > POS Profiles. Once you are there, select the profile you want to edit. You will then be taken to the edit POS Profile screen for that profile.
Now that you have created your production type, you will need to assign it to a printer to be able to use it. Printers are controlled from within your POS profile.
Scroll down to the devices section and select the printer you want to assign the production type to.
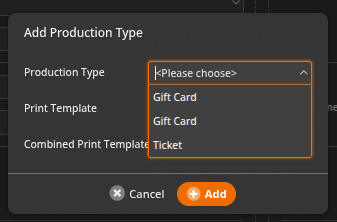
Expand the Production Type section and click on the Add Button. You will be presented with a popup drop-down menu. Select the production type you created earlier, “Print Order.” Leave the report file drop down as is for now. Click Add to have it added to that printer.
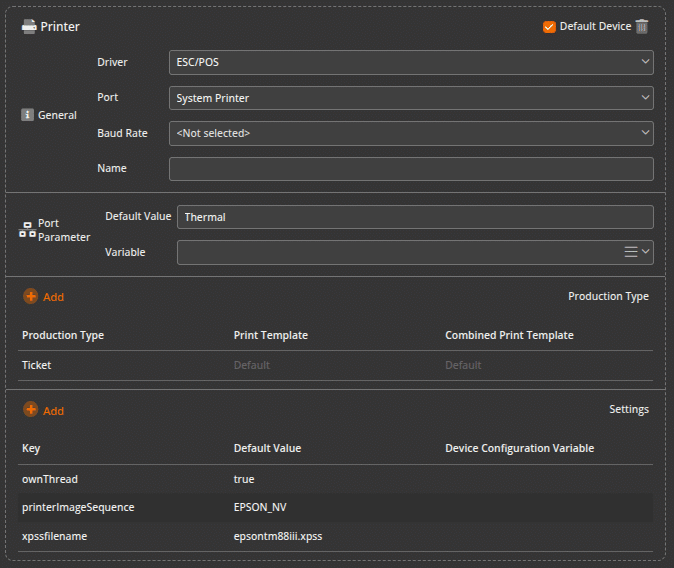
Once you are finished, you will need to save the profile by clicking on the Save button at the top of the screen. The production type is now ready to be assigned to a ticket for usage.
Assigning the Production Type to a Ticket The “Print & Activate Ticket” Function
Now that you created your Production Type and assigned it to a POS Profile, you will need to attach it to any ticket you created. This will allow the printing of your tickets so that they may be checked at your entry gates.
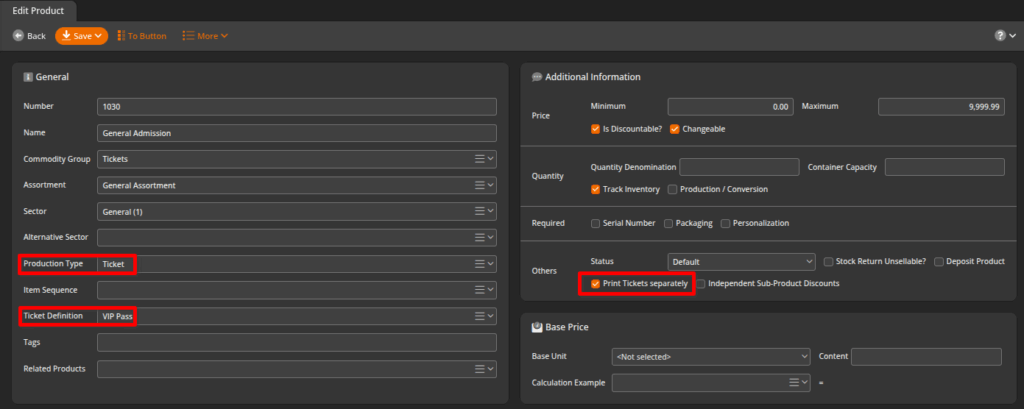
Go to the products screen by navigating Inventory > Products and selecting the ticket you want to add the production type to.
You will also need to have the ticket printed separately. Go over to the Additional Information section and tick “Print Tickets Separately.” This will have the ticket print separate from the receipt.
Go down to the Production Type box and select the “Print Order” type that you created earlier.
When you are done assigning your ticket to the production type, click on Save.
Whenever you ring up your ticket from the terminal, the ticket will print from the printer to which you have assigned the Print Order production type.
To ensure that your new type works, you will need to retrieve the master data and restart any point of sale that will be affected by this change.
Cancelling Production Type Items
Previously, generated production type items could not be reversed when printing to the kitchen or activating tickets. Now, this is possible!
If a generated item or a document with generated items is reversed, this reversal is passed on to the creator. This means that when printing in the kitchen, a cancellation document is sent to the kitchen printer, and activated tickets are blocked. The best part is that all this happens automatically, and you don’t have to do anything else!
But there is still one small limitation. When a ticket is canceled, the creator is not addressed because the ticket cancellation must also be possible offline. So, if you ever have to cancel a document that contains generated items, you have to notify the kitchen itself or manually block the tickets.