This is a beginner step-by-step guide to creating and receiving orders. For a more detailed page, please visit our Stock Orders and Stock Receipts manual page.
Store orders
If a product is being ordered frequently, creating a store order template will help facilitate the process. To create the store order from the back office, navigate to Inventory > Store Orders. Next, click New from the top of the page.
On the Create Store Order page, you will be presented with the following information: Order Number and Created On (Date). Next, Select a Target Warehouse and a General Delivery Date and click Save. You will now be able to add products to the store order by clicking the “Add Product” or “Scan Products” button.
Once you are satisfied with the order, click on the Save button at the top of the screen. If you are ready to place the order, click the Order button. You will be presented with a pop-up dialogue box with the following options:
- Finalize order and assign each item to a supplier and warehouse
- Finalize order and have items without supplier and warehouse deleted
- Order all items from a single supplier
- Order all items from a single warehouse
Once you have made your selection, click on the order button again. You may now view the order by navigating to Inventory > Stock Orders.
*Note: The stock order will still need to be booked and sent to place the order with a supplier or source warehouse. You are also able to add any product regardless of supplier. Each store order can create a stock order for each supplier.
Creating a New Stock Order
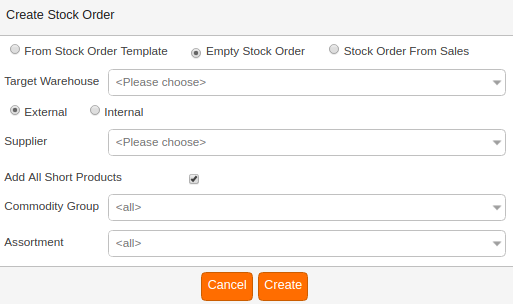
Navigate to Inventory > Stock Orders. Click New. Once the pop-up dialog box appears, choose Empty Stock Order. From the drop-down menu choose the target warehouse you are ordering for. Next, you will need to indicate if the order will be from an Internal Warehouse or an External Supplier.
Once you have made your selection, you may add All Short Products by ticking the checkbox. If you choose to do so, you may also specify a Commodity Group or Assortment. You may also leave the default set to ALL. Once you have all the desired selections, click Create.
Once done, you may add in products by using the +Add Products button or the Scan Products button. You may edit the Quantity, Container Amount, and Delivery Date for each product. Moreover, you may click on the orange drop-down next to each individual item for the following options: Remove Product, Edit Product, Store Prices.
Creating a New Stock Receipt
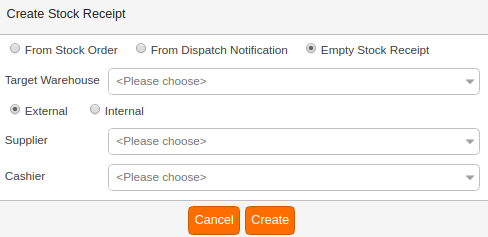
In order to receive items, start by navigating to Inventory > Stock Receipts. Click on +New and select Empty Stock Receipt. You must select a target warehouse – all other fields may be left set to default as <ALL>. Once you have made your selection, click Create. On the Edit Stock Receipt Page, once you have the desired products on the list, you may Assign the stock receipt to an Existing Stock Order, create a Dispatch Notification, and/or View Source.
You may also choose to select one from a manual search for a specific stock order. Once you have Assigned the Stock Receipt, you may then Book it. Once a stock receipt is booked there are no reversals. To undo the action, copy the stock receipt and enter in all negative quantities to negate the original stock receipt.
*Note: stock receipts may not be booked until they have been assigned.
Stock Receipts and Store Orders at the POS
You must create the Open Stock Management Receipt and Save Stock Management Receipt buttons to use at the POS. To learn more about creating buttons, please refer to our Creating POS buttons/Button Configuration manual page.
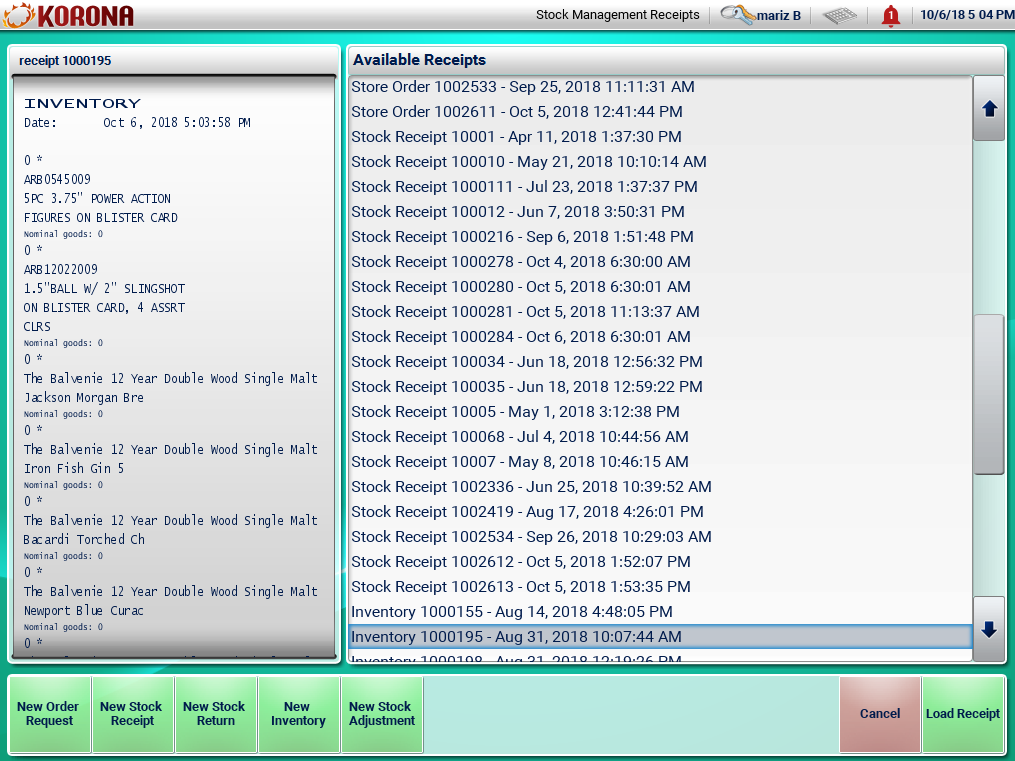
At the POS, select the Open Stock Management Receipt Button. Once the page launches all current Store Orders, Stock Orders, Stock Receipts, Inventory Counts, and Stock Adjustments will list. On this page, you may Create a New Order Request, New Stock Receipt, New Stock Return, New Inventory Count, and New Stock Adjustment. Or you may select any of the listed receipts for the option to Load Receipt. Once you have made your selection, proceed by ringing in any items you would like. Once you have selected your items for your order, simply click on Save Stock Management Receipt.