
Setting up Internal Transfers
Internal Transfers will move product stock from one location to another. These are done with Stock Orders or Stock Receipts.
You can do an internal transfer with a Stock Order or a Stock Receipt. Choosing which to use depends on your needs.
An internal transfer with a Stock Order will reduce the source warehouses stock level, while the receiving warehouse waits for the stock to arrive. After arriving, the receiving warehouse will create a Stock Receipt from that order to complete the transfer and add the stock to their warehouse.
An internal transfer with a Stock Receipt skips that first step, and immediately transfers the stock from the source warehouse to the receiving warehouse.
If you’re going to use Stock Orders, proceed to the next section. If you only need to use a Stock Receipt, skip to the “Stock Receipt” section after the “Stock Order” section.
Performing an Internal Transfer
Stock Order
- Navigate to Inventory > Stock Orders and click New at the top.
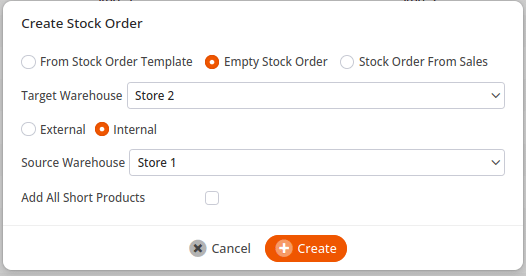
- Choose the option Empty Stock Order.
- Select your Target Warehouse, which is the location receiving the stock.
- Choose the Internal option.
- Then, choose the Source Warehouse, which is the location sending the stock.
You may also choose to Add All Short Products. This will add everything that is short of stock in the target warehouse and has stock available in the source warehouse. This also gives you the option to specify what commodity groups and assortments the short products should come from.
After creating it, add on all the products you wish to transfer. If you are sending singular products and not full cases (container amounts), then you can select the box for Order Single Items. Note that you will be prevented from transferring more than is available in the source warehouse.
When this happens, the quantity column will be set to 0. To bypass this, enter the quantity again to override it.
When finished, press the Book button at the top. This will take the stock out of the source warehouse, and add the stock to the target warehouses “ordered goods” section (this can be seen in Inventory>Warehouse).
Once the target warehouse receives the goods, the target warehouse staff will go back to the Stock Orders section and find the correct order. Then, the staff will open that order, go to More at the top and select Create Stock Receipt. Inside the stock receipt, the staff can verify all the goods were received and change the received goods amount if necessary. Once everything looks correct, they will book the stock receipt. This adds the stock to the target warehouse.
Stock Receipt
- Navigate to Inventory>Stock Receipts and create a new one.
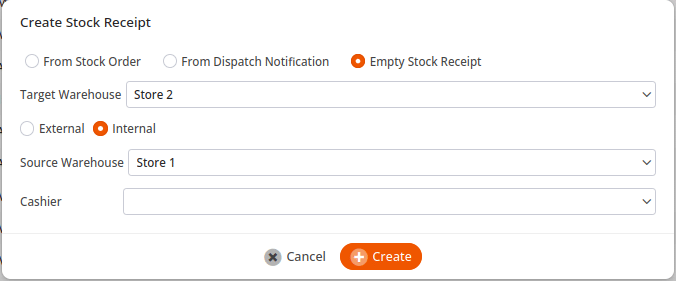
- Choose the third option Empty Stock Receipt.
- Select the Target Warehouse, which is the location receiving the stock.
- Then choose Internal, and select the Source Warehouse which is the location sending the stock.
- The cashier field is optional, if you would like to include which cashier is responsible for physically receiving the transfer. Then press Create.
Once the stock receipt is created, add the products on that you would like to transfer. Fill out the received goods column with the quantity of each product you are transferring.
When all the products you want to transfer have been added, click Book at the top. This will remove the stock amounts from the source warehouse and add them to the target warehouse immediately.
Internal Transfer Report
To view the internal transfer report, navigate to your evaluations tab. If you can’t locate it there, you must Edit Menu Entries.
This report may be filtered by Source Warehouse, Target Warehouse, Commodity Group, Date, and Booked Status, and you may also choose to show products within the internal transfer.
Once you have made your desired selections, click Update. Once the report loads, it will list the Source Warehouse, Target Warehouse, quantity of Stock Receipts, Item price, Received Goods, and a monetary Sum of products.
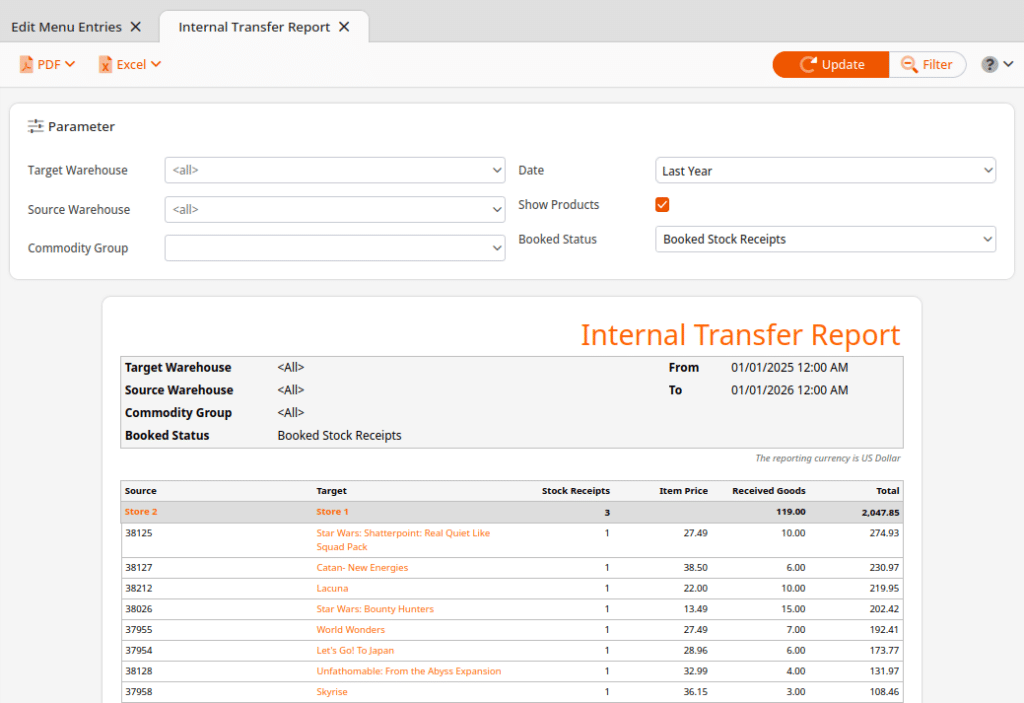
The Warehouse names will be highlighted in gray. You may select one of the names for an
additional drop-down menu.
By selecting one of the product names, these additional options will be available for selection: Edit Product, Product Report, Products per Weekday, Receipts, Stock History, Stock Return Rates.
Finally, you may export this report via PDF or Excel by selecting one from the top of the screen.