KORONA EVENTS is still under development at this time. As new features become available, this page will be updated. At this time some features that you see in the backend of KORONA EVENTS are not fully functional yet. If you have any issues setting things up or questions about how to do something that is not clear do not hesitate to email us at support@koronapos.com or call 833.200.0213
Getting Started
First, you will need to sign up for KORONA Event. KORONA Event is an additional application that interfaces with your KORONA Studio and POS. You can sign up here: KORONA Event
Once you have opened the sign-up wizard, you can log in. In the next step, you are asked for the name of your account. Keep in mind that this name will be used for the sub-domain of webshop, so choose wisely. If your account name is Toasted Ravioli, your webshop url will be ‘https://toasted-ravioli.shop.koronaevent.com’.
Once the account is created, you will be redirected to the login page and you can begin setting up the rest of your account details in the admin section.
KORONA Cloud
The first thing you will want to set up is your KORONA Cloud connection by going to your KORONA Cloud account. Under Settings>Data Exchange, add API by typing ‘API’ into the top bar and hitting ‘Enter‘. You will then have APIv3 integration. Under the APIv3 integration, create a User and Password with all of the permissions and hit ‘Save‘.
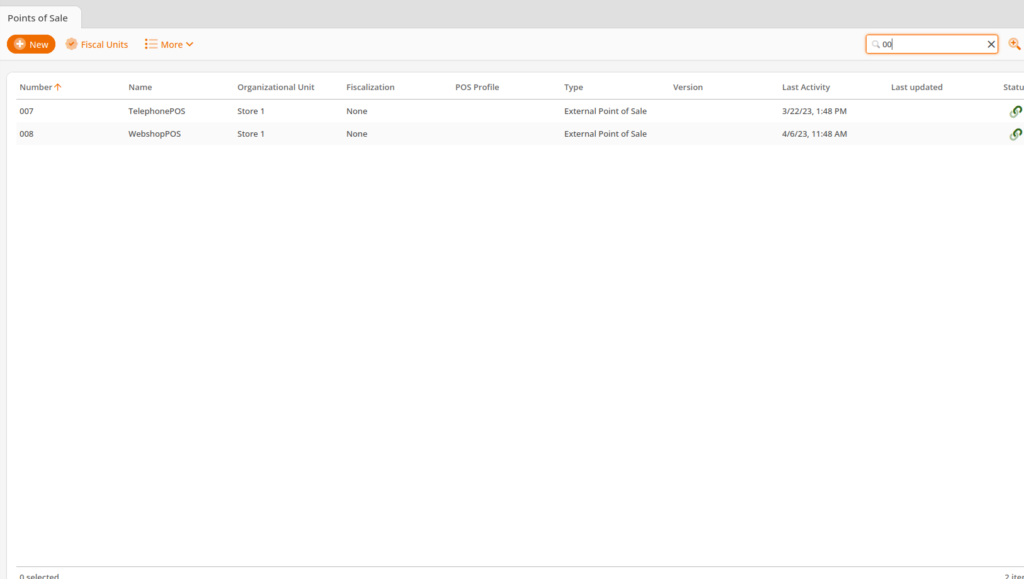
Next, navigate to Sales>Points of Sale. You may need to expand your account to add two more POS licenses. You will then create two new points of sale:
- Number: 007 Name: BackOfficeExternal
- Number: 008 Name: OnlineShopExternal
The numbers of the POS are important, but the names can be whatever you want them to be. If the numbers for the new POS are not 007 and 008 the Integration will not work.
Additionally under Settings>Data Exchange, type ‘API’ and enter to add a new API User and password. You will need this on the EVENTS side to enter in the next step.
KORONA Event
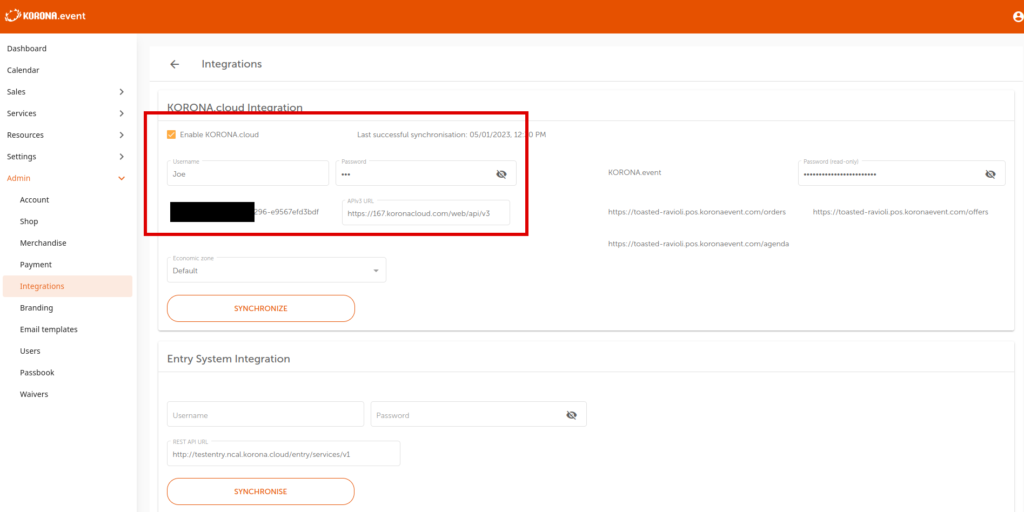
On the KORONA.Event side, navigate to Admin>Integrations.
Plug in your API login/pswd information along with your API Key, and hit ‘Synchronize‘.
From this page, you can also grab the information for the external system calls. We put these calls on the POS in order to sell Events from the POS.
EVENTS
You are now ready to start building Events! Please see the below links in regards to what you are going to build:
- Event: A one-off event that will definitely happen on one or a few specific dates.
- Event Template: A recurring possible event that customers can select their own time to book based on availability
- Admissions: A general admission ticket to your establishment.