This manual page will explain how to setup and customize the customer display for KORONA POS. For Windows POS hardware setups, the display needs to show up as a secondary monitor in the Windows settings.
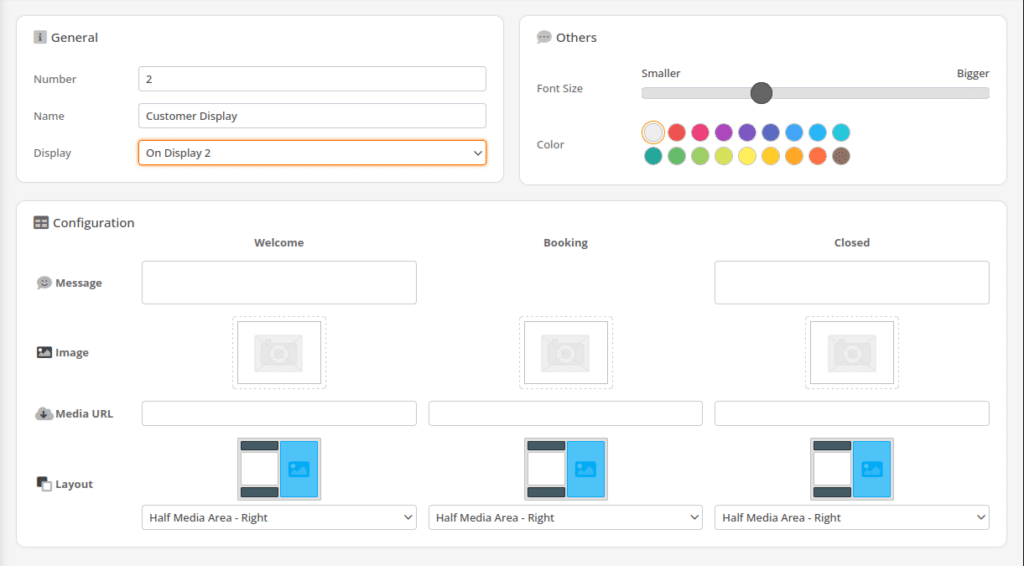
Create and edit your customer displays in Settings > Customer Displays. Create a new one, leave the number as is (it’s just an index), and give it a name. For Display you typically want to select “On Display 2”.
Adjust the Font Size on the customer display by moving the slider in the Others section. The color options are also in the Others section.
In the Configuration section, choose what you want to show on the Customer Display depending on what screen the POS is on.
- Welcome is displayed when the cashier is logged in and no products have been added to the receipt.
- Booking is displayed when an item has been added to the receipt. You can’t display text here because that is where the products are displayed.
- Closed is displayed when no cashier is logged in.
For each of those you can select one of the following:
- Message is for entering text that will display in the Receipt Area.
- Image is for uploading an image that will display in the Media Area.
- Media URL is for linking to a website or an image hosted on a website, and will display in the Media Area.
- Layout is for changing how much of the receipt and media area you want to display. There is options for all media, all receipt, or changing which side of the customer display each displays on.
After customizing the customer display, save it. Then go to Sales > Points of Sale and edit the POS you want to assign this customer display to. In the edit page, use the drop down menu for Customer Display and select the one you created. You can have different customer display configurations for different points of sale.
Restart the POS when you are done for the customer display to update for the first time. If the display already existed and you only changed the settings, retrieve master data to update it.
Accounts Configurable for Display
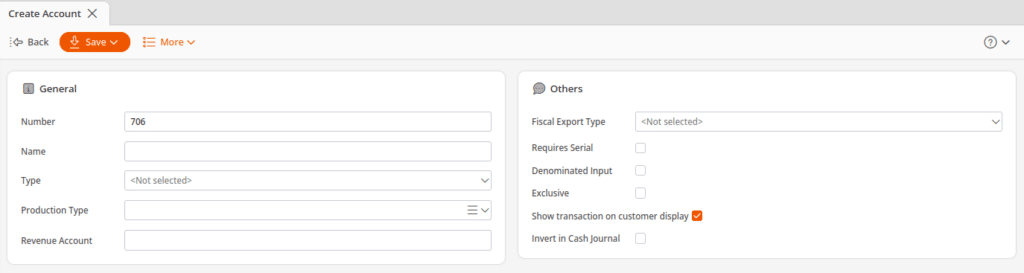
If you do not want an Account transaction to show on the customer display, such as cash deposits or cash drops, then you can disable that option. Go to Settings > Accounts and uncheck the box for “Show transaction on customer display”.
Setting up a Video on the Customer Display
The most common setup is to host a video on YouTube and then format the URL to auto-play and loop.
Let’s take this as an example of a regular video URL on YouTube:
You can add instructions in the URL that will allow it to play and loop automatically.
Hosting a Video Locally for the Customer Display
This will be most commonly used on a Windows-type PC. If you have a local video file that you wish to play on the customer display, it should be possible by creating a small HTML script seen below:
<html>
<body>
<video autoplay muted loop width=”100%”>
<source src=”file:///<path to video>”
type=”video/mp4″>
</video>
</body>
</html>
Once that html file is created, you can put the path for that file on the appropriate URL line.