Most USB barcode scanners will work out of the box when plugged into your terminal running KORONA POS. Nonetheless, below is a guide in the event you run into any issues.
Here are the common retail barcode types, how to enable your scanner to read them, and how to get the scanner to send the correct information to the software.
Scanner Vocabulary
First, understand that your scanner works as a keyboard input. When it scans a code it sends the corresponding set of numbers or letters to your computer just as you typed them into the keyboard. When using KORONA POS you may enter numbers into your keyboard end, then hit the “Enter” key. This will tell the software to search for the corresponding product. The scanner works the exact same way.
Below are specific instructions for your brand of barcode scanner, but the terminology will be similar.
When you scan a barcode, if you see that a number has been entered into the POS, but nothing else has happened, you will need to enable the scanner to send a “carriage return.” In other words, “press the ‘enter‘ key.”
When you scan a barcode, if numbers are added or subtracted to the end or beginning of the code, you will need to enable or disable “leading numbers,” “check numbers”, or possibly even the “country code.”
In order to change the settings on your scanner, you need to print out the set-up barcodes and scan them with your barcode scanner. Attached are product-specific quick-start guides and links to the full product manuals.
Leading Numbers, Check Numbers, and Country Codes
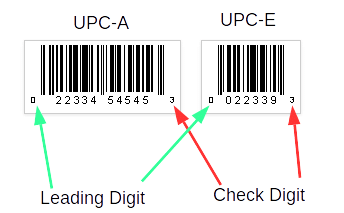
Below are examples of both UPC-A and UPC-E codes. The UPC-A code is 12 digits, while the UPC-E is 8. The first number is called the leading digit, and the last is called the check digit.
By scanning the UPC-A code, the scanner would enter “022334545453” into the KORONA POS software. By scanning the UPC-E, the scanner would enter “0223393” into the KORONA POS software.
If the UPC-A scans as “0022334545453” or the UPC-E scans as “00223393” then the country code is enabled. The country code for the USA is “0” and is invisible. This is known as EAN-13, the “13” meaning 13 digits (12 plus the country code).

1D vs 2D Scanners
In addition to different models of scanners, there are generally two types of scanners: 1D and 2D. The most prominent difference is that 2D scanners are capable of reading QR codes as well as reading data off of other screens (such as smartphones or tablets).
Product Setup
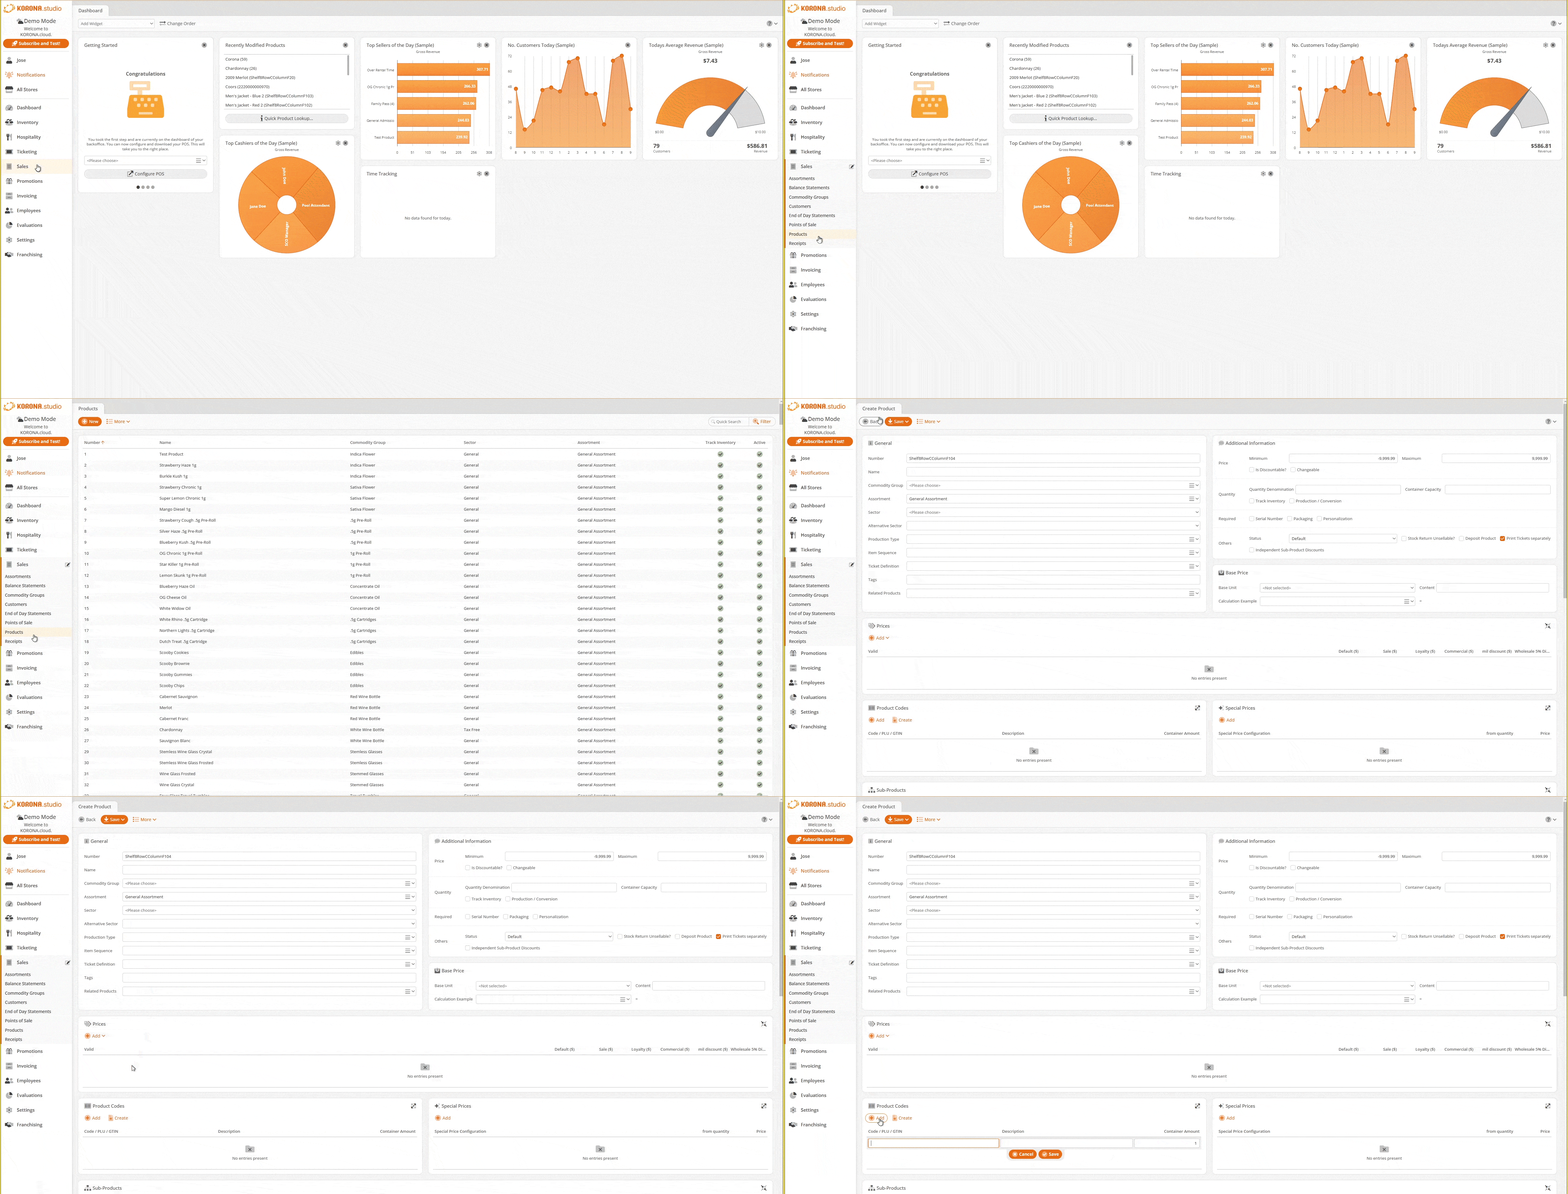
Below, you can see a product set up with a product number and a product code. All three numbers can be entered into the POS to add this item to the receipt, but all three must be unique and not attached to any other products. The product number can be the UPC code or a unique number that you create.
When creating a new item in the cloud, a unique product number is created for you. In the product code section, two numbers have been entered, 123456789012 and 2345678901. These two numbers represent the UPC-A code on the item with both the leading and check numbers turned on and off. No matter how your scanner is set up, you can ring this item in.
However, you must remain consistent throughout your product database. If you enter the UPC codes with the leading and check numbers, do that for all products and set your scanner up appropriately.

You can also use your scanner to enter products into your database. With your scanner attached to the computer accessing the cloud, click Add New Code, scan the item, and then click Save. Since your scanner is already set up, either by default or with your specifications, it will enter the code into the text field the same way it will when you attach the scanner to the POS terminal.
Honeywell Voyager 1400:
For instructions on adding a carriage return, adding or deleting check and leading digits, or removing the country code, download and print the following document: Honeywell Voyager 1400 Quick-Start Guide
Aures PS50 II:
For instructions on adding a carriage return, adding or deleting check and leading digits, or removing the country code, download and print the following document: Aures PS50II Quick-Start Guide
Motorola DS9208:
For instructions on adding a carriage return, adding or deleting check and leading digits, or removing the country code, download and print the following document: Motorola DS9208 Quick-Start Guide
Welquic Barcode Scanner:
- For a quick functions list, please refer to the Functions Card PDF.
- For a list of startup settings, please refer to the Functions Card PDF 2.
Below are the full product guides for the three scanners above in case you need to enable other scanner functions:


