
On this page:
Automated Fintech Invoice Import Tool
This integration fully automates the routine tasks of collecting, organizing, and updating business invoice spreadsheets from various suppliers. It acts autonomously to ensure that your business’s records are always up-to-date with the latest supplier data. This means you don’t need to manually enter products from spreadsheets or paper invoices, you only have to confirm the quantity and cost of goods match what was actually received.
It also assists in product creation. Any new products not in your current KORONA product list will have some fields auto populated from your supplier’s information: product name, UPC, and supplier information.
Getting Started With the Integration
The first step is to tell your Fintech representative that you would like to be setup for the KORONA integration. What this entails for Fintech is setting you up with .csv file exports to a FTP server.
Once they set this up, they will email KORONA support your FTP credentials, a list of your suppliers, and a list of locations (if you are a multi-store business).
Then, on KORONA.studio, you will need to add a KORONA.integration token to your account. You can do this by clicking on your username in the top left, going to My KORONA.studio Packages, and pressing Expand.

Typically only one KORONA.integration token is needed, but if you have over 8 locations you would need a second token.
Once your Fintech credentials are created and you add the KORONA.integration token, our support team will begin setting up the integration. This consists of setting up the actual service to run the integration, modifying any supplier names to match exactly how they are from Fintech, and modifying any commodity group names (e.g. Spirit → Spirits).
You will receive an email from support@koronapos.com once it is complete.
Using the Integration
Invoices from Fintech first get imported into your KORONA.studio account as a Dispatch Notification. These can be found under Inventory > Dispatch Notifications. If you do not see it listed there, please check how to edit menu entries.
In the dispatch notifications section, you will see a list of your invoices. The number on the left will be formatted as “invoice-####”, so that you can easily find which invoice you would like to finish. Each invoice is split up into it’s own dispatch notification (which also has it’s own supplier).
Editing a dispatch notification will show you the list of products that were received. The description box will contain the date of the invoice and the invoice number again. Below that, the comment section shows when it was processed by the import tool.
The main functionality of the dispatch notification is to allow you to see what products were not found/assigned when the invoice was processed. Any new or not found products will be marked with an orange ‘i’ to the left of the product name.

Pressing the 3-lines icon (hamburger menu) will give you 3 options:
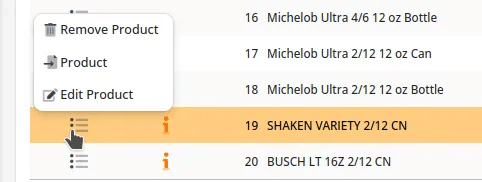
The first option allows you to remove the item from the dispatch notification completely. You may want to do this if you are unsure about the product, such as the name not matching any known item you have or if it was added by mistake. You can add products back on if they were removed at any time before you book the dispatch notification (or later on, the stock receipt).
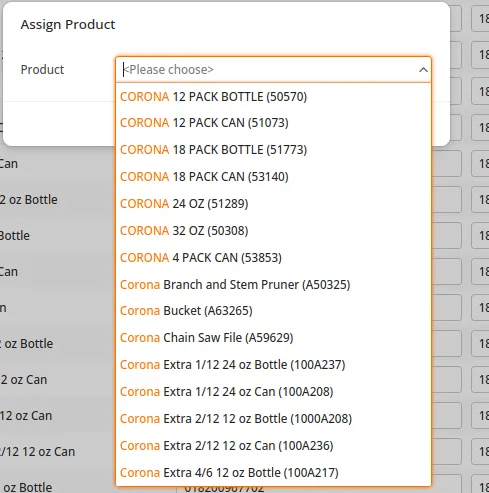
The second option allows you to assign this product to an existing product. You may need to do this if the item number from the supplier or the UPC has changed. Pressing the “Product” option shows a window with a search box, allowing you to search for and then assign the product. Once the product is assigned, the orange ‘i’ icon will disappear. After a product has been assigned and the dispatch notification is booked, that product will not have to be assigned again on future invoices (unless the information changes again).
The third option “Edit Product” will bring you to the normal “Edit Product” page where you can create this as a new product and add any necessary information. Some information you may want to add is price, commodity group, and track inventory. The information that will be filled out for you is the following: name, product code, and supplier information (supplier name, order code, container amount, item/container price).
Once you’re done assigning/creating any necessary products, go to More at the top and select “Book and Create Stock Receipt”. This will finish the dispatch notification (no stock quantities have been updated yet), and open up the screen for the Stock Receipt that was created.

If you did not choose any of the options for the not found/assigned products, then, once you go to book the dispatch notification it will give you this warning:
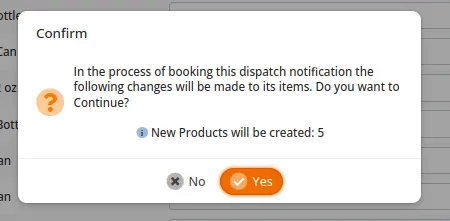
Pressing yes will create these products with the default information, which you can go back and edit later.
Once you have finished the “Book and Create Stock Receipt” step, you will be able to modify any quantity of received products (an example is breakage) and the cost of the products. In this step you would confirm everything matches what you actually received and how much is was received for, and then proceed like a normal stock receipt.
No quantity or costs are updated until the stock receipt is booked.
If you notice:
- Large amounts of products not being assigned/found
- UPC/Barcode not matching your products
- Quantities are not matching what you received
- Costs don’t reflect accurately
Please reach out to support@koronapos.com. Every store receives things in differently and there may need to be settings changed with the import tool to correct these issues. Examples of what doesn’t match and how it could be changed are appreciated. Our support team is able to modify the tool based on your needs to make this process as efficient as possible.