
In KORONA Studio, you have detailed control over how your POS handles end-of-day balancing. From how many attempts cashiers are allowed, to whether they see discrepancies, to how cash is counted, these settings help tailor the process to your business needs.
These configurations can be found in two main areas:
- Settings > POS Profiles for general balance behavior and report printing
- Settings > Payment Methods for how cash is counted during balancing
How to Configure Balance Behavior
- Log in to KORONA Studio.
- Go to Settings > POS Profiles.
- Select the POS profile used by your POS terminal.
- Scroll down to the Balance and EoD Statement sections.
Configuring Allowed Balance Difference
To set an acceptable difference in the cashier’s till count:
- Navigate to Settings > Payment Methods.
- Select and Edit the Cash payment method.
- In the Balance section, locate Allowed Balance Difference input field.
- Enter the maximum discrepancy amount you want the POS to accept between the counted cash and the expected total.
- Save your changes.
This feature allows minor differences in the cash drawer count to be automatically accepted by the POS, reducing errors or interruptions during the cash closing process.
Balance Section Settings
- Maximum Failed Balance Attempts
Set how many times a cashier can try to balance the drawer. If the correct amount isn’t entered within the allowed attempts, the system will accept the last entered value and proceed with closing. - Disable Blind Balance
When enabled, the system shows how much the drawer is over or short during the balance process. If left unchecked, the POS will operate in blind balance mode, meaning cashiers won’t see any differences and must enter the expected amount manually.
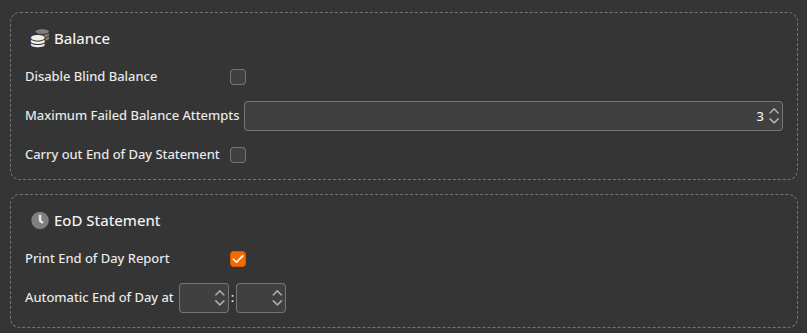
EoD Statement Section Settings
- Print End of Day Report
This option is independent of the “Carry Out End of Day Statement” setting. When enabled, the POS will print a physical copy of the End of Day report after balancing. Tip: If you don’t want cashiers to view sensitive business metrics (like revenue totals or payment breakdowns), you may want to leave this option disabled. - Automatic End of Day at [Time]
This allows you to configure the system to automatically close the POS at a specified time each day.
Configuring Denomination-Based Cash Balancing
To change how cash is counted during the balancing process:
- Navigate to Settings > Payment Methods.
- Select the Cash payment method.
- In the Balance section, enable Denominated Balance.
This allows cashiers to enter the number of each bill and coin (e.g., 3x $10 bills, 4x quarters) rather than entering a lump sum.
This approach improves accuracy and accountability in the cash closing process.