
On this page:
Overview
The KORONA E-Commerce Connector creates a powerful integration between your WooCommerce store and KORONA POS. This plugin enables bidirectional synchronization of products, sales, and inventory levels, ensuring your online and offline operations stay perfectly aligned.
Key Features
- Automatic Product Synchronization: Products sync from KORONA to WooCommerce
- Real-time Sales Upload: WooCommerce orders are uploaded to KORONA Studio
- Inventory Level Synchronization: Stock levels stay synchronized between systems
- Tax Mapping: Configure tax categories between KORONA and WooCommerce
- Configurable Sync Frequency: Default 10-minute intervals with customization options
- Detailed Error Reporting: Comprehensive logging and error notifications
System Requirements
WordPress Requirements
- WordPress 6.8.1 or higher
- WooCommerce 9.8 or higher
- PHP 7.4 or higher
KORONA Requirements
- Active KORONA POS account
- API access enabled in KORONA.studio
- Valid API credentials (Please visit this link to learn how to add API Credentials for Woocommerce: API Credentials
Installation
Method 1: WordPress Plugin Upload (recommended)
- Download the plugin: KORONA WooCommerce Plugin
- In WordPress, navigate to Plugins > Add New > Upload Plugin
- Choose the plugin zip file and click Install Now
- Click Activate Plugin
Method 2: Manual Installation
- Download and extract the plugin files
- Upload the plugin folder to
/wp-content/plugins/directory - Activate the plugin through the Plugins screen in WordPress
Initial Setup
Step 1: Access Plugin Settings
- Navigate to Settings > KORONA in your WordPress admin panel
- You’ll see the setup steps and configuration options
Step 2: Enter KORONA API Credentials
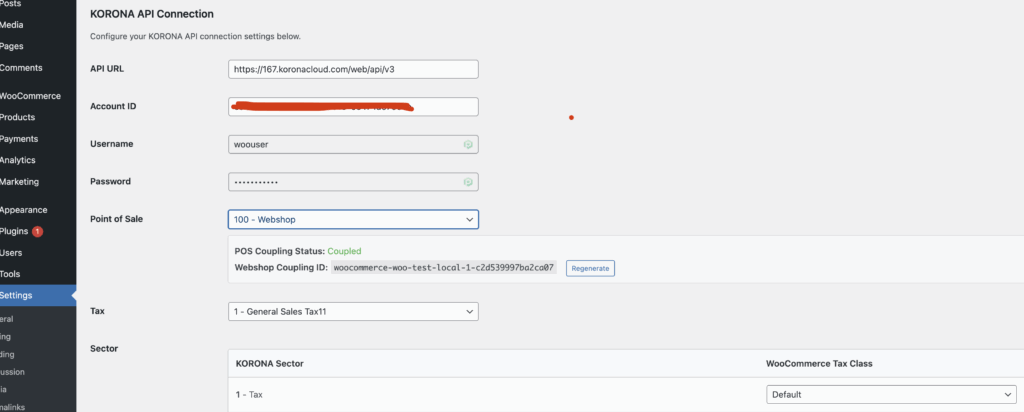
You’ll need to obtain these credentials from your KORONA.studio account:
- API URL: Usually
https://167.koronacloud.com/web/api/v3 - Account ID: Your KORONA account UUID (36-character format)
- Username: Your KORONA API username
- Password: Your KORONA API password
To find these settings in KORONA.studio:
- Log into your KORONA.studio account
- Navigate to Settings > Data Exchange > API
- Copy the required credentials
After filling these fields, press Save Changes
Step 3: Configure Basic Settings
After entering your API credentials and saving:
- Select Point of Sale: Choose the POS location for your WooCommerce store
- Important: The POS must be configured as “External POS” type in KORONA.studio
- Only External POS locations will appear in the dropdown list
- Once you have selected a POS, press Save Changes again
- Now your POS will be selected. Press Couple POS to assign the External POS to the WooCommerce Plugin
- Select Tax: Choose the appropriate sales tax configuration
- Configure Sectors: Map KORONA sectors to WooCommerce tax classes
Step 4: Advanced Configuration
- Draft Setting: Choose whether new products should be published automatically or saved as drafts
- Category Sync: Enable/disable category synchronization
- Debug Mode: Enable for troubleshooting (logs to WordPress debug.log)
Configuration
API Connection Settings
| Setting | Description | Format | Required |
|---|---|---|---|
| API URL | KORONA API endpoint | URL | Yes |
| Account ID | Your KORONA account identifier | UUID (36 chars) | Yes |
| Username | API authentication username | Text | Yes |
| Password | API authentication password | Text | Yes |
POS and Tax Configuration
Point of Sale Selection
- Choose the specific POS location that will receive WooCommerce orders
- POS Type Requirement: The POS must be configured as “External POS” type in KORONA.studio
- Only External POS locations will be available for selection
- This determines where sales are recorded in your KORONA system
Tax Configuration
- Select the appropriate sales tax from your KORONA configuration
- This ensures proper tax handling for online orders
Sector Mapping
Map KORONA sectors to WooCommerce tax classes:
- KORONA Sector: The sector as configured in your KORONA system
- WooCommerce Tax Class: The corresponding tax class in WooCommerce
Important: KORONA does not control how taxes are charged in WooCommerce. This mapping only sets tax classes for imported products. Ensure you have appropriate tax rates configured in WooCommerce.
Sync Preferences
Product Publishing
- Add New Products as Draft: New products from KORONA are created as unpublished drafts
- Publish New Products Automatically: New products are immediately published and visible
Category Synchronization
- Enable Category Sync: Synchronize product categories from KORONA to WooCommerce
- Disable Category Sync: Only sync products, not their category structure
Core Functionality and Synchronization
Product Synchronization
How It Works
- Direction: One-way sync from KORONA to WooCommerce
- Frequency: Every 10 minutes (configurable)
- Scope: Products, inventory levels, and categories (if enabled)
What Gets Synced
- Product names and descriptions
- Product prices
- Inventory levels
- Product categories (if enabled)
What Doesn’t Sync
- WooCommerce product changes are NOT uploaded to KORONA
- Product modifications should be made in KORONA
Order Processing
How It Works
- Direction: One-way upload from WooCommerce to KORONA
- Trigger: When WooCommerce orders are completed
- Destination: Your selected POS location
Order Data Transferred
- Customer information
- Product details and quantities
- Order totals and tax information
- Payment method (recorded as a note)
Order Status Handling
- Order Upload Trigger: Orders are uploaded to KORONA when they reach “Completed” status in WooCommerce
- Failed Uploads: Failed uploads are retried automatically
- Error Notifications: Error notifications are sent to admin email
Order Status Synchronization
- Completed Orders: When a WooCommerce order is marked as “Completed”, it gets uploaded to KORONA as a sale transaction
- Cancelled/Refunded Orders: When a WooCommerce order is cancelled or refunded, the corresponding transaction in KORONA is automatically voided
- Void Process: Voiding in KORONA is irreversible – once an order is voided, it cannot be undone or reactivated
- Reactivation: To reactivate a voided order, a new order must be created in WooCommerce and completed again
Important: The voiding process in KORONA is permanent. If you need to reactivate a cancelled or refunded order, you must create a new order in WooCommerce and complete it to generate a new transaction in KORONA.
Inventory Management
Real-time Synchronization
- Inventory levels sync from KORONA to WooCommerce
- Stock updates occur every 10 minutes
- Out-of-stock products are automatically hidden from WooCommerce
Stock Level Accuracy
- Ensures customers see accurate availability
- Prevents overselling
- Maintains consistency between online and offline operations
Automatic Sync Schedule
Default Schedule
- Frequency: Every 10 minutes
- Trigger: WordPress cron system
- Scope: Products and inventory levels
Customizing Sync Frequency
To change the sync frequency:
- Install a cron management plugin (e.g., WP Crontrol)
- Navigate to Tools > Cron Events
- Find the
korona_sync_eventtask - Modify the schedule as needed
Manual Sync
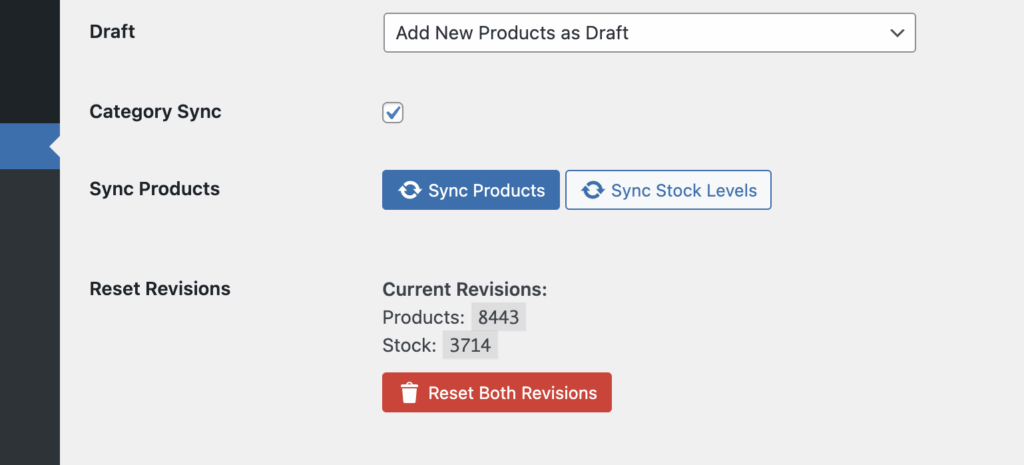
You can trigger synchronization manually:
- Go to Settings > KORONA
- Scroll to the Sync Status and Logs section
- Click Sync Products button
Sync Status Monitoring
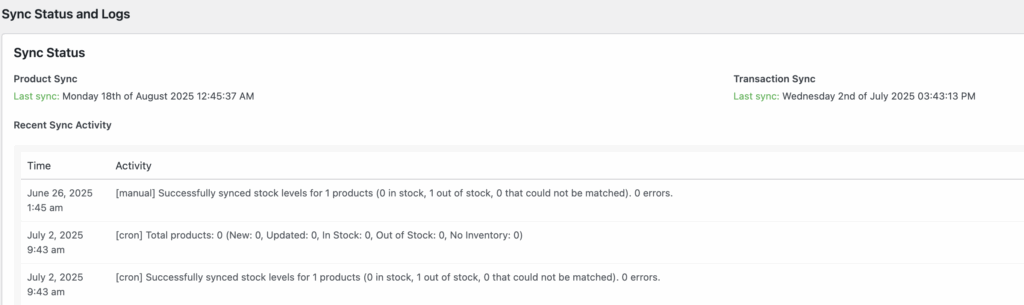
Status Indicators
- Product Sync: Shows last successful product synchronization
- Transaction Sync: Shows last successful order upload
- Error Logs: Displays recent sync errors and warnings
Debug Information
When debug mode is enabled:
- Detailed logs are written to
wp-content/debug.log - Error messages include timestamps and context
- API communication details are logged
Troubleshooting
Common Issues
Sync Not Working
Symptoms: Products not updating, orders not uploading
Solutions:
- Enable debug logging in plugin settings
- Check WordPress debug.log for error messages
- Verify API credentials are correct
- Ensure cron jobs are running properly
Connection Errors
Symptoms: “Could not connect to KORONA API” messages
Solutions:
- Verify API URL is correct
- Check Account ID format (should be 36 characters)
- Confirm username and password are correct
- Ensure API access is enabled in KORONA.studio
Cron Job Issues
Symptoms: Sync not running automatically
Solutions:
- Install WP Crontrol plugin to monitor cron jobs
- Set up a real cron job on your server:
*/10 * * * * wget -q -O /dev/null "https://yoursite.com/wp-cron.php?doing_wp_cron" - Ensure your server allows external cron execution
Error Reporting
Email Notifications
Critical errors during order processing are automatically sent to:
- WordPress admin email address
- Includes detailed error information and order data
Debug Logging
To enable detailed logging:
- Add to
wp-config.php:define('WP_DEBUG_LOG', true); - Enable debug mode in KORONA plugin settings
- Check logs at:
wp-content/debug.log
Performance Optimization
Reducing Sync Load
- Increase sync frequency only if necessary
- Monitor server resources during sync operations
- Consider using a dedicated cron job for better reliability
Database Optimization
- Regular WordPress database maintenance
- Monitor plugin storage tables for growth
- Clean up old logs periodically
Frequently Asked Questions
General Questions
Q: Are tickets or events supported? A: No, since version 2.0, all ticketing features have been removed.
Q: Do WooCommerce product changes get uploaded to KORONA? A: No, product changes only get synced from KORONA to WooCommerce. Make product modifications in KORONA.
Q: Do KORONA promotions work in WooCommerce? A: No, promotions are not currently supported.
Tax and Pricing
Q: Do tax rates sync to WooCommerce? A: No, but sectors can be mapped to WooCommerce tax categories. Tax rates for each category need to be set up inside WooCommerce. There are also plugins available for destination-based tax rates.
Q: How do I configure tax mapping? A: In the plugin settings, map each KORONA sector to the appropriate WooCommerce tax class. Ensure you have tax rates configured in WooCommerce for each class.
Inventory and Products
Q: Do inventory levels sync to WooCommerce? A: Yes, inventory levels are synced from KORONA to WooCommerce every 10 minutes.
Q: Can I sell gift cards? A: No, but this feature is planned for future development.
Q: How often does synchronization occur? A: The default sync frequency is once every 10 minutes. This can be adjusted using a cron plugin like WP Crontrol.
Order Management
Q: When do orders get synced to KORONA? A: Orders are uploaded to KORONA when they reach “Completed” status in WooCommerce. This happens automatically and creates a sale transaction in your KORONA POS system.
Q: What happens when I cancel or refund an order? A: When you cancel or refund an order in WooCommerce, the corresponding transaction in KORONA is automatically voided. This voiding process is permanent and cannot be undone.
Q: Can I reactivate a voided order in KORONA? A: No, once an order is voided in KORONA, it cannot be reactivated. To reactivate a cancelled or refunded order, you must create a new order in WooCommerce and complete it to generate a new transaction in KORONA.
Q: What order statuses trigger synchronization? A: Currently, only “Completed” orders are uploaded to KORONA. Cancelled and refunded orders trigger voiding of the corresponding KORONA transaction.
Technical Support
Q: How are errors reported? A: Critical errors that occur during order processing are sent to the WP admin email and can also be viewed on the config page.
Q: What if sync doesn’t work? A: Enable debug logging and trigger the product sync manually. Check the debug logs for specific error messages.
Q: Why don’t I see any POS locations in the dropdown? A: Make sure your POS is configured as “External POS” type in KORONA.studio. Only External POS locations will appear in the plugin’s POS selection dropdown.
Q: How do I upgrade from version 1.0 or 2.0 to 3.0? A:
- Deactivate and remove the old plugin
- Upload the new 3.x plugin
- Decouple the WooCommerce POS in KORONA Studio
- Enter API credentials in WordPress under Settings > KORONA
- Select POS and press couple
- Map taxes and adjust other settings as needed
Support and Resources
For additional support:
- Review the plugin’s error logs for specific issues
- Contact KORONA support for API-related questions
Plugin Version: 3.0.25
Last Updated: Current stable version