
To set up your POS for creating and using loyalty cards and numbers, follow these steps:
Any items eligible for loyalty point discounts must be set as discountable in the KORONA studio.
Setting The Accumulation and Redemption
- Navigate to Promotions > Couponing Promotions.
- Create a new couponing promotion, give it a name, and change the Type to Bonus Points for Customer.
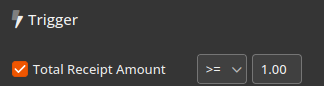
- On the right, setup the Trigger as Total Receipt Amount >= 1. This will activate the loyalty for anyone with a loyalty card. You can alternatively use Customer Group as the trigger to designate specific loyalty customers.

- Setup the Benefit. The first option, Customer gets __ Bonus Points, gives a set amount of points per transaction. The second option, Customer gets per full __ $ Revenue __ Bonus Points, is to set how many points they get per dollar spent. For example, Customer gets per full 1 $ Revenue 1 Bonus Points means they get 1 bonus point for every dollar they spend.
- Setup the Redemption of bonus points.
- The first option, Redemption (Monetary Value), means they get a dollar amount off for how many points they spend. For example, setting the first box to 100 and the second box to 10 means they spend 100 points for $10 off.
- The second option, Redemption (Percent Value), is similar to the above option but instead is a percentage off. For example, setting the first box to 100 and the second box to 25 means they spend 100 points for 25% off.
- The third option, Redemption (Product), means they get one free product (designated by a tag) for how many points they spend.
- Save the promotion and proceed to the next section to setup the POS for this feature.
Setting up the POS for Loyalty Functions
Step 1: Configure the Buttons
- Navigate to Settings > Button Configurations.
- Select the button configuration and layout you want to edit using the orange pencil icon.
- Choose an empty button spot where the new buttons will be placed.
- Create two buttons:
- Set Loyalty Card: This function allows you to assign or create a loyalty number that will be applied to the transaction.
- Bonus Points: This button should be set up as an Online Function to manage loyalty points.
- Save the changes. Your POS is now ready to use loyalty cards.
Step 2: Assigning Loyalty Cards to Customers
- When a customer makes a purchase, ask for their phone number/loyalty number
- Input the loyalty number into the number pad.
- Press the Set Loyalty Card button to link their account.
- Complete the transaction as normal.
- Any applicable loyalty points from the purchase will be added automatically.
Step 3: Redeeming Loyalty Points
- When a customer wants to redeem points:
- Enter their phone number/loyalty number.
- Press the Set Loyalty Card button.
- Add the items to the transaction as usual.
- Press the Bonus Points button.
- You will be prompted to use loyalty points towards a discount.
- Example: If the promotion is 100 points = $5 off and the customer has 200 points, they can redeem $10 off their purchase.
- The discount will be applied to the receipt automatically.
Adding Customer Account Information to the Loyalty Card/Number
If you’d like to associate customer information with a loyalty number or card, you can do this by first adding the customer to the receipt and then entering their loyalty number. This works for both existing and new customers. For new customers, click “New” in the bottom-left corner, fill in their details, and hit “Apply” to add them to the receipt. After completing that first transaction, any time the loyalty number is used again, the associated customer information will automatically appear.
*Note: The customer needs to be added to the receipt via the Set Loyalty Card button. Simply adding a customer to the receipt does not pull up their loyalty information. However, adding a loyalty card to a receipt that was previously linked to a customer will add the customer’s information to the receipt as well. Adding existing customers via the Set Loyalty Card button is our recommended method.
If you don’t already have the “Customer Lookup” button shown here, you can add it in your button configuration via Settings>Button Configuration. The button’s function will be Function>Customer Lookup.