
This section details how tags can be created, edited, deleted and copied within the KORONA POS system.

To view the tags settings page, navigate they by going Settings > Tags. Once you are there you will see the tags that have been created for your usage. The tags seen are based on what you have assigned for your products.
On this page you have the option to do the following:
- Create Tags
- Edit Tags
- Delete Tags
- Copy Tags
Creating Product Tags
To create a tag, click on the New button located at the top of the screen. You will be taken to a screen that will allow you to create your new tag. The only field there is the name field. Once you have chosen a name for your new tag, click on the Save button at the top of the screen.
Editing Product Tags
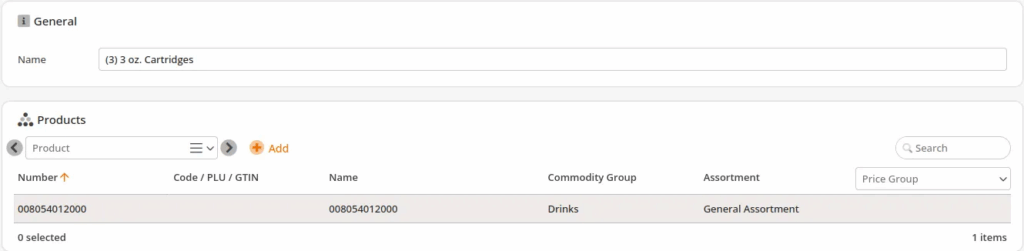
To edit a specific tag, select the tag you wish to edit and click on the Edit button located at the top of the screen. You will then be taken to the edit tag screen. Here you can add products, change the name of the tag, edit products, and remove products from the tag.
Adding a product to the tag
To begin selecting products for tagging, use the gray left and right arrows to browse the available options. You can select individual products using either the Product option or the Add Products with Codes or Numbers option. The Product option allows you to click within the input box and choose from a drop-down menu of products, while the Add Products with Codes or Numbers option lets you type or scan product codes or numbers to select items.
Other options provide methods for selecting multiple products at once, such as by Assortment, Commodity Group, or Supplier.
Once you have made your selections, click the Add button to tag the chosen item or items.
Editing products associated with the product tag
To edit a product, click on the Edit Product button. This button will also take you to the Edit Product screen so that you can edit different aspects of the Edit Product screen.
Removing a product from the product tag
To remove a tag from a product, select the tag you want to remove and click the Edit button. Next, choose the product from the list and click the Delete button that appears. This will gray out the product’s row to indicate the action. Finally, click the Save button at the top to confirm and remove the tag from the product.
Renaming your product tag
To re-name your tag, use the name field towards the top of the screen. Remember to hit the Save button after you make any changes. If needed you may need to synchronize the data any point of sale that is affect by this change.
Deleting Product Tags
To delete a tag, select the tag you wish to remove and click on the Delete button located at the top of the screen. KORONA Studio will give you a confirmation dialogue box asking whether or not to proceed. To proceed click on OK and your tag will be deleted. If not, click on Cancel.
Important Note
Products assigned to this tag will NOT be deleted. The tag will just be removed from the affected products.