
Creating Customer Order
Customer Orders can be created from the back office by navigating to Inventory > Customer Orders and clicking +New. The Create Customer Order screen should launch. You will need to choose the Customer from the drop-down menu. If your customer name does not appear there, please see our Customers manual page.
Next, select your Organizational unit, Warehouse, Cashier, and Target Time (date and time). After this, you must select the products you wish to add to your customer order by clicking on +Add Products and any discount you may wish to apply to all products by using % Discount for all Products. To discount individual products, you must manually change the number under the Discount % tab.
In this example, we applied a 3% discount on the “Cheddar Cheese” and a 20% discount on the “Ham Sandwich.” After filling out all the necessary fields, click Save.
For more details on the Customer Order POS function, please see our Customer Order (POS) manual page.

Editing Customer Order
To edit a customer order, please navigate to Inventory > Customer Orders, select the customer order you wish to edit, and click the green Edit button at the top of the screen. When you are done editing, click Book. A date should be reflected next to the “Booked On” at the top of the page.
*Note: If you do not book the order, it will not show on the POS.
Once the items are ready, click the “Not Ready for pick up” button. Notice how it changes to “Ready for pick up,“ and a notification text box should also appear.

Customer Order Lookup
To view all customer orders, navigate to Inventory > Customer Orders. Any already paid order will not automatically list. To view a full list, click the filter icon on the top right-hand side. This will prompt all orders to be listed. You may filter by Booked status, date it was Booked On, Comment, Created by, Create Date, Customer, Customer Group, Number, Point of Sale, Ready for Pick Up, and Target Time.
This page should give you an overall look at all Customer Orders, booked and non-booked.

You may also see all customer orders for the current day straight from the dashboard by using the Current Customer Order Widget. To learn more, please visit our Dashboard manual Page.

To search for Customer Orders on the POS side, please refer to our Customer Order Lookup manual page.
*Note: Customer Orders are sorted by Last Name instead of First.
Finishing a Customer Order
There are two ways to finalize or finish a Customer Order, either at the POS or in the back office via an Invoice.
When finalizing a Customer Order at the POS, you want to search for the Customer Order and then select the “Pay” option once it has been pulled up. Here, you can navigate to the Total screen like a normal transaction and complete payment.
This Customer Order would no longer be listed by default in the KORONA.cloud in the Customer Order list. To view all completed orders, you will have to select the Filter option.

The second way would be to perform an Invoice. An Invoice can be used when you are finishing a Customer Order where they have submitted payment via ACH or directly through an Accounting Department, and you need to notate in the system that it has been paid or issued.

When a Customer Order has been converted into an Invoice for Payment, you will no longer be able to search for this Customer Order at the POS. The order will be marked finished and moved into the Filter view.
You will need the KORONA.Invoicing package to submit Invoices. For more information specifically about Invoicing, you can reference our Invoice Manual page here.
Customer Order Summary
To view the customer order summary, please navigate to Inventory > Customer Orders. Click on the More drop-down and choose Customer Order Summary.

On the Customer Order Summary page, there should be a few filters available for your selection to help you customize your report. you may choose an Org. Unit to run the report on or leave the default to all.

You can also group by Organizational Unit. You also have the option to view Only Open Orders by selecting the checkbox on the right-hand side.
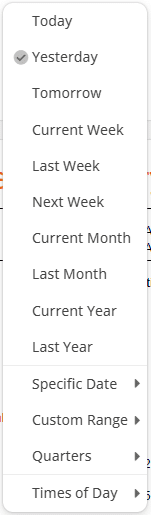
Finally, Target Time will help you refine the date and time you wish the report to view. This can be daily, weekly, monthly, yearly, date specified, custom range (from-to), quarterly, or even target certain hours of the day.
After making all your selections, click the orange circle or the Update button at the top to run the report.
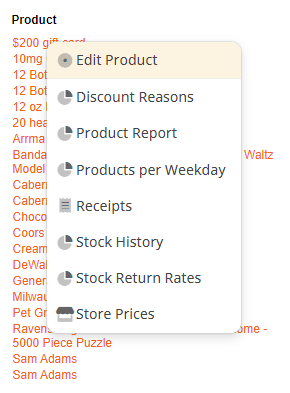
On the report, you can select individual products, and the drop-down menu is as follows: Edit Product, Product report, Products Per Weekday, Receipts, Stock History, and Stock Return Rates.
Detailed Customer Order Summary
On the Detailed Customer Order Summary page, there should be a few filters available for your selection to help you customize your report. This report can be filtered by Org. Unit, Commodity Group, and Target Time. once you have made your filter selections, click on the orange circle or the update button to run the report.
Within the report, you have the option of choosing individual products, and the drop-down menu should be the same as the one listed above. Customer order printouts with the title changed to ‘Order Confirmation’ are available in the editor via the more menu.
Once you run the report, you may export it into a PDF or Excel format.

Deposit Account for Customer Orders
To collect deposits on your customer orders, you must create an order deposit account and apply it to the POS.
To create the account first, navigate to Settings > Accounts.

You will need to create an Order Deposit account. The Number field will self-generate. Name the account and make sure you select Deposit for account type. click Save when done. Please take note of your account number it is going to be the string character we use when adding the deposit function to your Create Order Button.
For Example, our Order Deposit account is number 5.
To apply the deposit account to the POS, you must add special character strings to your Customer Order button. Please see our Customer Order (POS) manual page.
*Note: Cash down payments on Customer Orders are calculated in relation to the Cash Balance of the day.
Bulk Orders
To export multiple orders into a PDF, click and hold down the Ctrl button and select all the orders you wish to export. A red PDF Export button should appear at the top.
For a more detailed or refined export, click on the filter icon and choose which you would like to apply. Once done, click on the PDF Export button. A pop-up dialog will appear asking, “Are you sure you would like to export the # selected items?” click Yes.

Your PDF should begin downloading and appear at your screen’s bottom.
