Creating Cashiers & Users
At this point, you should be ready to add Cashiers & Users to the system. Please note that KORONA POS handles Cashiers & Users differently. This guide will give you a brief tutorial on creating both.

Creating Cashiers
To create new cashiers, navigate to Employees > Cashiers. Here, you will find the list of cashiers for your organization. You can create, edit, or delete cashiers.
Click the +New button to add a new cashier.

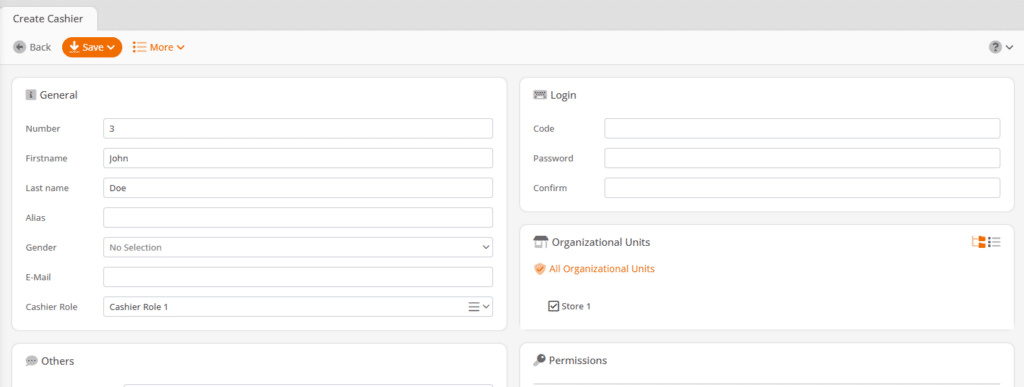
Each cashier must have their unique number, which is used for time clock actions. First and last names are also required for each cashier. Please be aware that the full name is displayed on the receipt. If you do not wish to display the cashier’s full name, please only provide the data you want to display on the receipt.
Another required field is the login code for the point of sale. You can use the same number as the cashier number or enter any other number to use instead. If you use login cards, you must enter the code programmed on the login card.
The last required field is the cashier role, which will define permissions granted to this cashier. On the right side, you will get a preview of what permissions the cashier will have.
The last cashier setting is optional and will only change the cashier’s background color of the POS. This can be helpful if you have multiple cashiers that share one register. That way, they can easily recognize by the POS’ color whether they are on the right login.
Once you are comfortable with the changes you made, press Save to apply your changes.
For a more detailed overview of creating cashiers, refer to our Cashier Set Up manual page.
Creating Users
To manage your back office users, navigate to Employees > Users. This lists all users that have access to your back office. You can add, edit, or delete users.
If you want to add a new user, click the +New button. This will take you to a new screen for creating a new user.

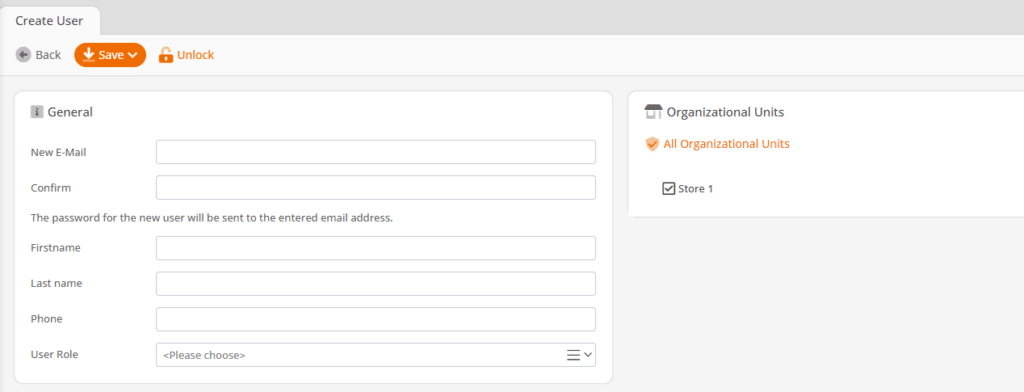
Assign the user a valid email address, and they will receive a system-generated password.
In addition, you should assign a first and last name and an appropriate user role that defines the user’s permissions. For more on this, refer to Manage Cashier Roles and Permissions.
The section for organizational units allows you to control the user’s access to each organizational unit. That way, you can limit the user’s reporting or price changes to certain organizational units.

Once you are done with the user’s settings, click Save, and their login credentials will be sent to their email address. If the user did not receive their email, please have them check their spam folder.
For more detailed information on setting up users, you can refer to our Setting up Users manual page.


