Price Changeable is a setting within the products of KORONA Studio. They allow prices to be changed on a specific product when the cashier does not have permission to change prices. Discountable is a setting that permits manual discounts, promotions, or price rules to be applied to this product.
Watch the video to quickly learn how to change an item price, quantity, and discount in KORONA POS.
Making a Product Price Changeable
To allow a product to have its price changed without assigning permissions to your cashiers, you will need to edit the product(s) to be price-changeable. First, go to your products by navigating Inventory > Products. Second, select the product you wish to edit and click the Edit button.
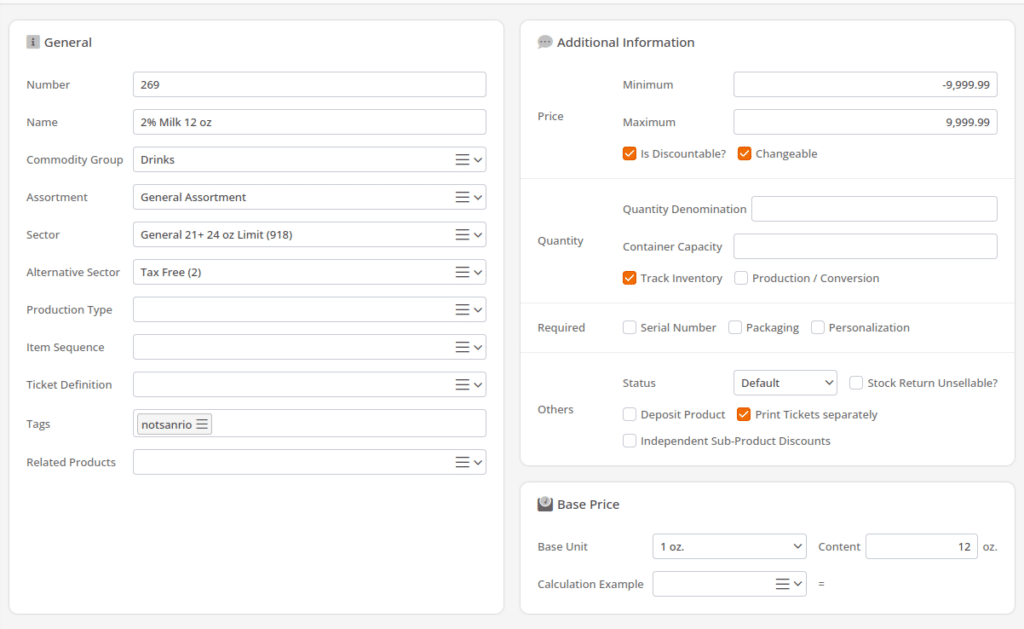
Once inside the editing screen, locate the Additional Information section. Inside that section, locate and choose the “Is Price Changeable?” checkbox. Notice that at the bottom of the box, you will see two text fields: Minimum Price and Maximum Price. These fields control how far you can change the prices. When you are done setting up the desired parameters, click the Save button.
Open Products
You can set up Open Products in KORONA POS as well. Open Products are products that do not have a price assigned to them from the back office. This is very useful for miscellaneous items. To create an Open Product, create your product as you normally would. However, leave the price field blank and select the Price Changeable option. When you are ready, click the Save button to save your product.
On the terminal, ring up the product normally. KORONA POS will prompt you to provide a price for the product. Once you have entered the desired price, hit Enter, and the product will be added to the receipt.
Changing a Product’s Price at the POS Terminal
Begin by adding the product to the receipt as you normally would. Using the number pad, specify the price you want your product to be and select the Change Item Price button. The product’s price on the ticket will change to reflect the new pricing.
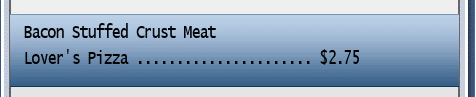
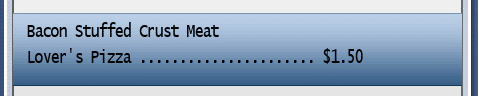
In this example, we have selected our Stuffed Crust Pizza. Its current price in the system is $2.75, as indicated on the receipt. However, today, we are selling it for $1.50. So we enter $1.50 on the number pad and press Change Item Price.
The price of the product now reads $1.50 on the receipt. Once you have made your changes to the price, process the transaction normally.
Price Permission Setting
The Price Permission setting allows cashiers to alter the price of any product, regardless of whether or not it is price changeable. This is useful if you wish to allow your managers to change prices at will.
To allow cashiers to change prices in KORONA POS, you must grant them the Price Permission.
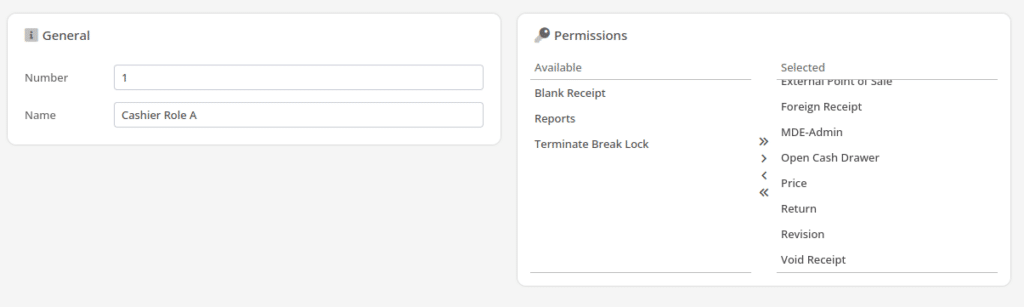
To do so, first, go to the cashier rolls screen by navigating Employees > Cashier Roles and select the cashier role you want to edit. To the right of the edit screen will be a Permissions field with two boxes inside: Available and Selected.
Select the Price permission from the available and click the Add Selected (single arrow pointing right) button to move it to the Selected box. When you are done, click on the Save button.
Now, any cashier assigned to that role can change prices on products at the terminal, regardless of whether or not the product is price-changeable. Note this setting will not override the discount settings on products.
For any other questions about setting up Cashier Roles, please review our Cashier Permissions manual page.
*Note: Remember to Retrieve Master Data on your terminals to ensure they have the latest permission settings.
Product Discount
Product Discountable is a setting that allows the cashier to specify a percent discount off the price of a product. For example, you can sell your product at 25% off to someone who buys it frequently.
Making a Product Discountable
To make a product discountable, you must edit the product(s) to be discountable.

Allowing for discounts at the terminal
To apply discounts at the terminal, add one of the discount functions available. Add Discount function can be added to a single item or multiple items. A subsequent Item Discount will override prior changes.
Another great discount button function is Target Price Discount, which applies a specific price to a product and reflects the discount in a percentage.
The last two options for discount apply not to a specific item but to the entire receipt. The Receipt Discount Absolute will have you set a new final total for the receipt and show the percentage discount given. Receipt Discount Percent will have you specify a percentage to take off the entire receipt and generate the new total from that discount.
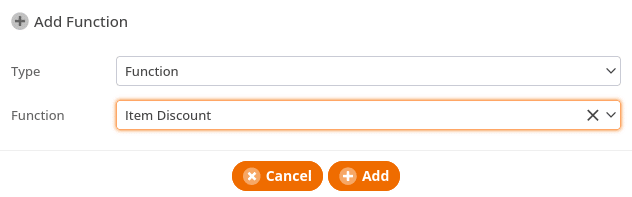
Begin by locating the desired button layout and click on the Edit button. Next, select the grid area that you want to add the button to. Click on “Add Function” in the Add Function box, select the type Function, and select the function Item Discount.
Then, click the Add button to add that button to the selected button layout. Finally, click on the Save button to save your changes. For detailed information on adding buttons to your terminals, visit our Create POS Buttons / Button Configuration manual page.
*Note: Remember to Retrieve Master Data on your terminals to ensure you have the latest settings.
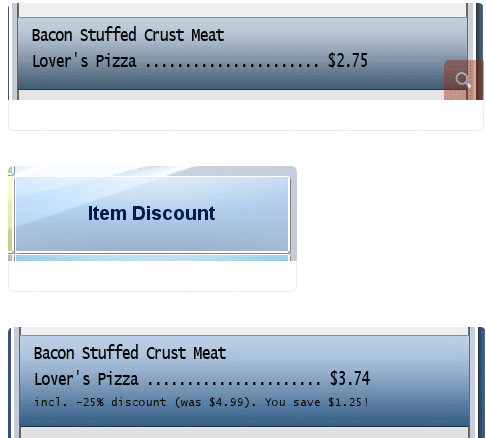
Using Discounts at the Terminal
Begin by ringing up the product you wish to apply the discount to. On the number pad, type in the percent you wish to discount the product and press the ‘Item Discount’ or ‘Add Discount’ button.
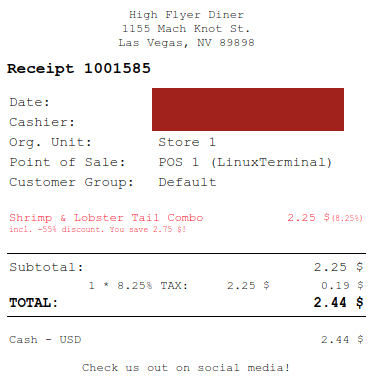
The price on the item will now show a new price based on the percent you have entered. The receipt will also show the discount percentage and how much the customer has saved with the applied discount. Finally, finish the transaction normally.
Promotions will also automatically apply at the terminal if they have been configured in KORONA Studio.
Promotions take effect as long as the trigger for said promotion is met and the receipt is taken to the Total screen. For more detailed instructions on configuring those, refer to our Setting up Promotions manual page.
Detecting Price Changes Within the Receipt Archive
KORONA POS allows users to detect product price changes using the Receipt Archive.
Begin by going to your receipt archive and navigating Sales > Receipts. On that page, you can choose to view the available receipt types and more by using the filter options. To find price changes easily, locate the Mark Price Changes checkbox and tick it.
As you go through your receipts, you will notice some items will be in a different text color. Each color represents the type of change made to that product at the terminal.
Red: The product’s price has been changed, or a discount has been applied.
Purple/Pink: A discount has been applied to a product, and the receipt has been canceled.
Blue: A receipt discount is displayed here.